
- What should be the sink in the kitchen?
- Types of kitchen sinks
- Materials for the manufacture of sanitary ware
- Self-assembly of the mortise sink for the kitchen
Sinks in the kitchen sometimes give way to dishwashers, but only for washing up dishes, and in other cases - they occupy a worthy place of honor in the kitchen space. And those housewives who spend a lot of time in the kitchen know that two-thirds of all kitchen affairs, in one way or another, are associated with a sink. Therefore, it is so important to choose a comfortable, stylish, durable, and, most importantly, functional sink in the kitchen. Perhaps it was the sink and it will be an attribute that will please the landlady and create a unique interior in the kitchen. Moreover, the rich assortment of shapes and colors of such shells is amazing. The most budgetary option - inline kitchen sinks from stainless steel, everyone can afford. About them and not only, today we will speak in our article.
to the contents ↑What should be the sink in the kitchen?
To determine the option that will be the best choice, let's make a list of requirements for the kitchen sink:
- The sink in the kitchen should be very roomy, as it will wash not only cups, spoons and plates, but also larger dishes - pans,frying pans, baking sheets and other utensils.
- Quality product must withstand:
- High temperatures.
- Exposure to chemical household products.
- Mechanical shocks.
- Should be easy to maintain and maintain a beautiful appearance, without much effort.
- Must have a long service life.
- Harmoniously fit into the interior of the kitchen space and be combined with a mixer.
- Should be convenient in design and shape.
As you can see, there are a lot of requirements to the item of use. Many manufacturers of kitchen sets offer sets of furniture with ready-made shells. But the demanding owners prefer to choose the subject of the interior on their own, relying on all the nuances and wishes of the household. And it's not surprising that it was the kitchen sink for kitchen that has recently become so popular with consumers.
to the table of contents ↑Types of kitchen sinks
All kitchen sinks for design features are divided into 3 large groups:
- Mortise.
- Waybills.
- Integrated.
Let us dwell in more detail on the merits and demerits of each type of shell, in order to understand what exactly was so fond of housewives washing carving.
Waybill
The bill of lading is the most common option in our country. It is built into the furniture from above in the form of a lid. Installation of the product is done on the floor cabinet.
Important! A similar version of the sink is suitable for headsets consisting of separate modules.
Of course, the overhead washers can have different sizes, but they are usually manufactured by furniture manufacturers according to the pattern to perfectly match the dimensions of the floor cabinet.
Pros of the surface design:
- Easy to install. It is very easy to install such a sink by yourself.
- Affordable price.
- There is no need to buy a countertop to cut out a hole for a sink.
- Operational reliability.
Important! Disadvantages of the device - Loose fit to the cabinet and walls. As a result of this lack of design, water penetrates and spoils furniture.
To fix the problem, many owners install silicone skirting boards( or plastic).
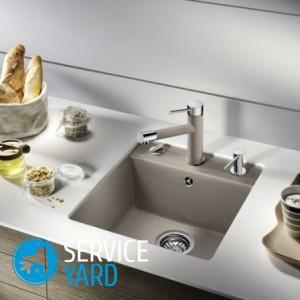
Mortise sink for kitchen
This type of sink is no less in demand than a bill of lading. Such a sink is installed in the garniture table top, which unites several floor cabinets of the lower tier of furniture.
Important! This option is especially recommended if you have a kitchen equipped with a long, solid top.
You can install the washer both under the table top and above it, or on the same level as the object with the headset. The option of mounting the sink depends on your preferences and on the model of the device.
You can cut a hole in the countertop yourself, but you can entrust this work to a professional. Here, increasingly depends on the material - both the curbstone and the sink.
Important! A sink in the kitchen of stone - natural, artificial, as a rule, is installed only by professional masters.
The only thing to remember is that between the mounted sink and the table top it is absolutely necessary to lay a gasket with an adhesive surface that will solve at once two problems related to: waterproofing and soundproofing
Advantages of construction:
- High reliability.
- Ease of care.
- Durability.
- Aesthetics.
- Variety of shapes and colors.
- Affordable price.
- Hygiene. The design eliminates the possibility of dampness between the cabinets.
Important! The disadvantages of the product include additional time, money and effort to cut the hole in the counter. But for the beauty and convenience you always need to pay.
Integrated washers
Integrated devices have an interesting design type. The sink may be slightly deeper into the countertop, the so-called substage version, or slightly protruding upwards from it.
Important! Install this type of sink can be on stone, metal, wooden countertops, and the deeper the recessed sink, the less spray will fly in different directions.
Design Cons:
- Complicated installation. To install the sink, you need a jeweler cutting the countertop, the availability of a special tool and equipment.
- Higher price compared to other options.
Materials for the manufacture of sanitary ware
We examined the classification based on the design features and the location of the shells. Sinks can differ in shape: square, oval, arbitrary geometry and by the number of bowls, and accordingly - mixers. In addition, all kitchen sinks are also divided according to the material of manufacture.
Important! When choosing a shell fabric, consider some of the nuances:
- Design and style of the interior of the kitchen.
- Budget opportunity.
- Desired product specifications.
Consider the most popular materials for making sinks, so you can make your choice. 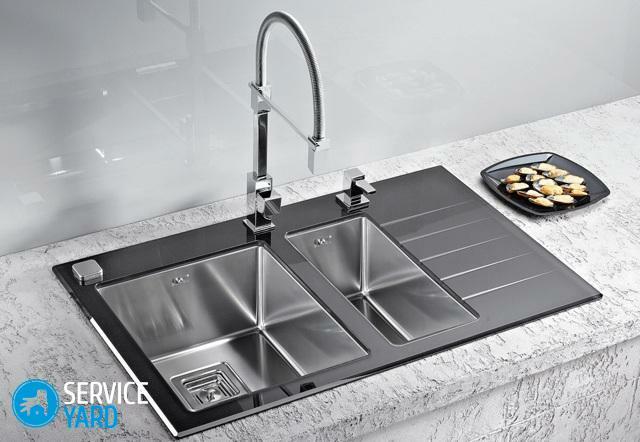
Stainless steel
The love of consumers for stainless steel can be explained by a combination of excellent performance characteristics of the material:
- Resistance to mechanical influences.
- Immunity to rust.
- Resistance to high temperatures and aggressive chemicals.
- Hygiene.
- Long service life.
- Spectacular sheen.
The technology of making sinks allows to produce them in two types:
- Stamped. Cost to the buyer is cheaper, but the level of reliability is higher than that of welded analogs. One drawback - the depth of the shell does not exceed 15 cm, which is not very convenient when used.
- Welded. The bowl and the base of the sink are made separately and welded to each other. This kind of shell can have any depth. They are much more convenient than their stamped brethren.
Mortise kitchen sinks made of stainless steel can have the following surface:
- Matt. A bowl with a matte surface is obtained as a result of the rolled steel sheet by a special machine. The advantage of this coating is the visual absence of scratches.
Important! The shallow relief of the shell looks very good, but it requires special care. Although with a huge availability of cleaning products - this is not a problem.
- Glossy. Gloss looks great in any kitchen, but only until the first scratch. To get rid of defects, modern masking aids will help, but if there is no time and desire to polish the sink, then choose a different option initially.
Important! Tips:
- To be sure that the selected inline washer is made of quality material, use a magnet. The real steel will make the magnet slide easily over the surface.
- If you are not satisfied with either the gloss or the matte surface, then choose an inboard sink for the kitchen with a textured pattern.
- When buying a welded sink, pay attention to the quality of the seams. If the quality of the welded work was low, the probability of leakage will eventually appear.
- Many properties can not be initially checked for quality, especially without having special tools, knowledge and skills. Therefore, always give preference to manufacturers with a proven track record.
Ceramics
Ceramic shells made of porcelain and faience are produced. These materials have a lot of advantages:
- Excellent appearance.
- Abrasion resistance.
- Ability to tolerate temperature changes.
Important! Less material - a strong blow can lead to a split in the plumbing. This must always be remembered during the operation of the device.
Ceramic mortise sink looks great, especially it fits the kitchen style of Country or Classics. However, it is very difficult to install such a shell yourself, since for such work, skill and certain experience are necessary.
Composite
Recently a new material has appeared on the market of building materials - composite. The sink from this material looks very stylish and can have any shape and size.
Important! Raw materials for the manufacture of shells are: rubber, quartz, stone crumb, acrylic, fiberglass, resin and dye composition.
Composite sinks seamlessly fit into any kitchen space and have a lot of advantages:
- Stability to deformation.
- Not afraid of high temperatures and chemicals.
- The color of the bowl does not change with time. In addition, no pungent beverages leave on the surface of the shell a composite of stains and marks.
- No sound of running water.
- Does not conduct electric current. In terms of safety, the composite advantageously differs from other materials.
- Durability. Use sinks from the composite can be for 10 years, and with proper and careful care the service life can be extended at times.
- Variety of shapes and sizes. Stamping and welding of the material does not limit the manufacturer to any framework. Therefore, composite shells come in different sizes and shapes, even the most bizarre.
Self-installing the mortise washer for the kitchen
If you purchased an in-line washer, you do not need to invite a specialist to install it, you can do all the work yourself. However, for this you must follow the sequence of works.
Step 1. Preparatory stage
First of all, you need to prepare the following tools and supplies:
- Cement.
- Pliers.
- Clamps.
- Drill( screwdriver).
- Screwdrivers.
- Electric jig saw.
- Adjustable wrench.
- Adhesive sealant.
- Painting Scotch tape.
- Safety glasses for the eyes.
- A simple pencil.
- Ruler.
- Roulette.
- Rags.
- Knife.
Step 2. Marking and cutting out the hole
The worktop has already been purchased - it's time to determine the location of the future washing. For this:
- Remove the table top with the headset and lay it on a flat surface( base).
- Apply a contour along which the cleaning hole will be cut. Use the template attached to the store wash.
- If the template is missing, then transfer the dimensions of the shell, circling it in pencil.
- From the traced outline, retreat 10-15 mm and draw a working contour.
- Use a jigsaw to drill holes in the corners for a landmark.
- Cut out the sink for washing. Drill need from the front side of the countertop.
- Remove the worktop fragments from the hole.
- Insert the sink into the cutout and check that the result is correct. The sink should be free to enter the hole, if not - then trim the edges with a jig saw.
- Thoroughly cut off cuts from sawdust and burrs.
- With a spatula or brush, apply sealant to the sections with a uniform layer. As a sealant, you can choose epoxy resin, silicone or other composition.
- After the glue is seized, return the countertop to its place.
- Fasten the worktop.
Important! To improve the quality of your work, take note of these tips:
- If the chipped surface on the table top, then seal them with a sealant.
- The worktop material affects the type of sealant: if the table top is made of stone, then use silicone compounds, if wood or plastic - glue on alcohol.
Step 3. Installation of the
Washer A special seal should be included with the sink. It is made of foamed polyethylene. Seal the sealant on the edge of the sink( all around the perimeter).
Important! If, after gluing the edge of the seal were left sticking out, rise above the edge, then gently prun them with a knife. Otherwise - the cutting sink will not press tight against the countertop.
The process of gluing the seal is as follows:
- Use a cloth soaked in gasoline( solvent) to degrease the edges of the seal.
- Apply sealant to sealant. Do not make the glue strip wide, as the glue will climb out when pressed.
- Glue the seal to the side of the sink.
Mount the sink on the countertop as follows:
- Align the sink on the countertop according to the marking.
- Fasten the attachments to the sink at an equal distance( come with the kit).Do not forget to constantly monitor the position of the sink, as when installing the fixtures, the plumbing can easily move out of the way.
- Wait until the sink is stuck.
- Remove excess tape with a knife, remove silicone with a rag.
- Install the mixer and attach the drain.
- On the next day of installation, turn the water on full and spray it slightly around the edges of the sink to ensure the correctness and quality of the installation. Even a small gap can lead to deformation of the countertop and the curbstone under the sink.
Important! So as a result, you do not have leaks and other problems with the operation of the sink, consider these nuances:
- If the hole for the mixer is not in the sink, then form it yourself.
- If you do not have the minimum plumbing skills, then plumbing is required to connect the drain to the pipeline, since the illiterate connection is fraught with leaks.
We hope that our information has helped you not only to choose an inline kitchen sink, but also to install it. And now enjoy the comfort, comfort and beauty.


