Contents:
- Where to install a washing machine?
- Preparatory stage
- We connect the sewer to the sewer
- We connect to the water pipe
- Hot water connection
- We provide the power supply
- We check the operation of the installed machine
Before you figure out how to connect the washing machine to the machine correctly, you need to figure out several positions.
- Where is the best place for installation - in the kitchen, in the bathroom or in the corridor? Do you need additional floor preparation?
- Check if there is an auxiliary contact in the socket providing grounding. If not, consider which scheme will be grounded?
- Will the connection be made to cold and hot water or only to cold?
It will affect how much the new equipment will work, and on its noiselessness. Choose a place where a new assistant will be installed, based on four parameters:
- usability;
- free space of the right size;
- location of utilities for connection to water and sewage;
- is a smooth surface of the base( floor).
Where to install a washing machine?
Location of water and sewer pipes near the washing machine is one of the main conditions. If there is no possibility to install a styralk in the kitchen or bathroom, near the communications, you can increase the length of the hoses connecting to cold and hot water. It should be noted that the drain hose can have a limited length, depending on the pump's power. It is desirable that after the extension, the total length is not more than 3.5 meters.
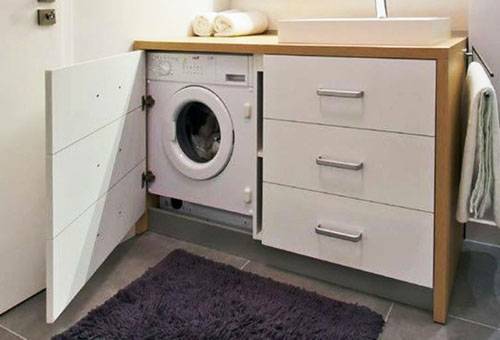
Each hostess decides where she is more comfortable using the machine - in the kitchen, in the bathroom or in the corridor. There are no general recommendations. But the flat surface of the floor is one of the necessary conditions. If you do not provide a level ground, during operation the machine will behave not in the best way - to jump and make noise. With this work, the fastening elements in the mechanism are blurred, which leads to breakage. Align the area under the machine can be special mixtures for floor screed. If this is not possible, you need to buy special rubber attachments on the legs.
Preparatory stage
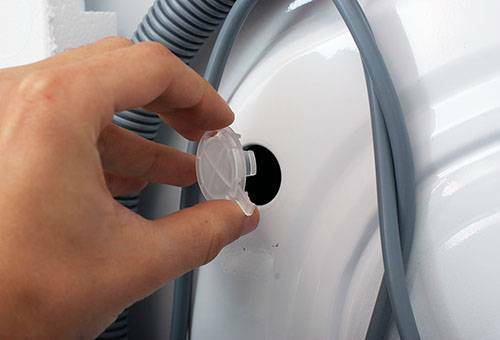
Before proceeding with installation, it is necessary to bring the technician to working condition - remove the bolts and other transport elements. The drum of the machine in working condition is attached only by means of springs, and for the time of transportation it is fixed with bolts. They are on the rear panel. If you do not unscrew them, the machine will be damaged at the first wash. The remaining holes after the bolts are covered with plastic plugs. It is also necessary to check the drain and intake hose for the absence of mechanical damage.
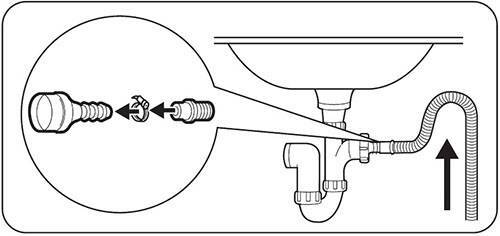
We connect the sewer to the sewer
We can connect the sewer to the sewage system in two ways: with the insert into the pipe or through the siphon of the bathtub or washbasin in the kitchen. The second method is simpler, but it is only suitable for good sewage operation. The first is universal and more reliable.
Step-by-step instruction on how to properly cut into the pipe through the adapter.
- Stop draining the water into the sewage system.
- Clean the surface of the pipe in the area where the tapping will be performed.
- With a drill bit drilled in a pipe, drill a suitable diameter hole in the pipe( 22 mm for a 50 mm pipe or 50 mm for a 110 mm pipe).
- Place the adapter on the pipe and tighten with bolts.
- If the fastening is provided not with bolts but with clamps, sealant is applied to the surface of the pipe before tightening them.
Connect the washing machine yourself to the sewer, crashing into the pipe using an adapter - the easiest way. In addition, it is suitable for both plastic and cast-iron pipes.
You can use a tee instead of an adapter.
- The pipe is cut and a part corresponding to the length of the tee is cut out of it. It can be done with a hacksaw, if it is plastic pipes, or a turbine with a stone for metal in the case of a tie into cast-iron communications.
- Deburrs are deburred at cut points( file).
- Sealant places where there will be a connection of tee and pipe are smeared.
- A tee is put on the pipe.
advice If the machine is not installed immediately after the tie, then the tap should be closed with a plug.
After tie-in, it remains to connect the machine's drain to the tap. The drain hose is connected via a sealing collar or with the installation of a siphon.
Installation with siphon installation consists of the following operations.
- Fixing: the drain hose is fixed at a height of 80 cm: there is a special lock on the back of the machine.
- Installation of the siphon into the bend through the rubber cuff.
- Hose mounting: the tip is inserted into the siphon hole and secured with mounting nuts.
Board
Connection to the sewage system with the installation of a siphon is the preferred option. In this case, the siphon performs an additional function: it does not let water and "aromas" from the sewer back into the machine. If the drain( drainage mechanism) of the purchased equipment is equipped with a non-return valve, then any method can be selected.
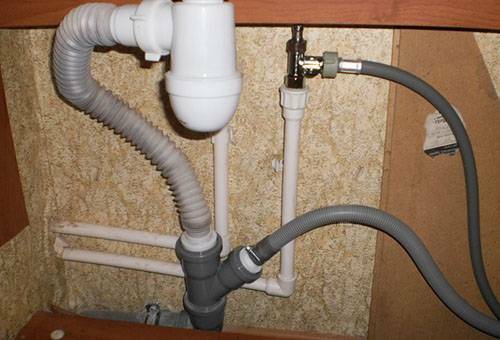
We are connected to the water supply
There are three ways to connect the washing machine to the water supply:
- through the coupling;
- through the corner cock;
- through a tee cock.
The choice of connection to the water supply depends on the connection location. For example, if the washbasin faucet in the kitchen is connected to a water pipe through a flexible hose, you can connect at the same point. To do this, close the water, unscrew the hose from the tap and connect the tee.
For sale there are special tees for washing machines: the size of the fitting in them corresponds to the size of the nut on the intake hose, and they are also equipped with shut-off valves. Next to the tee is connected the previously disconnected plumbing fixture and the intake hose of the machine. The connection point can be sealed with FPC tape for reliability.
If this method is not suitable, you will have to connect to the water pipe in another way - crash into a pipe in the bathroom or in the kitchen. To do this, you need a coupling with a seal, a screwdriver and a drill with a drill for metal. The cut-off should be in an accessible place so that you can open / close the water.
Step-by-step instruction on how to correctly insert a sidebar.
- Check the fixing of the water pipe and, if necessary, fix in addition clamps or clips.
- Close the water.
- Secure the coupling with bolts or clamps on the pipe over the gasket.
- Drill a hole in the pipe, winding the drill through the coupling.
- Tighten the coupling, making sure that the gasket does not move.
- Attach the valve to the coupling and the intake hose of the machine.
Board
When connecting with the extension, make sure that the extension hose is located in a safe place - under the bathroom or in the kitchen. It is also possible to mount to the wall with subsequent gypsum cardboarding.
Connection to hot water
Modern automatic machines have only one intake hose. It is designed for connection to cold water due to the features of the washing process. After all, many programs provide for washing in warm, not hot water. Powders with enzymes also work at low temperature. Equipment for heating, in other words - a heater, there is a stiralk, but it's too much for it to cool hot water when connected to a central water supply system. Refrigerating installations in the technique for washing are not provided.
Some older models, for example Ariston Margarita, have two sampling holes - for connection separately to hot and cold water. Their program provides for the alternate fence in accordance with the washing cycle. If you need to install such a model in a new location, they are connected to both cold and hot water. The procedure for connecting to hot water - the DHW pipe - is the same as for a cold water pipe. In this case, the drain is connected to the sewage system in the usual way. If the water is heated in a column in the kitchen, and there is no central hot water, then the machine will have to be installed there too.
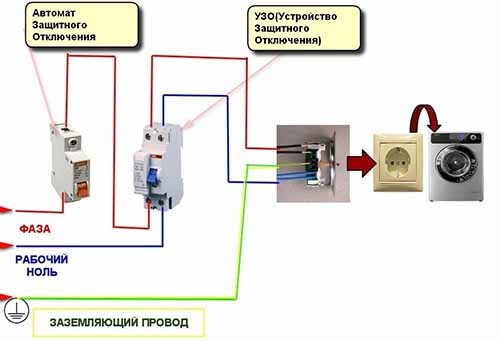
Provide power to the
To correctly connect the washing machine to the mains, you need to understand the safety rules. This type of household electrical appliances is characterized by a high level of energy consumption and works with water, therefore special requirements are imposed on the installation of the machine, including its grounding.
Key recommendations.
- Cable and socket outlets must correspond to the power of the device. The calculation of the cross-section of the wire is based on how much electricity the machine consumes.
- It is necessary to allocate a separate electrical line with the installation of an RCD( residual current device) and a circuit breaker. You can install a diffuser that combines the functions of the switch and the RCD.
- The RCD installation does not eliminate the need to ground, as this device does not protect against overcurrents.
- Earthing is performed according to the earthing scheme of the entire house.
- All electrical work must be carried out by a qualified specialist.
- In multi-apartment buildings, before installing the wiring, you need to find out which scheme is grounded throughout the house.
Council
It is strictly forbidden to ground the old way by connecting the wire to a battery or water supply. Even if the grounding is good, the equalizing current will go not only throughout the apartment, but also through communications to neighbors. Due to overcurrents in this design, there is a great danger of a fire.
Checking the operation of the installed machine
To check if the washing machine is properly connected, you need to enable and monitor the following nuances.
- Set of water. If it does not stop, then the drain hose is connected in the wrong position and the water immediately goes into the drain.
- The drum must rotate, and there should be no outside noise, such as a knocking of metal parts. Such sounds occur when the shipping fasteners are not completely removed.
- Heating. Collected water should be heated in 5-15 minutes( depending on the washing schedule).
- When connecting to hot and cold water, you need to monitor the water set in different modes. Perhaps one of the connections is not correct.
- Wait until the drain starts. If the water leaves slowly or does not drain completely, the water sensor( pressure switch) may not work.
- It is compulsory to monitor the absence / presence of leaks both in the machine itself, and in the places of intake and discharge of water.
All other parameters depend on the washing modes of the particular model. Therefore, before turning on the machine, you must first read the operating instructions.

