
- What is it for?
- How does it work?
- What are the buckets?
- What materials can be dealt with?
- Pros and Cons of the
- What does it consist of?
- We make hopper bucket
- Plaster wall
- A bit about technology
- Care for hopper bucket
Plastering is the most laborious part of the repair. It is rather difficult to mechanize this process, but nevertheless there are some devices that can facilitate the work of the finisher. One such is a special plaster shovel. Hopper bucket with your own hands - is it real? This will be discussed in the article.
to the contents ↑What is it for?
If you decide to make a bucket bucket yourself, the drawings are easiest to find on the Internet, but you can do it yourself. First, you need to understand why you need a plaster shovel. Its main purpose is to spread the solution evenly and quickly over the surface. This is especially important if you have to plaster large areas.
Important! Hopper bucket can, of course, buy in the construction shop. But there is such a device is quite expensive, so if you are not going to open an apartment repair company, but only want to put in order your own, spending such amounts is hardly advisable.
to the contents ↑How does it work?
The name "hopper ladle" comes from English "to hop" - to jump up and down. But the shovel itself is not jumping, but the mixture that it is filled with. Provides this compressed air, which is sent from the plaster gun. The air jet is created by the compressor, which joins the ladle.
The use of such a device allows:
- to save the solution, since the accuracy of spreading is higher than when finishing by hand, by about 30-40%;
- work with a variety of solutions, including silk plaster
- to obtain an even layer of plaster due to a greater impact force than with manual spreading;
- handle complex surfaces;
- use materials of different colors and different invoices for processing individual sites;
- improve the quality of the coating, because the process goes much faster than manually.
What are the buckets?
Professional finishers have to deal with a wide variety of surfaces. Therefore, adaptations are needed differently. On sale you can find hopper buckets:
- ceiling;
- walling.
From each other they differ in the design of the holder:
- at the ceiling handle is bent at right angles;
- at the wall angle of the handle bend is at an angle of 45 °.
What materials can be dealt with?
Having made a bucket for plaster yourself, you will get the opportunity to work with many materials:
- concrete mixes;
- with cement-sand mortars;
- with cork solutions;With
- expanded clay mixtures;
- with liquid wallpaper;
- textured paints.
Pros and cons of the
The hopper bucket allows the finishing material to better grasp the surface. After the introduction of such devices, the plastering work accelerated sharply. To fully empty the tank, it takes no more than 5 seconds, so that one plaster using this device can lay a layer of 1-2 cm on the surface in about 60 square meters per hour.
The main advantages of such an aggregate are not only speed and versatility, but also the fact that an unskilled worker can even deal with a plaster shovel, and even an amateur who first took up repairs.
Important! The bucket hopper has one drawback - a compressor is absolutely necessary. This is not always convenient, because you can not connect the unit anywhere. In particular, the plaster shovel is difficult to use when working at height.
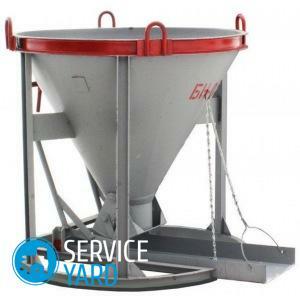
to the contents ↑What does it consist of?
Before you make a hopper bucket yourself, it is useful to find out what parts it consists of. The plaster shovel has:
- spray nozzles;
- solution tank;
- pneumatic valve;
- fitting with confusingly exit;
- hose;
- compressor;
- grip.
The spray nozzle( there may be more than one) directs the working mixture to the surface at a certain rate. The solution tank can be of various shapes and sizes, so when you decide to assemble a hopper bucket, the drawings will have to be customized for your own tasks. The shape is also affected by the angle of the nozzle's inclination to the surface.
The industrial hopper bucket is equipped with interchangeable nozzles. This helps to adjust the spray angle, depending on the material with which you have to work. Usually the angle is 30 ° to 90 °.
Important! If the slope is less than the minimum, the productivity decreases, and if more - the speed of the spray drops.
A pneumatic valve is required for the working mixture to flow to the injector. The coupling gives the required velocity to the departing solution. Finally, the shape of the handle depends on what kind of surface you are going to plaster.
Important! Industrial hopper buckets are equipped with compressors, and if you decide to make such an assembly yourself, the compressor will have to be selected.
to the contents ↑We make a hopper bucket
To make from the improvised means of a hopper bucket with your own hands, draw a drawing, size and shape, depending on what you will plaster and what kind of solution.
For manufacture you will need
- thin sheet stainless steel;
- Bulgarian;
- welding tools:
- ruler;
- pencil;
- graph paper.
Making the capacity of
You can find a good device of this type a lot. Industrial aggregates usually have a shape similar to a conventional bucket, but with a narrower lower part. This is not always convenient. Rectangular section is preferable. First you need to draw a drawing:
- Take a large sheet of graph paper.
- Draw a vertical line with a length of 60 cm.
- Draw a horizontal line of 20 cm from the same point.
- Draw a rectangle of 60x20 cm.
- . Divide the vertical line into 3 equal parts to form 20 cm segments, mark the resulting points as A and B.
- From points A and B draw horizontal lines parallel to the sides of the rectangle.
- On these lines, set aside from each angle horizontally 5 cm, denoted as A1 and A2, B1 and B2.
- Connect them in pairs in vertical segments - A1 and B1, A2 and B2, the resulting rectangle will be the central part of the bucket.
- Connect points A1 and A2 to the upper corners of the large rectangle, and B1 and B2 to the bottom, you should get a figure that looks like an hourglass.
Side parts of the
They are two identical trapezoids.
- Draw a horizontal line of 20 cm on the sheet.
- Add 1.5 cm on each side.
- Divide the line in half.
- Draw a vertical line 20 cm long and designate a point, for example H.
- From point H, set 5 cm horizontally to one side and the other.
- Connect the two new points with straight lines to the ends of the first segment.
- Cut out both patterns, transfer them to a steel sheet, and there should be two sidewalls.
- Cut out the details( best of all Bulgarian).
- Cook the details.
- Decide which diameter should be at the nozzles - usually done 2 mm or 3 mm.
- Make holes for them.
- Insert the valve.
- Attach the holder.
- Connect the compressor.
The capacity can be made not only from sheet steel, but also from aluminum. It is lighter, albeit deformable. Seams can be fixed with two strips of duralumin. Aluminum bucket is made on screws, but you need to ensure that the parts fit tightly to each other, without any gaps - otherwise the solution will flow out.
Important! The device should be light( up to 5 kg), otherwise - you will not be able to work with it for a long time.
Compressor
Its not necessary to buy. It is possible that you have a suitable device in your household that can give a pressure of 60-70 atmospheres with an air flow of at least 500 liters per minute. A unit with a capacity of 50 liters or more is suitable.
Important! The vacuum cleaner for such purposes will not work, because it does not provide a stable pressure.
Where can I find the valve?
Some parts for the plaster shovel, of course, have to be bought. However, as a pneumatic valve, one that is used for pumping tires, or a ball valve, is quite suitable.
Important! The second option is worse - instantly stop the flow of the mixture will not work.
We are assembling the
design. The bucket handle must be comfortable with our own hands. Think about which hand should have the main weight load. The right-hander will be on the left, with the left-hander on the contrary. You still need attachments to hold the spray gun and the nozzle hole:
- Put the bucket on the spray gun.
- Attach the hose to the spray gun.
- Attach the other end of the hose to the compressor.
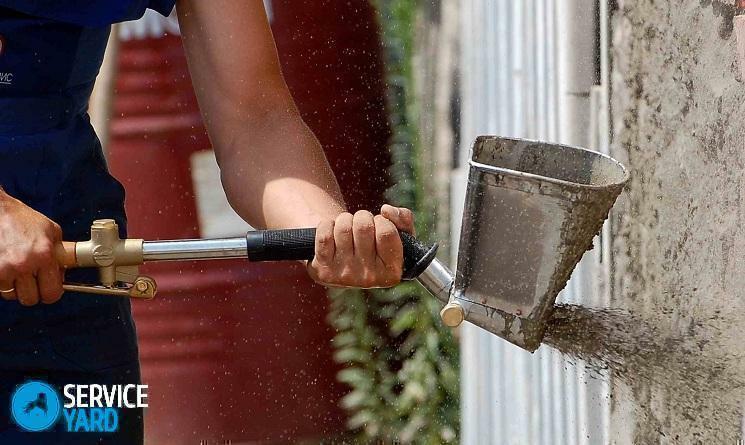
Plastering the wall
The time has come to try the device:
- Connect the compressor to the bucket - for this there is a rubber hose.
- Enter the working mixture into the bucket.
- Open the pneumatic valve - there is a special lever for this.
- Compressed air will go into the container with the solution, using the nozzles capturing the particles of the mixture.
- Outside the flow of solution together with air will exit through the nozzle.
- When moving the bucket, adjust the overlay of the layer.
A little bit about the
technology Even if you have collected everything correctly, some disappointments may await you while you work. To avoid them, study the technology of plastering:
- Before starting plastering, put beacons - gypsum, concrete or alabaster bulges. They are needed to maintain the thickness of the layer and ensure better adhesion of the mixture and surface.
- Dampen the wall with water.
- Moisten the bucket with water.
- Make a stock of the solution, taking into account that it is consumed very quickly - in 3-4 minutes you can spray at least 50 kg of the mixture.
- Immediately after cooking, spray the mixture - the hopper should be kept at a distance of 4-5 cm from the wall or ceiling.
- Align the layer with the building rule.
- Wipe the wall with a sandpaper.
Care for the bucket hopper
During operation, care should be taken to ensure that the solution does not adhere to the outside of the bucket. With regard to care, it will be exactly the same as for the factory production unit:
- After finishing work, wipe the remainder of the solution with a cloth.
- Turn on the compressor and blow the nozzles.
- Lower the hopper bucket into a bucket of water.
- Wipe off the container.
Important! If during the stucco work you are forced to interrupt, dip the dipper into the water and wash it, and then leave it in the water before the start of a new stage of work.
From this article you learned everything about such an interesting device as a hopper bucket. We hope you managed to make an effective tool with your own hands, and you do not regret that you spent time building it.