
Despite the variety of materials floor covering on the shelves of Russian hardware stores, natural wood does not lose its popularity. No wonder. After all, an array is an environmentally friendly material that not only "breathes", but also looks great in the interior. However, several factors can negatively influence the appearance of a wooden floor. Today we'll talk about how you can fill up the gaps between the floorboards, how to do this work correctly, and when you shouldn't.
Read in the article
- 1 Why gaps can appear between floorboards
- 2 Materials used to seal cracks and crevices in wood
- 2.1 Professional compounds for filling gaps in wooden floors
- 2.2 Self-made compositions
- 3 Homemade wood floor repair
- 3.1 Glue and sawdust: preparation and use of the mixture
- 3.1.1 Step-by-step instructions for sealing cracks with glue and sawdust
- 3.2 Cement mortar with broken glass
- 3.3 We get rid of cracks with pine slats or rope
- 3.4 Paste of starch or flour, paper and copper sulfate: preparation
- 3.5 Using plywood or particle board (chipboard)
- 3.1 Glue and sawdust: preparation and use of the mixture
- 4 Deflection of boards when walking on the floor
- 5 Final part
Why gaps can appear between floorboards
There are several reasons for this problem. The most common of these is the drying out of the boards. Often seemingly thoroughly dried out wood it is not. Inside, it is wet, which leads to the appearance of cracks over time. Therefore, when choosing boards, you should give preference to those that have been vacuum dried in production.

Another reason can be various errors during installation. If the logs are laid with violations, the floor will "walk", which will lead to the appearance of cracks.
Humidity too low in room. Usually a similar problem occurs in winter, when the heating radiators are running at full capacity and the windows are closed. In this case, it is not recommended to seal the joints. When the normal microclimate in the room is restored, the boards will begin to expand, which will lead to their bending - the floor will go in waves.

Also, you can not ignore and rodents. But here it makes no sense to close up holes and crevices until the root cause is completely eliminated.
Materials used to seal cracks and crevices in wood
DIYers use a variety of materials to seal the joints and cracks in the wood floor. In this case, everyone decides for himself whether to use professional means or to give preference to a home-made composition. Although, we must pay tribute, sometimes folk remedies show themselves much better than professional ones. Let's try to understand what are the pros and cons of various materials.

Professional compounds for filling gaps in wooden floors
Two sealants are worth noting here - silicone and acrylic. If the floors in the house "walk", then silicone is perfect for sealing joints. This compound remains elastic after drying. The advantage of silicone formulations is that you can choose the desired color that will not be noticeable after drying. However, one of the disadvantages cannot be ignored - the pungent smell of vinegar. Therefore, when working with silicone sealant, it is worth taking care of good ventilation and personal protective equipment.

Acrylic sealant is devoid of such a drawback as a pungent odor. However, he is not doing well with the color palette. The manufacturer offers only transparent formulations that require painting. Otherwise, all the cracks will be visible to the naked eye.

You can use various putties, but such a repair will not last long. Putty joints and seams will start to crack quite quickly, which will not improve the appearance of the floor.
Self-made compositions
The following are used as folk remedies for sealing cracks or joints between walls and floors:
- PVA glue mixed with sawdust;
- paste of starch or flour, paper and copper sulfate;
- cord or rope impregnated with glue;
- plywood or Chipboard (with a large number of cracks and irrationality of their putty);
- cement mortar with broken glass.
Let's try to understand how the listed options for repairing a wooden floor are applied.

Homemade wood floor repair
If the packaging of professional tools for sealing cracks has complete instructions for use, then using homemade compounds should be dealt with in detail. Indeed, with the rise in prices in hardware stores, it is folk remedies that are used by home craftsmen more and more often.
Glue and sawdust: preparation and use of the mixture
In order to prepare such a mixture, small sawdust and PVA glue will be required. Sawdust must be poured with boiling water until mushy, and then left for a couple of hours. During this time, the sawdust will become soaked, increasing in volume. Next, PVA is added to the mixture. Better if it is wood glue. The composition should turn out to be viscous.

After the gaps are covered, it is necessary to remove the excess with a spatula and wait two or three days until the glue is completely dry. The final touch will be the processing of the seams with sandpaper.
Important! Before grouting the joints, they must be cleaned by removing all dirt and dust.
Let's try to consider step by step the process of sealing cracks in a similar way.
Step-by-step instructions for sealing cracks with glue and sawdust
For work, in addition to sawdust and glue, you will need masking tape, which will protect the wood from unnecessary contamination.
| Illustration | Action being performed |
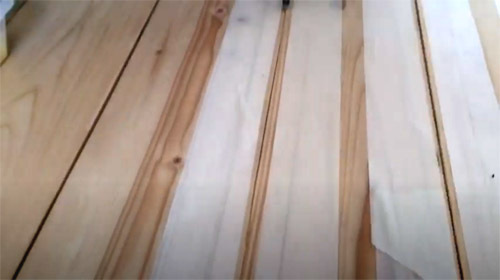
 | The first thing that needs to be done is to clean (expand) all the cracks. This is done with an awl or a regular slotted screwdriver. After that, the floor is thoroughly swept. |
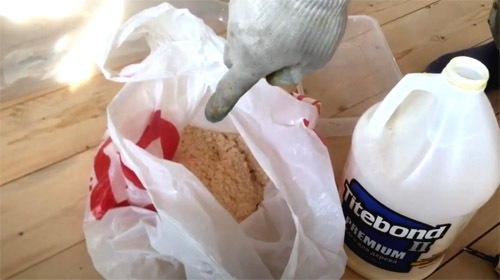 | Fine dry sawdust must be poured with boiling water in order for them to swell. It is not worth pouring a lot of water. Ultimately, you need to get a thick mass. |
 | While the sawdust is swelling, you need to glue the boards along the cracks with paper masking tape, so that later there will be fewer problems with the treatment of the greased cracks. |
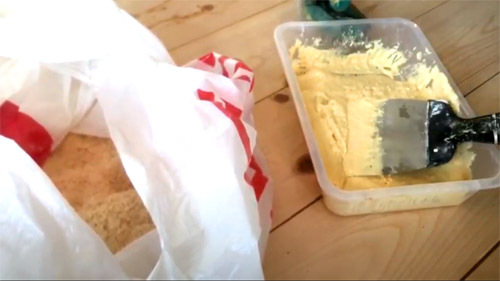 | PVA joiner's glue is poured into the swollen sawdust, the mass is mixed. As a result, you should get a composition with which you can putty the cracks in the floor. It is also not worth making it too thick, otherwise it will be inconvenient to work with it. |
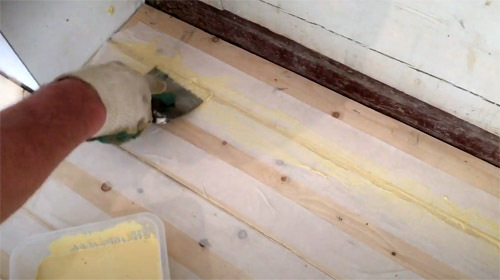 | Then you can start to putty the cracks. If the composition is not very liquid, then even large gaps can be closed with it, but too thick is not suitable for thin seams, and this must be taken into account. |
 | After the gap is covered, the paper tape is removed. For this, you should not wait for the complete drying of the composition. If the glue dries, it will be very difficult to remove the masking tape. |
Cement mortar with broken glass
Pests such as rats and mice often spoil the floor or the joints between the floor and the wall. Ordinary putties will not help here. Mice and rats can easily gnaw through the newly repaired area. In this case, the next solution is prepared.

The thick solution is mixed cement with water, to which broken glass is added. The finer the glass fractions, the better. With this composition, the hole that the pests have gnawed is smeared over. Mice and rats habitually try to gnaw through the passage, but are cut by crushed glass. The pain and the instinct for self-preservation prevent from continuing to work, and the pest leaves.
But don't think that this is the final. After a while, the pests will return and make a hole nearby. Therefore, you must first get rid of them and only then repair the floor covering.

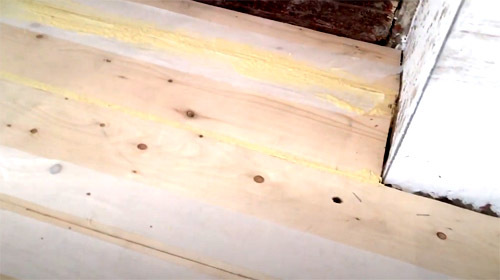
We get rid of cracks with pine slats or rope
This method is considered the most effective. Pine planks impregnated with PVA glue become very flexible, which allows you to close gaps even between uneven boards.
Preparation is required before starting work. The slots are processed with a hand router, and the pine laths are shaped like a wedge. After that, the gaps and slats are abundantly coated with PVA glue. Now all that remains is to drive the pine slats into the cracks. The same sequence of actions and when used instead of ropes. Well, after complete drying, the seams are processed with sandpaper by hand or using grinder.

Paste of starch or flour, paper and copper sulfate: preparation
The work algorithm for the manufacture and use of such a composition is as follows:
- the paper is torn into small pieces, after which it is filled with water;
- paste is prepared from starch and water (flour can be used);
- while the paste has not cooled down, copper sulfate is added to it (it will relieve excess moisture later) in a ratio of 1:10;
- the paper is wrung out and mixed with the paste until a thick homogeneous mass is obtained;
- now you can putty the cracks with the resulting putty;
- after drying, the seams are treated with abrasives.


Using plywood or particle board (chipboard)
This option is suitable if the gaps in the floor are too large or the boards have already moved, they stand up hump and are very dry. There are practically no difficulties in this work, even a novice home master without experience in this area can cope with it. The main thing here is accurate calculations and reliable fixation of the coating.


A comment
Mikhail Starostin
Head of the team of the repair and construction company "Dom Premium"
“Before laying chipboard or plywood, it is worth getting rid of the creak of the floorboards. To do this, you need to put nails in a bucket of water 2 times the thickness of the floorboards. It is necessary to keep them in water for at least 2-3 days until a pronounced rust appears on the metal. These nails also need to break through the boards. Such a folk method will forever save the home craftsman from the creak of floorboards when walking on them. "

Deflection of boards when walking on the floor
The deflection of the boards when walking on the floor is a very serious problem that requires a major overhaul. The reason for this may be poor-quality material from which the logs are made, violation of construction technology, increased dampness under the floor. And you can only help here by completely replacing the floors. This work is long and difficult. However, it is quite possible to perform it without the involvement of specialists, on our own.

There are quite a few videos on the Internet with training master classes on a similar topic. The main thing here is not to be mistaken. After all, not all instructions can be called professional. Often, such videos are recorded by novice amateur masters who have not fully studied the technology. However, if you watch the video to the end, it will become clear whether it is worth listening to the advice of the master.

As for the hiring of specialists, not everything is going smoothly here either. Today, a huge number of small repair companies have appeared. And not always real professionals work in them. Therefore, if you decide to ask for help in replacing the floor, it is better to look for a large company that has been on the market for several years. It is also necessary to carefully study customer reviews. But not on the official website of the company, but on large third-party resources.


Final part
We very much hope that the information presented today was interesting and useful to our dear reader. HouseChief editors will be happy to answer your questions if they arise in the course of reading the article. From you only need to explain the essence of the discussions below. There you can also comment on what you read, express your personal opinion about whether it is worth doing such work on your own. Below you can find a button that is designed to evaluate the above. Don't forget to click on it. Your feedback is very important to us. And finally, according to the already established good tradition, we bring to your attention a short video that will tell you about the independent replacement of rotted logs in a wooden house.


