
- Kepi, "stockings", Berets
- Let's talk about the materials
- Let's start with the pompons
- Brushes
- Our chain
- How to decorate the hat with rhinestones?
- Decorating the hat with the ears
- Application
- Hat with the veil
- Roses and chamomiles
- What else to think?
There is a knitted hat in almost every wardrobe. However, not everyone loves wearing it - knit headdresses without any decorations look a bit rustic. But you can even turn the most uncomplicated beret into an attractive, and even a vintage thing, if you make a little effort. How to decorate a knitted hat with your own hands? There are many ways, and new ones are constantly emerging. We will now talk about some simple variants.
to the table of contents ↑Kepi, "stockings", berets
Among the knitted models are very popular:
- hat-stocking:
- cap with a lapel;
- takes;
- cap;
- hat;
- ear-flaps.
Any of them will look original, if you come up with an interesting decoration of a knitted hat and do it qualitatively. But it is necessary to consider the type of binding:
- is very large;
- large;
- small manual;
- is a small machine.
Important! Products associated with very large viscous, as a rule, do not need additional design - well, except that you can attach a pompom, a brush or ears to the cap with a lapel, and "scatter" sequins or beads along a mohair beret. Large knitting itself can be very decorative.
The greatest chance to show their creative possibilities is provided by products made by small manual or machine knitting. Here everything is permissible.
to the contents ↑Let's talk about the materials
Puzzled by the question of how to decorate a hat, first look in your jewelry box. Maybe there is:
- the remains of yarn of different colors;
- pieces of fleece or other soft tissue;
- pieces of fur;
- rhinestones;
- chains;
- veil or tulle;
- skin pieces;
- beads;
- beads.
In addition, you will need some additional materials and the most common tools:
- cardboard;
- needles for embroidery;
- scissors - manicure and sewing;
- blade;
- compasses;
- adhesive for rhinestones;
- Adhesive for leather;
- paint for the skin.
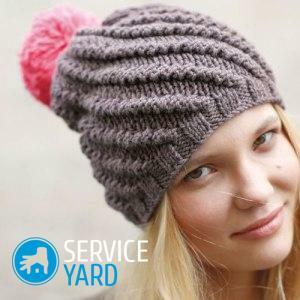
Let's start with pom-poms
The easiest way to decorate a knitted cap with your own hands is to sew a pompon to it. This option is suitable for almost any hat - well, except that on the bonnet pompon will look somewhat strange.
You can make one big fluffy ball and attach it to the top of your head, or you can make it a little small. They are attached to the lacing( can be of the same thread) to different parts of the cap:
- bunch on the crown;
- with two tufts in the manner of the jester's caps;
- one at a time in random order.
We design the pompon
To begin with, in any case, you need to make the pompom itself. For this, take two identical pieces of cardboard. For a large pompon, pieces of about 10x10 cm, for small ones - at your discretion, but not less than 3x3 cm, will do, otherwise it will be inconvenient to work with them. Next:
- Fold pieces of cardboard together.
- Draw the largest circle that you can.
- From the same center draw another circle, smaller( for example, if the diameter is large, 10 cm, then small - 6 cm).
- Cut out the ring.
- Tie a tangle to the ring - it should be of this size to allow it to pass freely through the hole.
- Wrap the ring with threads, laying coils close to each other.
- When the row is finished, cut off the thread, but so that the tail is 10-12 cm long.
- Insert the tail into the needle with a large eyelet.
- Pass the needle under the turns on a small circle, slightly pull off.
- Cut the loops around a large circle.
- As follows, pull the thread running along a small circle, firmly tie.
- A large pompon is sewn to the cap with threads in the tone of the product.
If you have small pompons, you can tie them to the shoelaces. These are just chains of air loops. Nothing prevents and weave them in the form of ordinary braids of three strands, or use a ready-made braid, suitable in color.
Important! The pom-pom can be either monophonic or mottled. In the second case, put the layers on half the ring, tear off the thread, tie another tangle and continue the process.
to the table of contents ↑Brushes
Also a simple but effective way to make decorations for knitted hats with your own hands. The brush is made even easier pompon. The most important thing is to make the edge smooth, so it's necessary to do this:
- Take a small strip of cardboard( for example, 3x5 cm).
- Wind it with threads so that the coils lie down along the length and tight enough.
- Make 2-3 layers of turns.
- Use a needle with a thread in it to intercept the bundle along one of the short sides of the strip and pull it tightly.
- Cut the threads on the second short side of the strip.
- After that, you will only have to sew a brush to the string, which is done exactly the same way as for a pompon - or is used ready, made of cloth or leather.
Our chain
An interesting option, how to decorate the cap with your own hands, will prompt a metal chain.
Important! This method is suitable to make a cap with a band, hat or hat with a lapel.
In this case, the chain does not have to cover the entire head. It can only be in the front, only on the side or be placed by fragments along the entire circumference. To make such a knitting cap decoration with your own hands:
- Arrange the fragments of the chain as they will lie.
- Check where the start and end links of each piece are.
- Short pieces for the first and last links.
- If the chain is long, it needs to be picked up in several places.
Important! Between the fragments, you can sew the matching beads or knitted buttons. A chain on the lapel or band does not interfere at all with a stylish pompon or a flirty button on the vertex.
to the contents ↑How to decorate a hat with rhinestones?
You can decorate a hat of any type with crystals - crystals that simulate precious stones. You can buy them at the clothing store. There you will also be sold glue, and hoop, which in this case will be very convenient.
Important! In fact, in the store you can find rhinestones with an adhesive layer and without it. The first option for decorating knitwear is not very suitable, because not every knitted thing tolerates heating well. However, for products of small machine knitting, this option is also suitable. In other cases it is better to use special glue.
Before decorating a cap with stones, pick up a suitable glue. Not suitable:
- formulations containing acetone;
- silicones with acetic acid;
- acrylic dispersion.
Important! Such adhesives do not keep the rhinestones very well, moreover, they damage their appearance.
Picking up the right adhesive, get down to business:
- Invent an ornament - it can be vegetative, geometric or simply alternating stones of different kinds.
- Draw an ornament on a leaf in full size - you can just outline the places where the rhinestones will be.
- Transfer the picture to the cap - the pencil falls very badly on the knitted fabric, so sweep the sheet with the pattern, and then place the needle with a thread of contrasting color.
- Fill the jersey in the embroidery frame, slightly pulling it to make the place for the rhinestones smooth, but the hat does not lose its shape.
- Glue the rhinestones according to the instructions on the glue pack.
Important! The pattern can only be made from stones. But artificial crystals are perfectly combined with embroidery or applique.
to the table of contents ↑We decorate the hat with the ears
On the children's or youth hat with a lapel look great ears - cat, rabbit, squirrel, fox. They are very simple. They can be:
- tied from yarn of the same quality;
- stitching from fur.
In addition to the main material, you will need:
- pieces of wire;
- thread and needle;
- cardboard;
- ruler;
- ballpoint pen;
- chalk or soap.
Option 1
Foxes or cat ears are just triangles of fur that match the color. We make them according to the following scheme:
- Make a cardboard pattern, for example, an equilateral triangle with a side of 6-8 cm.
- Use this triangle to cut out 4 pieces of fur - you do not need to leave allowances, you can sew on the front side with a seam "over the edge".
- Sew the workpieces in pairs, leaving one edge open.
- From the wire, bend 2 triangles on a cardboard pattern.
- Insert the frames into the ears.
- Sew the ears to the cap.

Option 2
Triangles can also be knitted. It is best to make them from the same coat as the hat itself. Knit crochet more comfortable:
- Tie a chain of 20 air loops.
- Make a row of columns without a crochet in each column of the chain.
- Beginning with the second row, do not tie up two bars in each row to the end.
- Knit so, until there is no one loop, tighten it and cut off the thread.
- Tie the second triangle.
- Fold the details, tie them along the perimeter with half-columns or columns without a crochet.
- Inside, as in the first case, you can insert the frame.
Option 3
Bear ears, mouse or Cheburashki are simply circles of the appropriate size. They can be sewn or crocheted, and the frame inside is not necessary to insert.
to the contents ↑Application
The knitted cap looks great applique. It can be:
- flower compositions;
- fantasy patterns;
- animals muzzles.
Important! Elements can be knitted from yarn remnants, but pieces of suitable fabric - for example, fleece or thin cloth - are also suitable. If you make an ornament with repeating elements, it is better to first make a template, along which to cut all the same fragments.
Cat, fox or bunny
Animal muzzle consists of several elements. Need to do:
- eyes;
- irises;
- pupils;
- nose;
- mustache pads;
- mouth.
Important! You can do with a completely stylized option - to sew only the eyes. It is best to find a suitable stylized image of the animal's muzzle and take a slit of the eyes from there.
We decorate children's knitted cap:
- Cut out eyes from white fleece or cloth.
- Cut out the iridescent shells - these are just circles of green, bright yellow, blue or brown.
- Shape pupils - black circles or stripes( in a fox, for example).
- If you make a nose, cut out a triangle of black, brown or pink.
- The whisker pads are circles, and the mouth is an obtuse triangle of red or pink.
- Mark the places where you will sew details of the face - the eyes should be approximately at the same level.
- Sew the iris and pupil using black strands.
- Sew the contour of the eye and the iris with threads in the color of the iris.
- Sweep your eyes to the hat.
- Sew them with black thread, using the seam "over the edge", stacking the stitches as tightly as possible to each other.
- Pads of whiskers sew threads in the tone of the parts, and the mouth - with red.
Hat with a veil
It could not have crossed the mind a decade ago. To a knitted cap, yes with a veil? But now - the time when you can decorate as a knitted hat with fields, and a hat with a lapel.
You will need:
- finished veil or piece of transparent fabric 25x60 cm;
- thread in the tone of the hat and veil;
- needle.
Important! For such work, it is preferable, of course, to prepare a veil, but generally any transparent fabric that passes air well will work. The veil can cover only the face or be placed all around the circumference.
Option 1
A ready-made veil is simply sewed over the top cut with a notch, small stitches:
- Gently pick up.
- Attach to the cap from the wrong side.
- Try and arrange the assemblies so they look nice.
- Sew a veil with threads in the tone of the cap, the cut must be from the rear - it can be sewn or left as is.
Option 2
If you just have a fabric, cut out a rectangle of the correct size:
- Determine which side will be sewn to the cap.
- Make a notional stitch and assembly.
- Sew a part.
Important! You can decorate the veil, for example, with beads or embroidery, but try not to overload it with decorative elements.
to Contents ↑Roses and Camomiles
Flower is a popular knitted cap decoration. It can be embroidered, made in the technique of applique, but it can be done separately and sewed.
Option 1
It's very easy to make a flower if you know how to crochet a bit:
- Tie a chain of 40-50 air loops.
- Make 3-4 rows of columns with a cake in each column of the previous row, at the end of the last one - cut off the thread.
- On the row from which you started( that is, by the air chain), lay the suture with the same threads, tighten and fasten the knot - the flower is ready.
Option 2:
- Tie a chain of 10 loops and close it in a ring.
- Make 2 loops to climb.
- Arrange a series of columns in the ring so that they fit snugly together.
- Corrugate a series of columns with a crochet in the columns of the previous row.
- Corrugate the series with half-columns.
- Sew a flower to the hat.
- In the middle you can sew a bead.

Option 3
You can associate the color elements, and then compose a pattern from them. For example, an apple-tree flower is five small circles, a leaf of a clover consists of three circles, a chamomile is a strip( an air chain), etc.
Important! You can use a mixed technique - bind and sew the petals, and stitch - embroider with a stitch or stalk seam.
Option 4
How to decorate a knitted hat with your own hands? It's great if there are pieces of fleece, felt or cloth - in general, any material that does not fall off the edge and which keeps the shape well.
Important! A suitable picture can be found in any book on embroidery by smoothness or by application. To translate a drawing on a cloth is better, of course, with the help of carbon paper( sold in sewing shops), but it is also possible by spraying.
The procedure is as follows:
- Collect a complex flower from several parts first in one piece.
- Sew it to the cap.
- Sew additional decorative elements( for example, beads or pieces of leather).
- Embroider the remaining elements - antennae or stems.
What else to think of?
Decorating a bead with beads is quite easy. It is necessary to pick up beads of suitable shape and size( from natural stones, plastic or wooden) and firmly sew them with threads in tone. In this case, you can draw an ornament, or you can arrange them in any order.
Lace
Knitted hat - and lace? Why not? Of course, synthetic white lace, which is sewn to nightgowns, in this case, do not fit. But:
- Knitted or made in the technique of frivolite from the same wool - very good.
- The contrasting lace strip on the cap band or the lapel of the cap will look spectacular.
- A delicate openwork strip can be used to cover the field of the cap. It will be interesting to look and a hat, the lace of which is decorated with lace circles in the Brazilian style. By the way, the same circles that are made only with a sheet of paper, a compass and a needle, effectively look and on the hat-stocking, connected with small manual or machine knitting.
We were convinced that it's very easy to decorate a knitted cap with your own hands, and there is a myriad of them? Now it's time to act! Once again, go through all the ideas, correlate them with what skills you have and in what style you prefer to dress, and then - the matter of technology. Good luck!


