

- Kitchen counter - options:
- Types
- Preparation
- Work order
- Basic requirements for the hallway equipment
- Ladder types in the hall
- Features of the hall design with the
- ladder Arrangement of the wardrobe in the hallway under the
- How to decorate the hallway interior with a ladderin a country house?
- Useful advices
Modern design of any kitchen primarily involves functionality. Therefore, experts in the search for interesting and practical solutions often borrow ideas from completely different areas. One of these successful loans was the bar counter. Today, these designs are used not only as working surfaces for bartenders, but also at home. Of course, at home kitchens the racks are lighter than their professional counterparts, but the style, design and functionality of them remained at an excellent level. We'll figure out how to make a bar table for the kitchen with your own hands, so as to save on expensive services of professional designers.
to the table of contents ↑Racks in the kitchen - options:
- In kitchens with large areas, you can make a real bar counter, in its direct sense. For such a design it will be possible to sit on a high chair, drink coffee or strong drinks, and even snack something. In this case, the rack is equipped with special holders for glasses, bottle holders and shelves for drinks and accessories.
Important! Installation of such structures occurs either in the middle of the room, or with the support of one part on a wall or kitchen furniture.
- In a small area the rack is used for a variety of purposes. It is divided into one part of the room from the other, used as an additional work surface or instead of a dining table. In this case, the construction can be installed along the wall to save the area of the room.
Important! For greater functionality under such a rack, you can mount a cabinet, refrigerator or shelves.
Very often such constructions can be found in apartments such as "studio".In this version, the racks demarcate the space of the kitchen and the combined room, and can also act as a desktop.
The advantages of a bar table in the kitchen
Before we figure out how to make a kitchen bar for yourself, let's take a look at the advantages of this kind of design:
- The room design becomes more stylish and modern with a rack.
- The ability to install at different heights different holders, shelves and other additions that will help create a huge functionality in a small space.
- Such designs can be used as a full-fledged dining place, while saving the space that would be needed to accommodate the table.
- In addition to the dining area, it is also an additional working surface.
Which version is right for you depends on many factors. But as soon as you decide, you can begin to disassemble the question of how to make a bar table with your own hands.
to the table of contents ↑Types of
When deciding to install a bar in the kitchen, start with the question of what they are. It is often misleading that there are no significant differences between these constructions. In fact, bar furniture is not only different in color and material, but also in form and function. Consider these differences in detail, because they will depend on the interior and convenience of your kitchen.
Classic version:
- This model assumes that the table top and furniture for it will be used for food intake.
- The standard height of such structures is up to 120 cm, but no one prevents you from adjusting it to your growth and requirements.
- Complement the design of special high furniture - bar stools or stools.
Important! Excellent classic models fit in studio apartments, and in rooms with an interior in the style of Minimalism.
Island These designs assume that the room will be spacious enough. In fact, this design includes not only the rack, but almost all the functionality of the kitchen:
- cooker or hob;
- washer;
- mini fridge;
- place for food.
Important! This is a very rare option, which is not available to everyone today, but it is successfully used in the design of television studios for culinary shows.
Combined version of
But for these designs, small apartments are ideal:
- This is a countertop that simultaneously serves as a work surface, bar counter and a place for eating.
- The height of the structure is usually about 90 cm, and the length is not more than a meter.
- Such products can be made foldable, and used if necessary, or to combine a table top with a window sill.
Next, let's talk about what forms you can make a bar table, what materials are suitable.
to content ↑Preparing
Of course, before you start working, you need to decide on the format of the design and draw the project. It can be a detailed drawing of the bar with a sofa, chairs, windows and doors, and maybe a small sketch, indicating the size and the necessary materials. Then you can go to the building store, and pick up the materials necessary for making the construction.
Choose the material
Today, tables made of the following materials and their combinations are very popular:
- of natural wood;
- artificial stone;
- laminate;
- of artificial marble - Koriana;
- ceramic tiles;
- glass;
- transparent plastic and other options.
Of course, such a huge selection of colors and textures allows you to stay on the most ideal for you option, which will not only be incredibly convenient to use, but harmoniously fit into the overall style of the room. 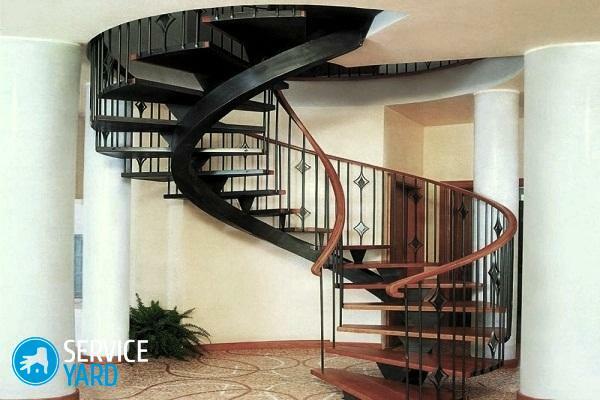
Select the form
After the appropriate material is selected, you need to determine its shape. Here, the diversity of options is just the same. Popular today the options for racks:
- rectangular;
- angled;
- in the form of a semicircle;
- oval structures.
Important! As in the case of the material, select the shape, relying on the overall design concept of the room. A convenient and functional solution for the countertop of a bar table - the possibility of its adjustment in height or a few table tops located at different levels. Of course, at first such a choice of forms and models can lead to a stupor, especially since an inexperienced master often can not immediately create complex designs. But the same stores come to the rescue, where you can buy ready-made versions of individual elements for your future stand:
- different shelves and multi-tiered structures;
- feet for your table;
- ready-made countertops;
- backlight elements;
- various accessories and other elements.
The final stage of preparation will be the determination of the sizes and the purchase of all selected materials.
Define size
For racks, there are no specific standards for width, length and height. There is only a small piece of advice, which is also not always used. And it consists that:
- the recommended height of a rack for the house - no more than one and a half meters;
- optimum width - half a meter.
What the length of the rack will be, its shape and additions - depends only on your wishes.
Important! In bars, the racks usually look like thumbs with table tops. For home use, another option has taken root: with a table top on the pipe, from floor to ceiling. But today there are more modern models with curbstones, shelves and cabinets in the lower and upper parts of the structure.
Let's analyze further how to make a bar table with your own hands.
to the contents ↑Work order
In fact, if you strictly follow the sequence of work, then in creating the designs of any complexity, nothing is impossible. Let's start with a simple example - a rack attached to the wall.
How to make a simple rack?
The kitchen counter in its classical sense is the easiest to create:
- One end of the table top is fixed to the wall or cabinet pedestal.
- The second end is drilled to the required diameter and mounted to the pipe support, which is installed to the full height of the room.
But first things first. First, we will prepare everything necessary.
We will need:
- worktop or material for its manufacture;
- brackets;
- bar leg;
- varnish for worktops
- a lock on the floor, stops, corners, screws.
To work successfully, you need to act in a certain sequence.
Steps:
- We prepare the table top for a bar table. If necessary, round it and cover the surface with varnish.
- To the countertop with the help of flat screws screw the fence and the corners along the edge.
- Thus, we assembled the work surface. Next, you need to choose the height, attach the stand to the wall, and mark the places where the dowels will be mounted.
- After - attach the table top to the wall, and our design is ready.
Useful advices:
- When attaching the stand to a wall without a pipe, it is better to purchase reinforced corners.
- When mounting the structure along the wall, it is possible to use brackets for hanging shelves as fasteners.
- The worktop can be ordered in the same place where you made the working surface for the headset, or made yourself from a wide hardwood board.
- You can use thick plywood as a table top. However, then it will have to be faced with plastic, tiles or other methods.
Important! The rest of the details can be selected in stores selling furniture fittings. The choice of brands and manufacturers is very large, but the cost of the same design at first glance may be very different:
- Do not pursue cheapness. Such products are most often made in China, and are not associated with quality. So, the Chinese chrome pipe after a while of use will become noticeable as the coating will cover.
- German manufacturers provide a lifetime warranty on their products, but their cost may be the reason for refusing to purchase.
- The average ratio of price and quality is still held by Polish manufacturers.
We will tell you about the work on structures with shelves
Making a rack with shelves
If you decided to do without a pipe when choosing a design, there is another way to make a bar table for the kitchen with your own hands.
Important! In this case, you lose an additional storage space that could be mounted on the pipe.
Possible options:
- If you replace the leg with a stick, like near the wall, a large stand immediately becomes more modern.
- You can also make a rack of wide wooden panels, join them at an angle of ninety degrees.
Above we considered the rack options without a foundation. But there are other models, which should be told a bit more.
Making a stand on the basis of
In this case, we mean that the table top will be fixed to the cabinet or other solid surface:
- When placing the table top exactly on the cabinet, it is mounted using standard horizontal fasteners.
- When the rack is moved, special inclined fasteners are used.
- In this case, you can fix the countertop to the cabinet or other finished surface, or you can make the cube yourself. The most important thing is to carefully assemble the frame and trim it with plywood or any other suitable material for the style of your room, for example, wooden slats or metal parts.
Important! If desired - you can assemble the base of the rack from sheets of plasterboard and even make a brickwork. But keep in mind that the floors must withstand the full weight of such a structure. Brick masonry is ideal for premises in Loft style.
Another option is to make a stand on a gypsum board.
Made of plasterboard
Drywall is an inexpensive material, work with which will not be difficult even for an inexperienced master. The main thing is to understand the principle and sequence of works.
Steps:
- First, we build a framework of metal profiles. If desired, you can use wooden bars. At this stage, it is important to observe the evenness of the lines and right angles. Check the correctness level will help - for horizontal surfaces, and a plumb line - for vertical structures.
- The next step after the assembly is the planking of the carcass with plasterboard.
- Next - it is necessary to fill all the marks from the screws and finish the work.
- After - we mount the table top on our table, and we are happy with the new bar table, which we made ourselves.
Bar counter - very convenient and stylish way to diversify the design of the kitchen. Usually it does not completely replace the dining area, but only complement it. For such a small table it will be convenient to sit with friends or use it as an additional surface for cooking. Moreover, it is not difficult to make such a design yourself if you choose the right style, material, its location, and act neatly, in a certain sequence. In any house, the hallway is one of the most important premises, since all guests originally come to it. Therefore, on the basis of its design, it depends on how much the positive impression is about the owners of the house. Of course, this applies only to people who first came into the house, and for the residents themselves, the practicality and functionality of this premise, as well as the conformity to their tastes and requirements, comes first. Today, the design of the hall with the staircase is very popular, about the features of which we will talk in this article.
to the table of contents ↑Basic requirements for the hallway equipment
The hallway is certainly the face of any house, but the presence of a ladder in it will be a winning move, thanks to which you will successfully emphasize the whole interior. The most important thing is to achieve the ideal harmony of the staircase with the objects of the interior, so that it only emphasizes the wallpaper surrounding it. The design of the hallway with the stairs should be thought through to the smallest detail and you need to take into account a lot of nuances. Such an original design must necessarily meet the following requirements:
- The ladder should be well lit from all sides. If the light is not enough, you can seriously injure yourself while traveling on it. It is better to place along it point light fixtures, which, by the way, can be mounted even in the steps.
- If you want to divide a room into several functional zones, then you can select them by certain objects, for example, a table on which you can install a flower pot or use for changing clothes.
- If the staircase comes out too massive, then you can decorate it with a long rug, laid on the steps.
- Please note that the width of the marches must be the same - just like their height.
- Do not make the elevation angle more than 45 degrees.
- On the height of the railing should not exceed 90 degrees, so it was convenient to move on the steps.
Important! Designers recommend using the entire free space of the hallway to the maximum, for example, to place under the stairs a mini-library, a small cabinet or a cabinet.
to the contents ↑Varieties of stairs in the hall
All existing staircases are divided into screw and flight stairs. Each of these types has its own variety. Let's consider each option in more detail in order to understand which design of the hall with the staircase will be more appropriate:
- Marching stairs - represent a continuous row of steps, ranging from one site to another. Depending on the area and height of the house, you can build a single-mast structure without spans, or a ladder of two or three marches with small gaps.
Important! Such stairs can have additional steps, due to which space is visually easier.
- Spiral staircases. Their main feature is the absence of marches, but they represent a spiral. Externally, such structures look incredibly luxurious and have an incredible charm, and therefore suitable for any interior. With their help, you can visually raise the ceiling.
Important! As a rule, such stairs have very steep steps, and it is not quite convenient for them to move around to them and to the elderly. This must be taken into account when choosing a hall design with a staircase.

Design features of hallways with a ladder
The staircase is able to become a real decoration of any hallway. The main thing is to properly organize the layout and clearly determine the color scheme and stylistic direction. The design of the corridor with the staircase more often refers to such styles:
- Classics. Classic style - the embodiment of high cost and luxury, objects in this style are made of natural wood, marble and granite. That's why these staircases are too expensive. The colors here predominate muted and neutral. Classics allows decoration with balusters, carvings and curls.
Important! The main thing here is not to overdo it, because excessive pretentiousness is not appropriate here, it can eclipse the effect of aristocracy and sophistication, and vice versa - to give the interior a note of cheapness.
- Country. This style is characterized by an abundance of natural materials and textiles. Such stairs, as a rule, are made from natural wood of natural shades. In particular, preference is given to pine and alder, and not to massive cedar or oak. The style of the country is characterized by the presence of a rough stone. In such cases, the steps are laid out with colored ceramics or forged elements are added.
Important! A perfect solution can be a pot of fresh flowers in the span between the marches. This style does not accept the aristocracy.
- Modern. This is a categorical, outrageous and ultra-modern style. He gathered in himself all the best from such styles as Minimalism, Urbanism and High-tech. It is characterized by such materials as metal, plastic and glass. In these hallways for floor covering, choose the clinker tile of the avant-garde color.
Important! The staircase in the Modern style must necessarily be equipped with neon lights, which will complement its design in an original way.
- Neutral. Stair constructions in this style perform a variety of shapes, any color and any material. The most important thing here is not the staircase should become the main object of design design. Do not forget that the neutral staircase is the embodiment of laconicism, simplicity, and the absence of excesses.
Arrangement of a closet in the hallway under the
ladder The ladder itself is quite a cumbersome structure, and it takes up a lot of space. Naturally, nobody wants to lose even a meter of free space, I want to use it rationally. Therefore now we will consider how to decorate the hall with a staircase in an original and beautiful way with the help of a cabinet. This is the most successful version of the useful use of underbrush space:
- The built-in closet can be quite beautiful externally and incredibly roomy.
- More often such cabinets are used to store rarely used equipment or dishes, cleaning equipment, bed linen, books and other things.
- This solution can be called incredibly practical, besides, due to the presence of the closet, the hallway will become more cozy and homely.
Important! This is a great way to resolve the issue of storing winter clothes and shoes. Such cabinets are often combined with shelves for books.
to the contents ↑How to decorate the hallway interior with a staircase in a country house?
In a private house, as a rule, in the corridors and hallways there is enough space for equipping the staircase, besides, it perfectly complements their design. The design of the hall with a staircase in a private house is based on the location of the main element strictly in the center.
Narrow long corridors and hallways in private houses are often equipped with stairs, but the following rules are observed:
- The ladder should be located along the wall.
- It's better if it consists of one span.
- It is necessary to create an original wall adjacent to the stairs.
- It's better to give up too massive accessories in favor of garlands, photos, paintings and built-in lamps.
- An excellent solution will be the use of mirrors that can visually expand the room.
Useful advices
- Hallways with stairs to the second floor are often found in country houses, because without this element in such housing simply can not do. But it is important to take care not only of the good design of the staircase, but also of its safety. Therefore it is better if it is straight, with one span.
- Wooden cottage, of course, will be unsuccessful to look with a metal staircase inside, so with its arrangement you need to take into account every nuance, even the most seemingly insignificant.
In this article, we looked at the main points, so that it would be easier for you to design a hall design with a ladder. We hope you did not have any difficulties, and you could use this practical device to emphasize the interior of your house, having issued a lifting system safe for each member of the family.

