

- Milling table and its function
- Where to start?
- Tools and materials for work
- Where to collect the table?
- Preparing workpieces for work
- Manufacturing instructions with drawings
- Safety in operation of the milling table
The milling table with our own hands for someone seems to be an unnecessary thing in the household, and someone will be very necessary, because with it you can make a large amounta variety of beautiful wood products. Ready-made original shapes can be used to decorate the interior of your house, and even to decorate the landscape area in the recreation area in the garden. How to make such a device correctly, we'll tell you in this article.
to content ↑Milling table and its function
The convenience of using a router that is placed inside the table is the safety and optimization of work with wood, as well as the manufacturing time of parts.
The essence of the operation of this installation is quite simple, because not the router moves on the machined plane, but the part moves to it. The milling cutter, which is fixed in the table, gives a broader perspective for the machining of parts. As a result, the billets of the products are obtained as by professional masters who have professional equipment.
to the contents ↑Where to start?
Before you make the milling table with your own hands, determine the size and appearance.
Important! You must consider the possibility of changing the table. The table must be stable and reliable in use. The presence of boxes will create additional convenience during operation.
There are three types of milling table, and you need to choose from them a more suitable option for yourself:
- Stationary is a specialized design that is usually large in size and not subject to displacement.
- Portable - has compact dimensions and relatively small weight. This table can easily be moved from place to place.
- Aggregate - its design provides for the expansion of the plane of the saw table, which is very convenient and advantageous for the processing of multi-format parts.
Tools and materials for the work
In order to produce the countertop as a rule, MDF boards, boards or thick plywood are usually used. These materials are easy to process, have a small weight and a long service life.
Important! Some masters think that the metal table top is the most durable and durable. And they are right, but a similar table with any electrical appliance will become an excellent conductor, which is quite dangerous. Also, metal is extremely prone to corrosion, so it makes sense to paint it.
The milling table covers must be smooth. They are often made of metal or plastic. 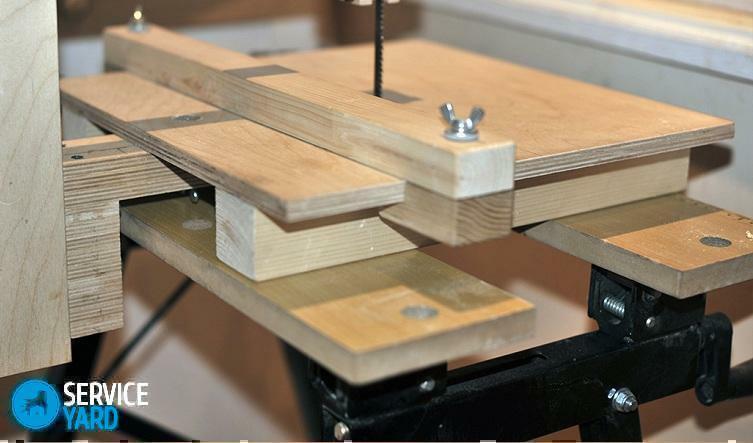
Tools and materials that are required for to manufacture the milling table with your own hands :
- Joiner;
- Screws;
- Bolts with nuts;
- MDF board and birch plywood sheet;
- Spanners;
- Electric jigsaw;
- Sandpaper;
- Pencil;
- Ruler:
- Drawings and calculation.
Where to collect the table?
You can use a separate plane to produce the table under the router, which will be fixed in wooden supports or between two pedestals. The simplest way to create such a table top, details for a milling table and support parts will be using a MDF plate or birch plywood with a thickness of 16-25 mm.
Important! If the plate is covered with plastic, there will be much less resistance in the manufacturing process. On both sides the laminated board does not crumble during operation.
to the contents ↑Preparing workpieces for the work of
In this case, during the manufacture of the milling table we use:
- 1 MDF panel, dimensions: 19x1000x1800 mm.
- 1 plywood sheet, dimensions: 19x1000x1650 mm.
- 1 plate, dimensions: 4x30x30 mm.
- Guide rails made of aluminum - 2,3 m.
- Wheel suspension with brakes - 4 pcs.
Assembly instructions with drawings
The top structure will be made of wooden parts cut from a solid 19 mm MDF board. To replace this material you can use birch plywood.
In Action:
- Cut sheet materials into fragments according to the above parameters.
- Before cutting on the part, check the thickness of the MDF board, because it can often be defective or not match the specified dimensions.
- Remove the plastic cover from the base of the router. In the future, it will serve as a template for marking on the mills on the plane of the countertop.
- On the most large-sized sawed part No. 1, dimensions of which are 90x70 cm, make a marking for the cutter. To do this, at a distance of 235 mm directly from the edge in the middle, draw a line, putting a mark. Then place the patch in such a way that the adjusting mechanisms of the router are closer to the edge of the table top. Arrange the overlay exactly, mark the places for making holes, which then will be fixed with screws.
- Measure the diameter of the lining, as well as the distance from the cut of the sole to the outer edge.
- From the middle of the part of the sole that you have cut, perpendicularly draw a straight line to its center.
- Use holes in the sole and lining to mark out future holes that will serve for the mounting screws.
- Take the parts under number 2 and number 3, drill holes for the cutter and fixtures in them. In the front part and the base of the stop, make a marking for the semicircular holes. Using a jigsaw, cut out the semicircular holes. Sand all surfaces.
- To the bottom of the tabletop, secure the four straps with screws.
- Glue the remaining workpieces and secure them with screws. From the table top, install the milling cutter.
- Now prepare the supporting structure of the entire table. In this case, its height is 820 mm. For this, use a sheet of birch plywood, the dimensions of which are 19x1000x1650 mm.
- Saw the plywood on the part, observing the parameters.
- Assemble the table design by connecting its parts with glue, screws, screws. You will have a frame with a free space in the cabinets.
- Make a mounting plate of duralumin, getinax or polycarbonate, the thickness of which varies from 4 to 6 mm. Cut out the selected material with a square with sides of 300 mm. On it, glue the sole of the router with a double-sided adhesive tape. In this case, the overlay plays the role of a template. Drill a plate through the holes in the pad. Then remove the patch and make a large drill groove for the hats in the plate.
- Place the plate on the countertop, circle its outline, and with a chisel, hammer and sandpaper, make a groove under the plate.
- At the point where the milling cutter is fastened, drill the holes and expand them already from the back side of the counter using a 11 mm drill. Lay the mounting plate in the hole in the countertop, connecting them with bolts for fastening. Attach the element to the base of the router. Insert the tool into the worktop, and then secure it with screws.
- To connect the vacuum cleaner to the machine, prepare a dust extraction sleeve. From the plywood, cut out a piece in the size 140x178 mm. In the center of the part, make a circular hole in order to fix the adapter fitting of the vacuum cleaner.
- For the stop, add a safety shield that can be made from plywood, as well as plexiglass.
- Sand all surfaces of the table, especially those places where milling work will be done.
- Clean all wooden parts from dust and cover with oil.
Safety during operation of the
milling table During operation on the milling machine, accidents are likely, as well as the generation of different degrees of injury from contact with the rotary mechanisms of the milling cutter and all particles of the workpieces flying away from it. To prevent this:
- Before you start the milling cutter, remove the entire tool from the surface of the table top, clean its surface of various debris and small wood particles.
- You can also equip the milling table with a protection screen that will not allow particles to fly apart.
- In the process of working at the table, in no case should you clean and lubricate the parts, remove the protective screen and measure the workpieces.
- In order to avoid getting into the eyes of all emitted particles, always use safety glasses. This is especially true during high-speed milling or processing of bronze, cast iron or silumin elements.
Now that you have assembled the milling table with your own hands, you are ready to create original wooden products for the joy of yourself and your loved ones. And if the matter seems very interesting to you, then it can become a hobby or even a professional activity as an additional or main source of income. We hope that we helped you in implementing any of these ideas.


