
- What is decoupage?
- Decoupage by yourself
- Decor chairs and their restoration - other ideas
Agree, almost everyone has old furniture, which is a pity to throw, but it has ceased to harmonize with the new interior. Any old piece of furniture can be given a new life, updating it with simple technique decoupage. Perhaps this is the chair on which you did the lessons, and the warmest memories are associated with it. Decoupage of a chair at home is sure to please you. This style of decor is able to add furniture of individuality, style and brightness to the dwelling of its owner. With the help of this creativity, many become famous designers, while receiving large fees for the work done. Do not be afraid to start, bolder! To bring to life the most original, author's ideas you can, thanks to our advice from this article. Boldly take on this not only interesting, but also profitable process.
to the contents ↑What is decoupage?
In translation, this means "cut", and the essence of the technique itself is to decorate the surface with images of paper, by cutting from napkins. This method can be compared with painting on wood - the effect is stunning!
So, let's deal with it. Decoupage is a certain process of drawing an image on an object by fixing it with the help of special tools:
- The drawing for application usually hasPaper basis, most often it is a three-layer napkin.
- Subjects of the pattern can be absolutely different: floral, patterns, festive, children's, in the style of Modern.
Important! The use of such decorating techniques can be, for example, on furniture, on dishes, as well as on personal items, and not only. Why not?
to the table of contents ↑Decoupage by yourself
Decoration of different furniture elements, including chairs and other interior items, is able to update, decorate them, make the center of attention of guests of your house.
Important! With the help of this technique, prolong the life of old chairs without upholstery, hiding all the defects and irregularities. Perhaps you will have to give advice on such a cardinal upgrade, as well as hold a master class. Be prepared for this development. It is interesting, is not it?
The main types of decoupage
When developing a single room design, such a technique as decoupage is very useful. Therefore, you can think ahead of all the nuances of your creative ideas. Now we will tell you how to make decoupage of old chairs with your own hands. Stay with us, it will be interesting!
Decoupage itself can be executed in various variations, and includes such ways of execution:
- Direct or classical. It is the main and most common technique. We can say that the classic decoupage is an application of motifs on different surfaces.
- Artistic. This species is often called smoky. It includes a system of different techniques to create a seamless picture( imitates the painting).
- Liquid lamination. This is the complex technique of decoupage and patchwork. When decorating use a large number of pieces of paper to create a quilt effect.
- Volumetric decoupage. This is such a technique, which uses cloth flakes, shells, various natural materials, to update old furniture.

Necessary materials and tools
Decoupage of a chair at home is a creative process that consists of several stages of work. The final result depends on the accuracy of their implementation. To begin with, we need to stock up on a set of items and tools that help to directly decouple the chair at home.
For work we will need materials and tools that can be bought in special shops:
- Three-layer wipes with a picture or printed pictures on the printer.
- Glue PVA.
- Scissors and brushes.
- Sandpaper of different granularity.
- Adhesive vinyl or plain wallpaper paste.
- Acrylic paints, pencils, markers which( for the correction of the finished image).
- Water-based varnish for surface coating.
- Auxiliary elements for decor( crystals, sequins, stickers, shells).
- Putty( to prepare the object for painting).
- Primer( to remove unevenness and other defects).
We are determined with the artistic idea of
Now we will consider the classical technique that will help you in creating different masterpieces for yourself and as a gift to friends and close people. We will help you make decoupage of old chairs yourself.
Important! Do not worry about the fact that the first result may not be absolutely ideal, since such a technique requires special experience. But then your work will please you more and more, motivating you to new achievements.
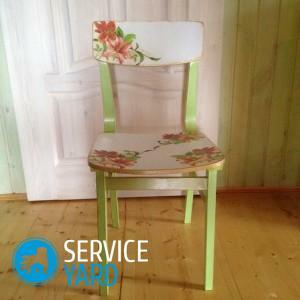
It is best to decorate a chair in the style of Provence. The motives of Provence are able to emphasize the abundance of cozy trifles, especially in the kitchen, where the chair is an integral part of the interior. You can easily make furniture that looks like furniture:
- In order to give the products the effect of antiquity, you can use some tools and techniques, for example, chaotically process an already finished surface with a pattern of sandpaper.
- Decoupage of old chairs with their own hands, made in the style of Provence, usually has the characteristic motifs and scenes of the picturesque French province. The Eiffel Tower, narrow streets, lavender fields, flower gardens, sandy beaches and vineyards are ideal for creating such a composition.
Important! Restoration of furniture with their own hands in the style of Provence is not only an exciting and beautiful process, but also the creation of a cozy, light and hospitable atmosphere.

Decoupage technology. Step-by-step instruction:
- To get started, we must prepare the surface, that is, carefully remove the old coating from it. Will help you with this sandpaper.
Important! Use a material of different abrasiveness, starting a coarse-grained operation, and ending with a shallow one, - so it is easy to achieve an ideal smoothness of the surface.
- In the next step, we must remove the dirt with a soft brush and soap solution.
- Now, we begin to cover this surface with a primer, at the end of work the stool should dry thoroughly.
- When the required time has passed, the chair can be safely covered with base paint, while its color should be slightly darker than the top layer.
- Just before cutting, you need to determine the shape of the image and the size of the area to be cut.
- Now choose the napkins, which, in your opinion, perfectly complement the harmony in the interior of your apartment.
- Three-layer napkins are divided into the necessary parts and cut off by hand in the necessary boundaries. This is done in order to block the obvious transitions and create a whole effect on the finished product. Separate the top color layer of the napkin, since only it is required for work.
- Next, cut out the selected image, and only then connect it to the surface of the chair. We paste the picture with the help of PVA glue - it will hide all the nuances and irregularities.
- Next, correct the space that appeared between the paper segments. Now we are waiting for the glue to dry completely.
Important! Some gaps can be drawn with colors or pencils, thereby adding integrity to the image.
- After complete drying, it is necessary to coat the product with acrylic lacquer, always water-based.
Important! The color depends on your idea of execution. You can use both glossy and matte varnish, all at your discretion. To visually remove the obvious boundaries, apply glue in several layers, each, in turn, should dry well.
- It is necessary to leave the stool for a while, about one hour.
Now you can say that the master class you went through successfully. Not a bad job, is it? Decoupage chair at home, great for beginners lovers of this kind of creativity.
to the table of contents ↑Decor chairs and their restoration - other ideas
Do not be discouraged if your chairs or stools lost their "market appearance", and it's a pity to say goodbye to these already beloved things. There is an excellent solution to this problem. In this not artful work will help restoration. This is your wand-wand.
Important! Such work is for patient and orderly people. Cardinally update the appearance can be either alone or by contacting specialists in this field. With them, everything is very clear: you leave your idea, and later take the finished product.
If you still decide to do the restoration yourself, we will give you some interesting ideas for updating your chairs or stools.
We decorate the cases with
The easiest way to transform an old chair is to cover it. If desired, you can buy it, sew it yourself, bind it, and also weave it from different materials:
- You can use fabric, grapevine, ribbons to weave a cover on a chair.
- All this can be decorated with a gentle embroidery made by own hands.
Everything is in your hands! The task is not as difficult as it seems. These transformations in an excellent way will update your chairs, which will give the interior a new breath.
We update the cover
Everything is extremely simple! An old chair can easily be restored by painting it in a new color, thereby giving it new features. To do this, remove the old coating with sandpaper beforehand so that the new coating is easily even, and color the chair in the color you have chosen. Or you can cover the wood with acrylic glossy varnish.
Important! It is possible to apply both monophonic paint and experiment, drawing patterns and inscriptions.
You see, nothing complicated, but only positive emotions.

We decorate with a cloth
Just replacing the upholstery of your favorite chair, you will see how much it will transform it. Here is the list of the main stages:
- To begin, choose the suitable material for the seat, backrest. There are many options. It can be textiles, natural, synthetic fabrics, tapestry upholstery, velvet, flock, velor or plush. To decorate the chair, you can also use leatherette, which will never go out of fashion.
Important! Suitable material for finishing the chair can be an upholstery fabric for upholstered furniture, and you can sew a one-piece pouch from shreds. In this case, the main thing is to stick to your preferences and the interior in general.
- In order for the backrest and seats to be soft, foam should be placed under the upholstery fabric, the thickness of which is selected individually.
- Then, from the upholstery material, you need to cut out the necessary fabric, taking into account the dimensions of the seat itself, the thickness of the foam rubber, the necessary allowances( about 5 cm on each side) to secure the fabric with a construction stapler.
Important! Effectively, the first layer of upholstery to make the batting, and later to secure the chosen fabric. To avoid deformation of the foam rubber, we recommend not tightening the fabric heavily - it is able to deform the foam rubber, which, in turn, spoils the appearance of the chair.
- For durability of the upholstery it is necessary to be reinsured: it is better to nail it in two or three rows.
- The excess fabric needs to be trimmed, giving the upholstery aesthetic appearance.
- To update the back of the chair, take a plywood or cardboard that matches the dimensions of the backrest opening. These materials can significantly strengthen and give strength to the back.
- Creating a new backrest on the chair begins with the laying of the fabric in the opening of the backrest face down. On it is put a pre-prepared sheet of plywood or cardboard and then everything is attached to the chair frame by a stapler.
Now everything's ready! Your old chair has become and looks much more interesting, and in general is now much more comfortable.
Paint with paints
If there is a desire and zeal to restore a chair or a stool with your own hands and make it completely different, then safely take the paint in hand and create your creation:
- The very first thing the chair that you are going to restore, you need to sand it with sandpaper or a grinder.
- Its surface must be smooth, without any residue of the old paint or varnish.
- With a damp cloth, remove the dust and particles from the old coating.
- If suddenly on the chair you found different defects( bumps and cracks), seal them with a putty for the tree.
- The next step in decorating the chair is priming.
- When the primer has dried, you can proceed directly to the painting itself.
Important! We recommend covering the surface with acrylic paint in 2-3 layers, thereby strengthening the strength of the coating. Each new coat of paint must be applied only after the previous coat has dried. The number of layers of paint depends on its hiding power, that is, on the ability to hide the color of the surface.
The conceived image on the restored chair can be made both independently and use a ready-made stencil. Include fantasy and you will succeed! The idea of a decor directly depends on the room and the interior. The chair can be designed for a hall or living room, for a kitchen, a children's room. And the technique of decoupage itself, images and colors, are chosen exclusively for the style of the room.

Restoring a chair with colored wallpaper
To date, there are a huge number of ways and ideas with which you can make decoupage of furniture. It is possible to decorate the furniture with appliqué, rags or carving out different fragments, use different pieces, update the furniture in parts. For this purpose, use a whole cloth or paper that will fit perfectly on the furniture. Now you will learn how to do decoupage of objects with wallpaper without much effort and work experience.
First of all you need to prepare materials and tools that are absolutely necessary, namely:
- Wallpaper clip.
- Adhesive for decoupage or varnish.
- Brush with roller.
- Sandpaper.
- Scissors or clerical knife.
Operation:
- Before starting to do decoupage of the chair with wallpaper, you need to unsolder the surface, thereby making it smooth and smooth.
- We'll do the work with the wallpaper, so pre-wind the cut in the required size so that the necessary reserves remain.
- The adhesive must be treated with the entire stool.
- After that, carefully handle the same and the reverse part of the wallpaper. In this way, we evenly distribute paper over the chair, using a soft roller in work.
- Next you need to start smoothing the wallpaper, removing the folds and air bubbles under the cloth itself.
Important! Take care that the paper does not tear - in the process of decoupage furniture should be extremely accurate.
If your furniture is out of date, it does not mean that it needs to be thrown away. After all, parting with your favorite thing is not so easy. Especially, it can give a new breath, make your creative ideas real. Especially when you have such assistants as paint, varnish and various variants of bright napkins, you can decorate your remaining wallpaper after repairs and decorate your own imagination with decoupage using fabric, appliqué, weaving, drawing, perhaps not just furniture, but the whole apartment, including the ceiling andwalls, as well as floors of rooms. Doing decoupage, you will save a decent amount of money, buying only supplies. Create, develop, experiment, and you will succeed!


