
- How to make a classic system?
- Ironing board built-in
- We cover the main part of the ironing board
Such a device, like an ironing board, will surprise no one, and even many people heard that there is a built-in ironing board with their own hands. But since the device is really needed in the house, and the models presented in the sales are often not reliable, a quite reasonable question arises: why spend and buy or order it if you can make it yourself? And here's how the ironing board is made with our own hands, and this article will be discussed.
to the contents ↑How to make a classical system?
To start the production of a classic ironing machine model, in addition to the baseboard and upholstery fabrics, you will need to prepare the following materials:
- wooden bars for the manufacture of legs, length of which is 110 cm - 3 pcs.;
- wooden bars in length of 30 sm to make stops - 2 pieces;
- ordinary screws;
- bolts brand M10.
Of the tools we will use:
- jig saw electric;
- wood drill and drill;
- staples and furniture stapler or upholstery nails with a hammer;
- screwdriver.
Important! The length of wooden bars for the legs you can pick up completely different, according to what you will be comfortable with.
Before, to understand how the ironing board is made by hand, prepare all the tools and materials. Then:
- You should round one end of the board with a jigsaw.
- Further - with the help of a drill in long bars drill holes through D 8 mm. The holes must be drilled two: one - approximately in the middle, and the second - a few centimeters from the edge.
- Use a mirror drill to make a selection in 2 of the 3 bars near the holes in order to drown the bolt caps in it.
- After this, connect all 3 future legs with bolts through the middle hole, turn that bar that is in the middle, to 180⁰.
- Take a small bar, drill a through hole 8 mm in it, about 3 cm from the edge. On either side of the hole you must add a sample.
- Then, join the workpiece together with one of the large wooden bars with the bolt through the outer hole.
- Do the same with the remaining short bar, only now attach it to another long leg.
- Turn the small brushes small to 90⁰, attach them with screws to the surface of the board. Do not forget to retreat about 18 cm from its edge.
- You got a fixed support for the ironing board. To fix the movable leg during the layout of the board, you can make a groove in the necessary place with a jig saw or else fill another block into which the foot will rest.
- The final step is to install your board, check its horizontal and stability. If necessary, trim the legs.
- After this, coat the surface for ironing with a thick cloth with a gasket using a stapler or an upholstery nail.
Ironing board built-in
If you do not want the ironing board to ruin your interior with your own hands, and each time you clean up its laziness or once, you can make an embedded board.
The most popular is a wall-mounted version, when the surface of the ironing board is attached to the wall with a folding mechanism.
What are the differences of this design from the above:
- As a rule, the folding board is manually hung with ordinary door hinges - they give a sufficiently effective and reliable fastening.
- As a leg there will be enough one long and 2 small bars. Only now they are attached to the edge of the board, which is rounded.
- The stop of the foot in this case will be made directly to the floor - this is more reliable than the wall.
Important! In the interval between using the ironing board, it folds back to the wall, and then closes with a special door. As a rule, near such a board collect special lockers, which also store irons and other necessary things for ironing. But when the design allows, as well as the wall material itself, instead of a cabinet you can make a special niche.

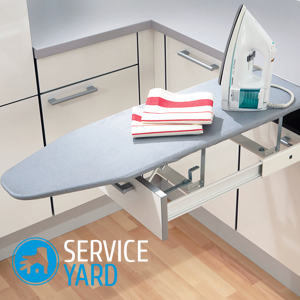
Retractable model
Typically, the location of such an attribute, which is necessary for ironing clothes - in the kitchen cabinets or in the closets. You can use even the most ordinary chest of drawers.
This device can be specially ordered in furniture companies or independently manufactured. The main part of the ironing board is placed on the guides. Foldable part allows you to reduce the parameters of the countertop in 2 times. Parameters of a board of this type will not exceed the parameters of the box in which the board is located. The advantage of this option is its incredible compactness.
Important! It should be noted that the built-in ironing board with its own hands of this type can withstand only the weight it is allowed to hold the guides.
Ironing board in the cabinet
The optimal arrangement for such a system is an ordinary cabinet. In order for this device to be serenely stored in such conditions, it is necessary to thoroughly measure everything, and also to remove all the interfering partitions. For the functioning of the withdrawable mechanism, the simplest device made of hinged fasteners is used.
Important! The most important thing that you have to do is check the reliability of the fasteners. If they are in poor condition, the board may well be torn out synchronously with the back of the wall.
to the contents ↑Tighten the main part of the ironing board
The ironing board built into the wall, or any other, is not finished unless a skin is made. Otherwise how to ensure comfort while ironing?
For this operation you will need:
- bath towel;
- furniture stapler;
- staple clamps;
- hammer;
- scissors.
Important! Remember that the upholstery occurs only after you have inserted the hinge in the board.
In this case, we will act as follows:
- We trim the surface of the board with a bath towel, then attach the corners with a stapler.
- You should definitely stretch the fabric so that there are no wrinkles on the bottom of the board.
- The staples, which will be difficult to hammer, can be finished with a hammer or try to repeat this action with a stapler.
Next is a layer of facing material - any fabric that you liked, but it should be resistant to high enough temperatures. - Using a stapler and a hammer, follow the fixing procedure as you did with the first layer.
- Use scissors to cut off excess pieces of hanging cloth.
Having become acquainted with the information in this article, you are surely convinced that it is not difficult to make an ironing board with your own hands of any type suitable for you. The main thing - to allocate for this time and to be reserved by patience.