
- How to give furniture an antique look?
- Stage # 1.Preparatory
- Stage №2.The choice of the method of aging furniture
- Stage number 3.Furniture ripening
- Stage №4.Finishing
- Some details of aging procedure
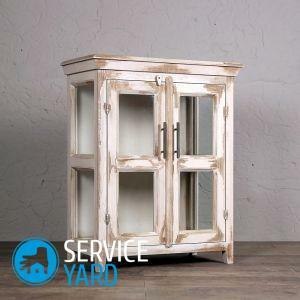
Antique and antique products give the interior sophistication, chic, luxury and a special look. In the days of our grandmothers, scratches and scuffings on the furniture were diligently tried to disguise so as not to give out her age. Hardly anyone at that time guessed that today peeling paint will become the main trend in interior design, and many of us will think about how to make furniture at home to give the room a vintage appearance. An artificially constructed wardrobe or chest of drawers gives the room an original style, character, individuality, both in a modern apartment and in an interior in the style of Country, Provence or Shebbi-chic. Today we will tell you how to grow old cupboard with your own hands, so that it looks really beautiful and expensive. After all, to make the result stunning, you need to know a lot of nuances. We'll talk about this below.
to the table of contents ↑How to give furniture an antique look?
Not every tree species can be given a spectacular appearance by aging. For decor elements for antiquity, the breeds of high and medium softness, having a heterogeneous fiber density, are usually chosen. Perfectly suited for this purpose is the majority of coniferous species:
- Pine.
- Spruce
- Fir.
- Tees.
- Larch.
Choose from hardwood:
- Poplar. Alder.
- Lipu.
- Chestnut.
- Fruit trees.
Important! It should be noted that not all furniture is made of wood species suitable for aging and brashing. In some cases, it is better to open the main parts with a moderately dark lacquer and use overhead aged decors.
If wood is suitable for quality, then it must be prepared for the process: to lighten, remove all paint and varnish materials and clean off greasy dirt and stains. To make it easier for you to perceive the whole process of "artificial aging", we divided it into stages. Choose a simple wooden product for the experiment, please be patient and follow our recommendations.
to the contents ↑Stage # 1.Preparatory
To prepare the furniture for the aging process, follow these steps:
- Remove all handles and protruding decor elements.
- Unfree all the drawers of the cabinet( chest) from the things and completely pull them.
- Remove the old paint or varnish from the furniture surface until the texture appears with sandpaper.
Important! When removing old paints, use a respirator to protect the respiratory system from dust.
- Too greasy areas of furniture, wash with a solution of laundry soap.
- Surface to dry thoroughly.
Important! Polishing with old furniture can be removed manually or with the help of special chemicals. Developed small cracks, crevices and other defects of the tree should not be masked with putty. They will give a special flavor and emphasize the effect of aging.
Special tools must be prepared for work. For the procedure of painting and aging wood you will need:
- Special paint for wood.
- Paint roller.
- Sandpaper, steel wool.
- Brushes.
- Lacquer varnish.
- Sticky gauze or napkin.
- Rags.
Tips:
- For home creative use special chalk paints for wood are produced. The most suitable for beginners are Autentico or Annie Sloan.
Important! Chalk paints have a rich palette of shades, including blurred and imitating the past. Such paints are very convenient to use, they are applied immediately to the surface without additional treatment with a primer.
- If you decide to use a conventional water-based matte paint, then a preliminary priming of the wood surface with a water-soluble agent is required. This is necessary for the best adhesion of the paint to the surface of the product and for the formation of a barrier against the penetration of oils from the wood onto the coating of the base paint.
There are about 10 basic ways of artificial aging of a tree. Each method is based on a certain technology and requires its skills. Consider the simplest methods that you can apply at home.
to the contents ↑Stage # 2.Choosing the aging method for
furniture In order to age a wooden product, there are following ways:
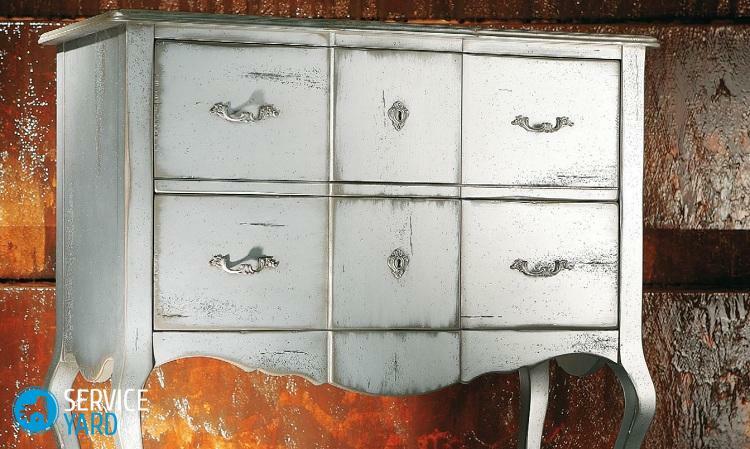
- To give the effect of peeling paint. For this, a paint of two shades is used, one of which will be seen through the cracks in another kind of coating. The product will look as if it was repeatedly repainted.
- Create abrasions on the product. When using this method, only one coat of paint is used.
- Brashing or creating a raised surface. The main work is carried out with metal brushes. The roughness and thickness of the brush nap is selected in proportion to the hardness of the wood.
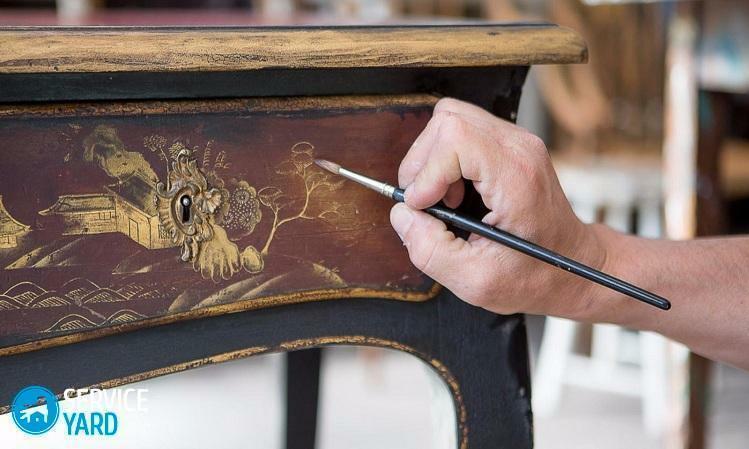
- Drawing of a gold web. This method is easy enough to use and will appeal to all who admire the exquisite and antique furniture. With its help you can quickly grow old furniture. It is necessary only to paint the product in the desired color( which is pleasant), use a sponge to apply a golden-colored paint on an acrylic base. After the paint has dried, the surface is varnished.
Stage №3.Asphalt furniture
Depending on the method chosen, prepare all the necessary tools and get to work. We will tell you how to conduct the necessary activities step by step.
A way that will help to give furniture a worn look
Step-by-step instruction on how to grow old furniture at home:
- Lightly sand the product.
- Wipe the object with a sticky gauze to remove the smallest particles of wood.
- Apply the base coat of paint( main).Paint the paint roller. Start work on the back side or inconspicuous pieces of furniture to understand what color shade gives, how much it needs to be typed on the roller.
- Allow product to dry thoroughly.
- Rub on the wax candle to those parts of the product surface where you want the visible color to be visible.
- Apply the top coat of paint of a different shade( more light).
- Allow product to dry thoroughly.
- Wipe with steel wool those areas on which you applied the wax.
- On the corners, legs, horizontal surfaces and in the places where hands touch, sand the paint to create the effect of a bare wood.
- Wipe the furniture with a sticky cloth and apply a varnish if necessary.
- Elegant antique furniture is ready.
Important! To make the result more interesting, we advise you to take note of such recommendations:
- Before the dyeing process, place the working area with newspapers or polyethylene. If possible, work outdoors for convenience and safety.
- During painting, roll the roller widely so that no streaks remain. If the stains are still formed, then sand them with sandpaper, and then apply a second coat of paint.
- To ensure that the roller does not dry out during the interruption of the painting process, lower it into a container of water.
- The simplest method of aging furniture is applying one layer of paint, through which the texture of wood and its natural pattern will appear. The surface will look uneven and shabby.
A method that involves the use of Crackleur for the cracking effect of the paint layer
The cracking grid can be obtained with the help of special caustic lacquers. With artificial aging, there are 2 ways of using craquelure:
- Single step. With a single step, apply two layers of dye of contrasting colors with an intermediate layer of cracel lacquer and drying. The upper layer of paint is cracked, as a result - the lower layer is exposed.
- Two-step craquelure. Two types of crucular composition with intermediate drying are applied. After the upper layer is cracked, dry pigments are rubbed into the cracks.
Important! This method is more labor-consuming and is used mainly in arts and crafts and painting.
Step-by-step instruction for the use of paint and craquelure:
- Choose a color of 2 colors - the main tone and a lighter color. For example, if you take contrasting colors: black and white, you get a fading effect.
- Color each design detail with the basic color.
- Wait until the paint is completely dry.
- Apply a lighter color.
- Wait until the paint layer has dried.
- Shake dust off the furniture and cover it with craquelure. The top layer of paint of lighter tones will start to crack, and the product will look as if it was painted more than once.
Important! To make the main color appear more saturated, carefully work the skin with the necessary parts of the product.
Brashing. Creating a raised surface
This method can be used separately or together with the other options listed above. For example, you can initially make a surface brush, and then use a stain, paint or varnish.
Important! The process is based on a simple principle - the soft fibers of wood are removed with the help of metal brushes, then holes are made by means of a drill or chisel, reminiscent of wormholes. You need to do this carefully, so that the furniture remains all the same durable.
Use this method for items made from the following wood species:
- Teak.
- Cherries.
- Beech.
- Oak
- Maple.
- Pear.
- Ash.
- Larch.
To better understand this process, we recommend following the instructions:
- Select the softest interlayer of wood between the hard fibers. To do this: consider the cross section of the object, thin hard fibers will alternate with wide soft fibers. Only the flat sections of the facade part of the furniture are being erected.
- Choose a metal brush - steel or brass. The roughness of the brush and the thickness of the pile should be chosen in proportion to the hardness of the wood.
- Take the brush and work the surface along the fibers. If you will process the tree in the transverse direction, then on the hard fibers may remain dashes, which will not look quite appropriate. Brush along the entire workpiece with medium pressure evenly. During processing, soft fibers inside the tree's annual rings are easily erased, and the knots and hard fibers remain. As a result, a microrelief is created on the surface.
Important! It is very important to stop in time during the surface treatment. Relief should not be strongly pronounced. The optimal depth of the furrows is no more than 2 mm.
- Treat the surface with nylon or sesal brushes. Their pile contains abrasive particles. With aging under natural conditions, the tree becomes smooth and pleasant to the touch, and after bragging there are burrs and a large number of thin rags that need to be removed.
- Treat the wood with a fine sanding pad or synthetic brush. Wood will become more textured and the roughness inside the furrows will disappear.
- To finally flatten the relief, use a fine abrasive powder or steel wool. Rub the wood with the selected agent until it shines.
- Polish the surface with felt with a colorless abrasive paste applied to it. It is possible to use for polishing and skins-nulevku on a foam rubber basis.
Important! Do all work on grinding and processing of wood in gloves and a respirator, so as not to inhale the wood dust and do not plant a splinter.
Varnish, stain or paint
After you have completed the invoicing, go to the second stage - toning the surface.
Here are just a few recommendations on the use of materials with which you can make furniture at home:
- The simplest version is to open the surface with a colorless varnish. The procedure is carried out several times to protect against rotting and contamination.
- A more pronounced effect of aging can be obtained by opening the tree with stain. The depth of the tone of the material is selected according to the type of wood. Thus, you will give the necessary contrast for the projecting furrows and ribs.
- To enhance the effect, wipe off the stain immediately after application. Soft fibers absorb the material more than solid, because they will be painted in a darker shade.
- If you apply a thick brush with an opaque acrylic lacquer and then wipe it with a dry rag across the fibers, it will remain only in deep veins. Hard fibers are colored with a dark polyurethane lacquer using a tamponizing method.
- If you want to make a tree gray, then use the remnants of steel wool. Soak them in a cleaner containing hydrochloric acid for several hours to remove the scale and limestone. Apply liquid with a foam rubber swab on the surface, immediately wipe excess, and dry the product at room temperature.
- The brushed wood can be patinated. Looks like this furniture is very impressive. For this procedure:
- Open the textured surface with one or two layers of varnish.
- Apply a small amount of glue to the surface.
- Apply copper foil.
- Remove excess surplus sandpaper.
- After the copper strips have remained on the protruding hard fibers only, wipe them with a herbal chemical agent, gently rinse with a gas burner.
Important! Here are a few additional tips that will help you do all the work qualitatively and beautifully, effectively age furniture at home:
- A very high-quality and fast result of the allocation of texture is obtained by burning a tree. In addition, under the influence of fire, the tree profitable changes color.
- For final processing, we recommend using a rotary sanding machine. Move the working part in a circle to avoid noticeable scratches.
- The patina effect can be achieved with a special lacquer containing metallized particles. Apply the composition with a wide fan, and turn the workpiece at a slight angle.
Stage # 4.Finishing
The processed product must always be protected against all possible damages, thereby increasing its service life. To do this, use the following materials:
- Wax for wood. It is dark or transparent. Apply the wax on the furniture with a foam sponge or a lint-free, soft cloth.
- Protective varnish. It is better to use matt acrylic lacquer for wood.
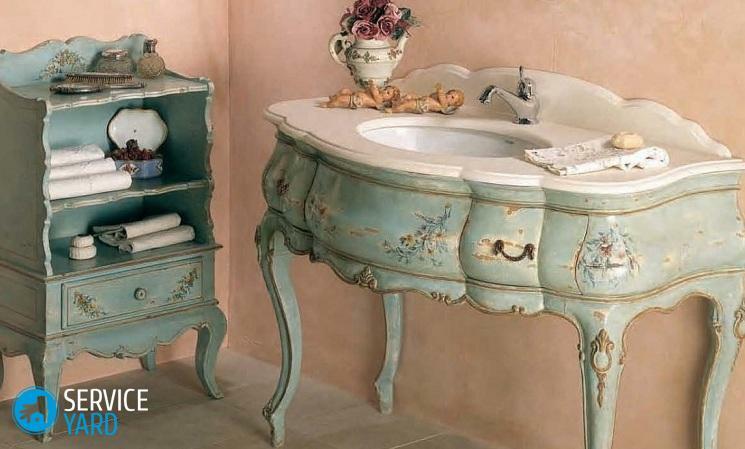
And to complete the stage of the artificial aging of furniture, refresh the accessories and complement the furniture with unusual accessories. Use a variety of vintage handles or hooks, other ornaments.
to the contents ↑Some details of the aging procedure of
furniture We described how to grow old furniture at home, and finally a few recommendations:
- It is best to paint on 4 different colors when painting. For example, the base one is white, two bright colors and gray paint.
- Observe the correct drying technology. Do not apply a new coat of paint if the previous one has not dried out. It is best if the paint dries up in natural conditions.
- Those places that should look more worn and old, smeared with paraffin. Thanks to this, the paint will depart better.
- To create a scuff effect, use a sponge to apply the paint.
- If you use ordinary bituminous varnish as a patina, you can reduce the cost of aging.
- For the final aging effect, 3-5 layers of paint are sufficient, not more.
- After drying out all layers of paint, sand the structure to clean it of excess layers of paint.
- To create the effect of volume and texture, and also achieve a certain relief, you can use shpatlevku. It is best to apply it with your finger in the glove.
The effect of antiquity allows you to make a real masterpiece of art from any subject. But in order to choose one or the other way, first, familiarize yourself with the photos of old furniture, then - perform all the processes only in a certain sequence, and your chic furniture will amaze everyone with its uniqueness and vintage!