- Where to start?
- Single lever mixer
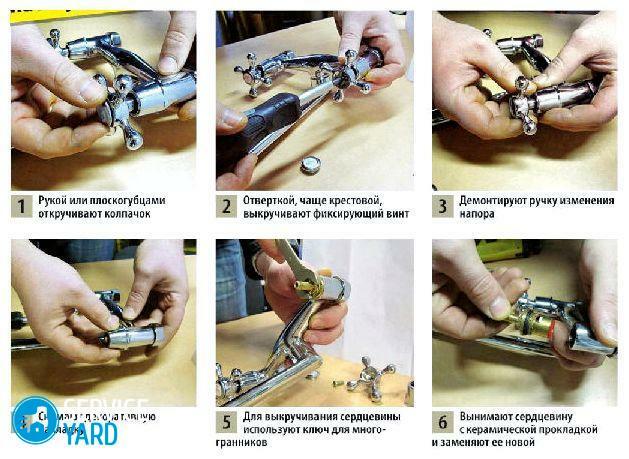
- Two-valve mixer
The need for repair of plumbing equipment is evidenced by strange sounds coming from the tap, as well as incomplete overlapping of the water flow. To determine the causes of the problem and to eliminate them, it is often necessary to call the plumber or to solve the problem yourself. In this article, we will share practical recommendations on how to disassemble the faucet in the kitchen for its further repair.
to the contents ↑Where to start?
Before disassembling the mixer in the bathroom or in the kitchen, it is necessary to shut off the water supply and, by opening the taps, release the moisture from the system. Only after the completion of this procedure will you be able to start repairing the equipment.
For this purpose you will need the following set of tools:
- gas key;
- set of flat screwdrivers;
- hex wrench;
- pliers;
- small piece of fabric;
- rags;
- repair kit for used mixer model;
- grease for sealing elements.
Before deconstructing the faucet in the kitchen or bathroom, you need to understand its design features. Depending on the structure, the equipment may fall into one of the following categories.
to content ↑Single lever mixer
Single-lever mixers are a new trend in the development of modern sanitary devices:
- This equipment is characterized by increased functionality and stylish design.
- By its design, the joystick mixer is a robust housing with a plate that acts as a lever.
- Ceramic, plastic or metal can be used as fabrication materials.
 Today, you can find several varieties of single-lever structures, each of which requires consideration of certain features in the process of repair and maintenance.
Important! You can find out whether the ball or cartridge mixer is installed in your kitchen by reading the technical documentation of the single-lever crane.
Ball mixer
As the main working element of such a device is used a small metal ball, built in the crane body. On the surface of the sphere, there are 3 functional openings intended for supplying cold, hot and mixed water. The design is driven by the adjustment stem, which allows the user to control the water pressure.
Detailed instructions on how to disassemble the ball mixer are as follows:
- Remove the mixer handle by first removing the locking screw that is hidden by the colored plug.
- Place the screwdriver in a special groove, gently rotate in the clockwise direction, which will help to unscrew the threaded ring-connection.
- Using pliers, remove the crane dome and the plastic part located underneath.
- We take the ball-shaped part and carefully inspect, in case of any damage, this part should be replaced.
- All mixer parts are assembled in reverse order.
Important! Specialists also recommend that you replace all gaskets with new parts from the previously purchased repair kit.
Cartridge mixer
To disassemble a valve based on a non-spherical operating element and the cartridge system of two ceramic plates, follow the following procedure:
- Use a flat screwdriver to gently pry the two-color mixer plug that is made of plastic, which is designed to indicate the direction for opening cold and hot water.
- Remove the locking screw located behind the plug with an Allen key and a screwdriver.
- After the operations, the handle of the mixer should be easily removed.
- The decorative nut is untwisted without the use of any tools.
- Now, using a gas wrench, unscrew the union nut.
- Now it is possible to remove the cartridge and clean the inside of the faucet with a rag.
- Install a new cartridge from the purchased repair kit, which requires matching the grooves in the base and the protrusions on the surface of the bottom of the part.
- Assemble the structure in reverse order.
Important! To prevent damage to the cartridge crane due to clogging of functional holes with solid impurities, experts recommend installing the filter.
to content ↑Two-valve mixer
A double-valve valve is a design that requires separate control elements for hot and cold water. Such a mechanism is very popular due to the convenience and ease of operation.
Such types of mixers are characterized by a rather long durability. If nevertheless you need to disassemble the faucet in the bathroom, then follow the instructions below:
- Unscrew the screw you need under the colored plug.
- The crane-axle must be unscrewed using a wrench.
- Replace the cushioning materials with new parts from the repair kit.
- Install all components in the reverse order.
In this article we have shared with you practical recommendations how to independently disassemble the mixer in the kitchen and, replacing the failed components, eliminate the leakage.


