- Guarantee of continuous laminate operation - alignment
- Decent substrate for laminate
- Qualitative insulation layer
- Specificity of laminate laying
- Features of tool preparation and preliminary work preparation
- Laminate floor installation technology
Laminate is a relatively young and at the same time inexpensive type of modern flooring. It attracts everyone's attention with an abundance of textured, colorful variants that accurately imitate the picture of noble wood, natural stone, even the skin of exotic reptiles. The most important reason for buying a laminate is in its technological priorities, due to which you can even independently arrange the arrangement of the floor - just follow certain rules, and then the result will be perfect. Today we will consider how to lay laminate flooring, we will study all the subtleties.
to the contents ↑Guarantee of continuous operation of the laminate - alignment
The rules for laying the laminate with their own hands assume, first of all, alignment of the rough foundation in accordance with the current building regulations:
- The old concrete floor must necessarily be repaired, expanded cracks and filled with cement-sandsolution. Large delaminated pieces must necessarily be removed, and grooves filled with a special mixture that can be leveled out independently. After hardening, the floors are ground or poured with a finishing screed.
- Cement from cement is primed with ceresite, so that the surface of the concrete layer does not dust, and the sand, separated from the concrete, does not creak under the laminate.
- Wooden old floors are simply repaired with replacement of damaged elements. To reduce the height of ceilings, the surface is leveled with plywood.
- With a plywood base and a new board flooring, the grinding machine cuts all irregularities.
Important! Any floor before coating the laminate is charmingly thoroughly washed and vacuumed to get rid of dust.
to content ↑Decent substrate for laminate
Laminate is a set of multi-layer panels that are equipped with four-way locking systems. Working with it is very easy and simple, it's enough to just snap the device, and all - no need to put extra effort. But besides the most decorative coating, to lay the laminate, you need to purchase related materials. One of them is the substrate.
Why is this necessary?
In accordance with the technological rules for laying laminate and manufacturers instructions, the substrate must perform the following functions:
- Sound insulation, the absorption of sounds from steps.
- Provides a certain level of static floating floor surface.
- Protection against abrasion of the inner side in contact with the roughing floor.
- Aligning small defects in the substrate.
- Protection against moisture emitted by wooden ceilings.
If the base itself is too embossed, and the differences will exceed 2 mm, then the ready-made floors will start to expand and break fast enough. The consequences of this process are very disappointing: the surface will begin to squeak, and the larger cracks become even larger, they will turn into real holes.
Important! The permissible uniform slope of the plane of the rough floor can be considered 4 mm per 2 square meters. But it is important to note that in such areas you can not put furniture - interior items will not be stable, because they can not stand on all 4 legs. As a result, the furniture parts will begin to warp and break.

Materials
Choose one of the following materials for the laminate substrate:
- Cork roll.
- Coniferous plates.
- Polyethylene foam roll material.
- Foamed polypropylene.
- Plate expanded polystyrene.
Important! The type of substrate, as a rule, is selected taking into account the class of the laminate itself and the quality of the rough floor.
Dimensions
The thickness of the substrate is determined by the similar size of the panels. Therefore:
- It is recommended to buy a laminate with a thickness of 9 mm and make a substrate of 3 mm material for it.
- If the laminate itself is thicker, accordingly - the thickness of the substrate will increase.
In principle, all panels are sold in boxes or rolls, on which there are recommendations of specialists, so it's better to focus on them.
to content ↑High quality insulation layer
Since the laminate is mainly made of impregnated paper, inexpensive coniferous boards and wood created by pressing wood waste, it is undesirable to contact the surfaces that emit moisture. Therefore, before laying the laminate, it is necessary to take care of the arrangement of the vapor barrier layer, which will play the role of a diffuse membrane. Otherwise, excess moisture will be freely transferred to your neighbors through the concrete floor. As insulation, thick polyethylene can be used.
Important! Only concrete floors are needed for isolation, and the bases of chipboard, plywood, wood and parquet do not need it. Despite technological differences, concrete floors can be considered:
- Screeds from cement and sand.
- Concrete floors with gravel or gravel.
- Factory plates and monolithic ceilings with round voids.
Actually, the age of the concrete foundation is not at all important, therefore, both new and old floors can separate and absorb moisture. Qualitatively made insulation will stop any attempts of water to penetrate inside the laminate, which will crush it from the inside.
Important! The lap stitch is overlapped by 20 cm on the previous sheet. After the completion of all the work with the laminate, polyethylene is simply covered with skirting boards.
to content ↑Specificity of laminate laying
Laminated floors are installed according to the floating scheme, that is, they are not attached to the roughing base and walls, only interconnect them. Interlayers under the panels also do not attach themselves to anything, they freely lie under the weight of the floors.
It is very important to know not only how to lay a laminate with your own hands, but also correctly calculate the right amount of material, choose the layout. It depends on this, how correctly the load will be distributed, the reliability of the connections is optimized.
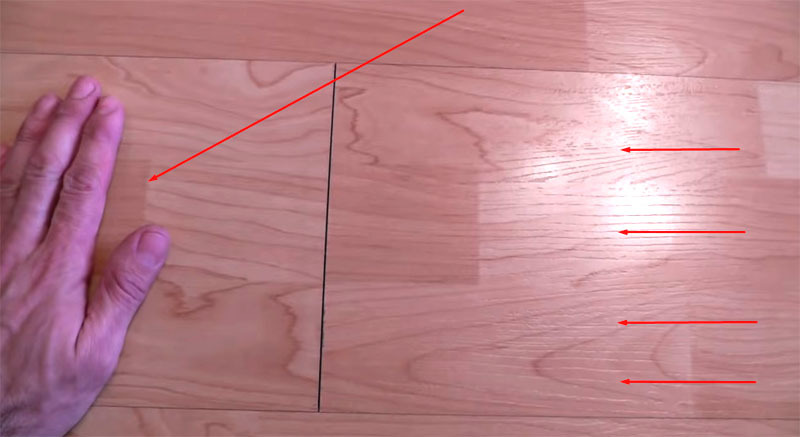
Important! Remember that in the assembled coating there should be no cross-shaped joints. In other words, the correct laying of the laminate should resemble a masonry of bricks with butt seams in the center of the panels of adjacent rows. This is how professionals work.
Home masters tend to shift the butt seams to the size of the piece that remains after the last bar was assembled in the previous row. Yes, it is not solid and ugly, but it is economical and reasonable.
Regardless of what you prefer, you should follow these mounting rules:
- The trimmed parallel end line of the bar should not be less than 30 cm in length.
- The panels trimmed along the share line must have a minimum width of 5 cm.
- The rows are buttThe seams are recommended to be displaced about ⅓ from the length of the element.
- If the laminate is laid on the plank floor, then it must be placed crosswise.
Important! To make it easier to adhere to these rules, it is better to manually draft an uncomplicated plan with the dimensions of the space being arranged. It is desirable to immediately immediately apply on it all the projections, architectural details, openings and stoves.
Also on the perimeter of the room it is necessary to leave 1 cm as a damper indentation, and then count how many solid panels approximately fit in one row, which part should be filled with pruning. When calculating, one should also take into account the fact that the longitudinal ridge of the very first row must be sawed flush before laying.
to content ↑Features of tool preparation and preliminary work
It is better - if the laminate laying scheme with your own hands assumes the use of a piece of the last bar as the first element of the next row. In this case, the longitudinal seams will be located along the stream of sunlight, which falls through the window opening. Due to this, the seams will be almost invisible.
The installation of the laminate itself should start from the furthest corner of the left side. Useful advice on the preliminary planning:
- Of course, it is difficult to imagine that the first row of laminate will be formed only from solid strips. But if this is the case, cut a piece from the left end of the first bar of the second row, so that its length corresponds to the amount of displacement. In other words, half or a third of the whole panel, depending on which way of laying will be chosen.
- If after distributing the laminate rows from solid strips the width of the latter is less than 5 cm, then it will be necessary to saw off the combs of the first row not only the comb. It is necessary to calculate everything in such a way that the rows along the edges of the floor are about the same width.
- If there are unusual architectural details in the room, then it is necessary to start distributing the laminate rows from the central axis.
Important! In any case, it is necessary to cut the laminate and use an electric jig saw or a crosscut saw for this. Hacksaw should not be used, because it can damage outside the decorative coating. In order for the cut line to turn out to be beautiful, it is necessary to stick out the adhesive tape while sawing the panel.
to content ↑Laminate floor installation technology
Laminate with its own hands is easy to lay, but it is necessary to keep the material for two days at room temperature so that it is accustomed to the specified conditions and adapted as much as possible. Elements can be interconnected in several ways indicated on the package, namely:
- Lock system, involves snapping locks located on the crest of the slats.
- Double locking system. In this case, the panels are connected by installing panels at a special angle.
- Adhesive way. It is used rarely enough. The sides and sides of the strips are treated with glue before joining.
Now get to work:
- Cover the entire roughing floor with a substrate. Stripes or sheets must be laid back to back and pasted with adhesive tape, so that later it would be more convenient to work.
- Assemble the first row of the strips with the already cut off comb. To the wall panels should be located on the circumcised side, and the locks - face to the master. To form the first row, do not necessarily be right next to the wall.
- Assemble and attach the second strip to the first row.
- Now start to attach to the wall the initial elements of the future floor covering and expose along the perimeter spacer wedges or special spacers. They are needed to avoid deformation of the floor. Observe a distance of 25 cm between them to ensure a clearance of at least 0.8 cm.
- Similarly, collect the entire floor to the end.
- Place the cover under the door frame so that there are no gaps between the floor and the strips. You can simply saw from the bottom of the rack of the box according to the thickness of the laminate.
- In places where the floor intersects with the pipeline, make a jigsaw or a drill hole in the board.
- Using adhesive, connect the floating floor and trimming the panels near the pipes and under the radiators.
On packages with laminate there is always an instruction, detailing how to lay the laminate with your own hands, and if everything is done clearly, then questions will not arise. Thanks to this article, you will be able to independently calculate the right amount of material, qualitative prepare for work and perform the installation.