CONTENT
- 1 Important points in the question of how to connect a switch with two keys at home
- 2 Detailed wiring diagram for a two-light switch in a home chandelier
- 3 How to connect a three-light chandelier to a two-button switch
- 4 Wiring diagram of an electrical two-key switch through passage
- 5 Connecting a two-button light switch with an outlet: decoding the circuit
- 6 How to connect a backlit two-button switch with your own hands
- 7 Subtleties of connecting two-button switches in houses with different grounding systems
- 8 Errors that occur when connecting a switch with two buttons
Important points in the question of how to connect a switch with two keys at home
Agree, the two-key switch is an engineering design that is practical and easy to use. As they say, from one point you can control several lamps or lamps in a chandelier at once.

Collecting tools for mounting the switch
Each craftsman has a standard set of tools in his household arsenal that is needed to repair lamps or electrical wiring. This bag should include:
- pliers with side cutter;
- painting knife;
- set of screwdrivers;
- well rubberized gloves;
- electrical tape or special tubes;
- self-clamping terminal;
- screw terminal;
- drill, cable (in the event that the wiring is pierced for the first time).
IMPORTANT INFORMATION!
All tools for working with electricity must have rubberized handles, otherwise there is a risk of electric shock if an unplanned breakdown occurs in the wiring.


Preparatory activities to be aware of
Before proceeding with the installation of a two-button switch and connecting it to the lighting, it is ideal to familiarize yourself with the safety precautions for this type of work. Unfortunately, many people ignore this fact, so we decided to limit ourselves to extremely important points:
- Do not forget to de-energize the room. Without this manipulation, it is extremely dangerous to start connecting the dimmer.
- We determine which of the conductors of the cable is a phase, which is zero. A special indicator screwdriver will help to deal with this. When a phase is touched, a lamp on it lights up.
- We will prepare all the insulating material. It can be silicone or rubber tubes, electrical tape and other materials that prevent high potential breakdown.

Detailed wiring diagram for a two-light switch in a home chandelier
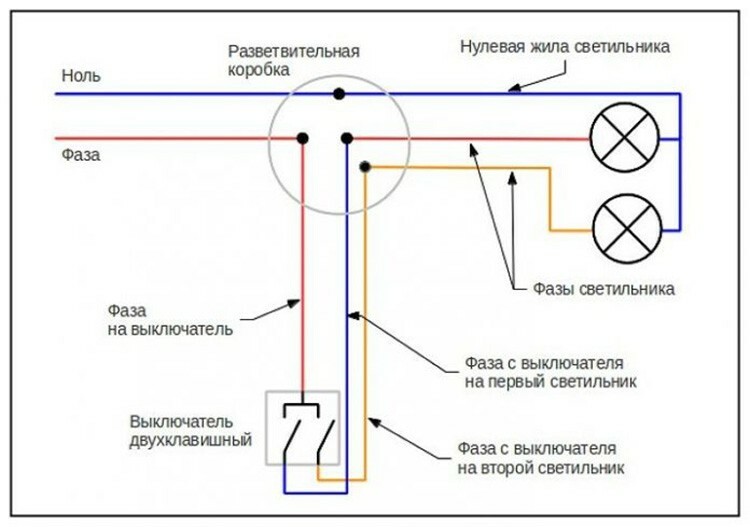
An experienced electrician will be able to read the connection diagram of the switch with two buttons on his own and install the device without watching the training videos. However, for beginners, this task can only be done by following the appropriate algorithm. Let's decipher how the given scheme works.
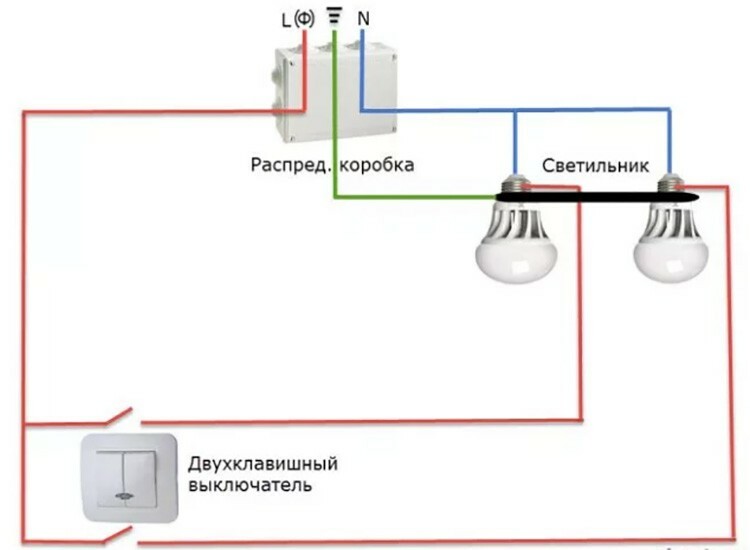
Pay attention to the design of the two-button switch shown in the diagram. It has two keys that open and close when the button is pressed alternately. Neutral and grounding conductors come to the light source directly from the electrical panel, and from the switch it is provided only the phase that preliminarily leaves the main corner, after which it passes through the opening contacts of both keys switch. We will consider the method of distributing conductors in a junction box in the instructions in the next section.
Installation and connection instructions for a two-button switch
The connection of a two-button switch must fully correspond to the diagram described above. We will carry out the installation according to the following instructions.
| Illustration | Description of action |
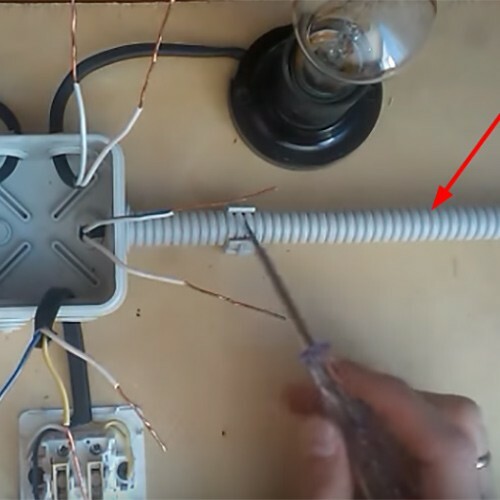 | We bring an electrical cable from the switchboard, in which two conductors are insulated: phase (white) and zero (white-blue or blue). |
 | We connect zero conductors from the incoming electrical cable with zeros from both bulbs. |
 | We twist together the yellow conductor from the switch with the white conductor of the first light bulb. |
 | We connect the phase of the second light bulb and zero coming out from the switch. |
 | All resulting twists must be insulated. It is ideal to put caps on them. |
 | We assemble the structure and apply voltage to it. |
 | If both bulbs are working properly and light up when alternately switching the rules, then the installation is done correctly. |
NOTE!
Depending on the marking of the electrical wires, the phase and zero may differ in color. The phase can be brown or gray in color, and zero always remains blue or light blue.

How to connect a three-light chandelier to a two-button switch
Many would-be electricians, not knowing how to connect a two-button switch with a chandelier equipped with several lamps, simply connect a light source to one key. However, this manipulation is incorrect, since all the capabilities of the regulator are not used.
Let's see what a detailed diagram of a given connection looks like. As you can see from the diagram, we need to divide the wires that go to the chandelier sockets at their junction into two groups. One group will branch off to the first switch key, and the other will branch off to the second.
Wiring diagram of an electrical two-key switch through passage
The connection mechanism of two-key pass-through switches is not similar to the method of connecting a device of a conventional design.
NOTE!
Pass-through switches are necessary so that the lighting in the room can be controlled from different places. The technology of this connection is time consuming, so it is important to have the skill.
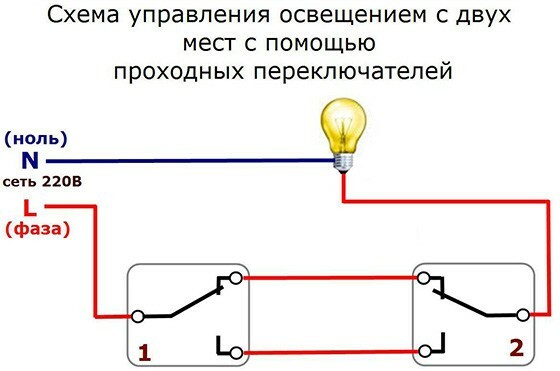
Switches are inserted into two prepared places in the room. Remember that they must have fairly long contacts. Next, all the luminaires that will be connected to this system are placed. With the help of three-core cables, the connection is made as shown in the diagram. Twisting of all six contacts should only take place in junction boxes. It is not allowed to contact the conductors with each other directly in the wall or in front of the switch.
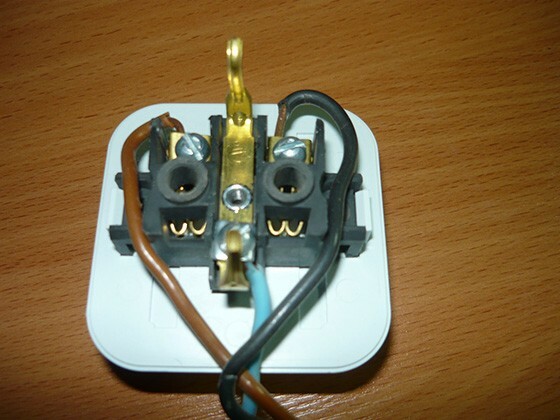
Connecting a two-button light switch with an outlet: decoding the circuit
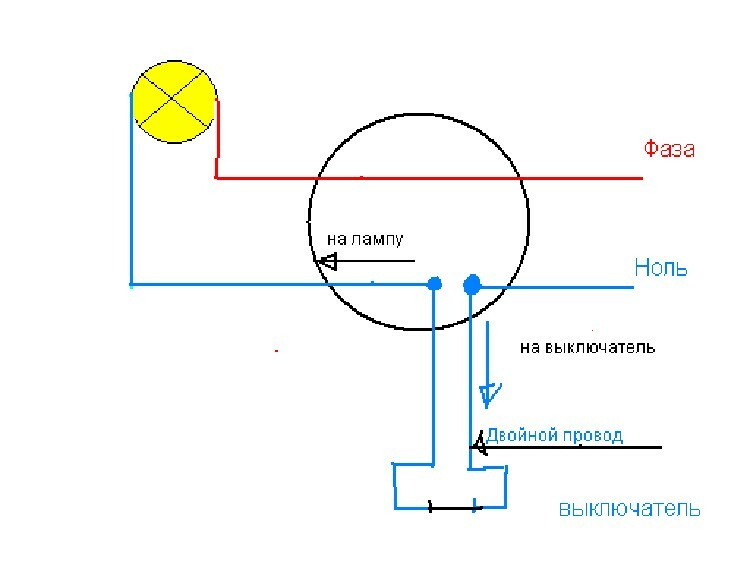
In order to properly install the unit, in which the socket and the switch button are combined, it is necessary to proceed according to the diagram below.
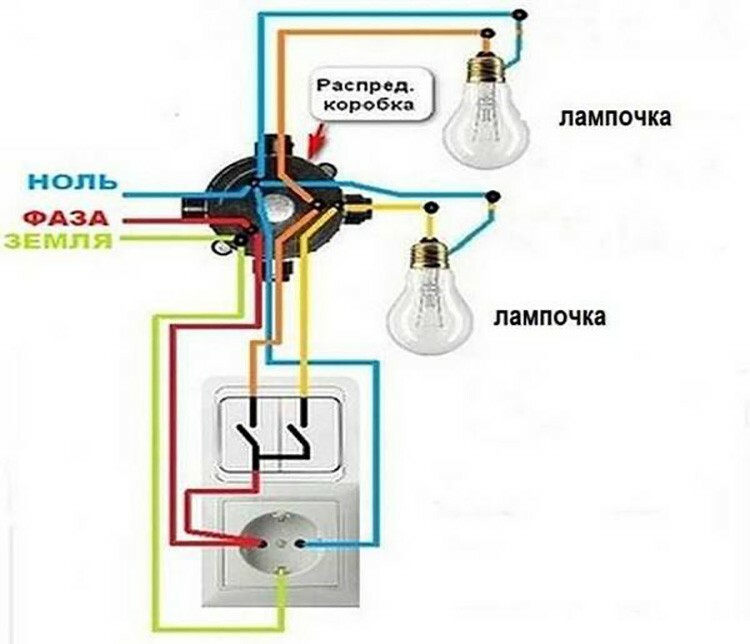
The algorithm of actions is as follows:
- a cable with two cores is taken out from the main shield: phase and zero. It connects to the contacts in the junction box. By means of a double cable, a lamp and a switch with a socket are connected;
- the junction box contains three cables coming from the installed unit. The luminaire is connected with one core to zero, and the other - to the free terminal of the switch;
- if a grounding conductor is provided in the “socket + switch” block, it must be connected to the same conductor in the junction box.
How to connect a backlit two-button switch with your own hands
Without knowing how the backlit two-button switch works, one cannot talk about the possibility of its correct connections, so we will consider what components are included in the design of the regulator through the image below.
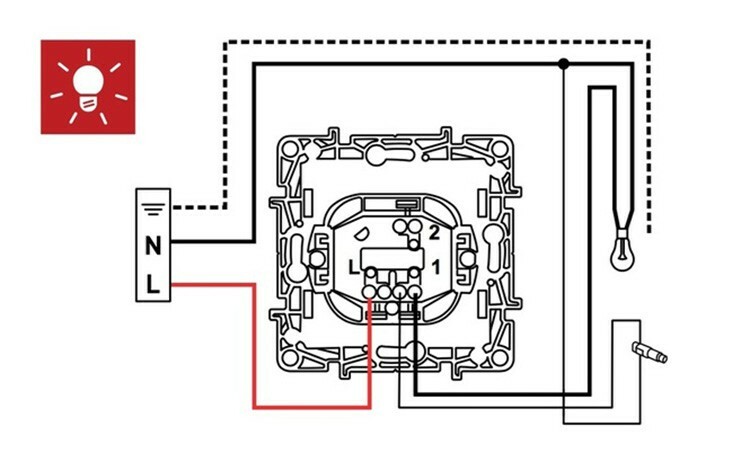
The phase arriving at this type of switch is connected to contact L. Further, from the contacts L1 and L2, the phase goes to the lighting. When moving contacts are in operation, L1, L2, L are closed with each other. The backlight itself, which our switch is equipped with, consists of a resistor and a neon lamp, which are soldered to the contacts L and L1. In the case when the switch is in the off position, contacts L and L1 are open, while through the filament voltage comes to the neon diode, causing it to light up. When the switch key changes position, the contacts close, bringing the lamp into operation, thereby stopping the supply of voltage to the backlight.
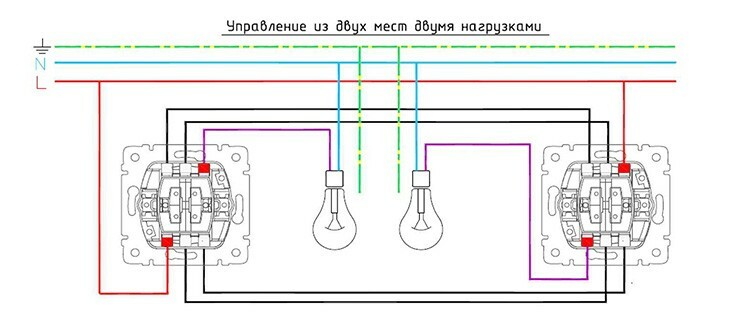
Subtleties of connecting two-button switches in houses with different grounding systems
Depending on the novelty of the electrical network in the house, its method of grounding also changes. It is this indicator that affects the difference in the settings of two-button light switches for grounding systems such as TN-C, TN-S, TN-C-S.
Wiring diagram for a circuit breaker with two buttons in a TN-C grounded network

According to the diagram, we see that a phase (red) and zero (blue) come from the general electrical panel to the junction box. The neutral conductor is connected to the corresponding contacts on the two luminaires. At the time when the phase comes to the switch on the contact L, and then leaves the contacts L1, L2 or "1", "2", depending on the model of the device. Further, the conductor from the first contact through the junction box goes to the first lamp, and the conductor from the second, respectively, to the second light source. All wire connections in the diagram are shown in bold dots.
Installation diagram of a two-button switch with TN-S and TN-C-S earthing systems
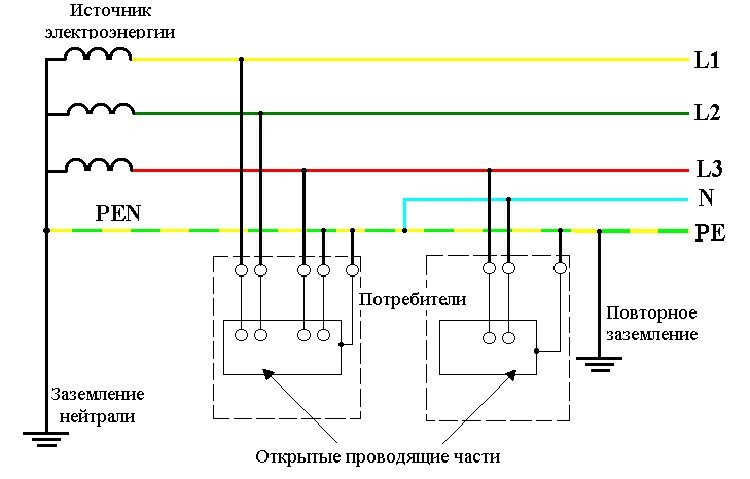
The connection diagram of a two-key device will be made in the same way as the previous one, the only difference is the presence of a yellow-green grounding conductor coming out of switchboard. The protective cable, like "phase" and "zero", comes together in the junction box. From where only the luminaire leaves and is connected to the corresponding color cable.
NOTE!
If there is no third protective wire in your home electrical network, then you do not need to connect the existing conductor on the chandelier anywhere. Only protective grounding can be performed in the apartment.
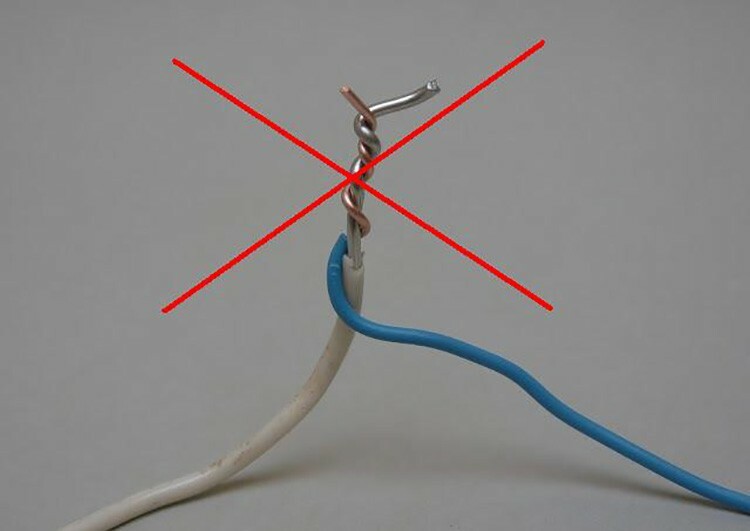
Errors that occur when connecting a switch with two buttons
Even experienced electricians are able to make the connection incorrectly, and there may be various reasons for this: fatigue, redoing someone else's work, and others. In any case, the most common mistakes are:

- Connecting the neutral (blue) conductor to one of the "phase" conductors (red, yellow or brown). Zero must always be connected to zero directly in the junction box.
- It is possible to connect a "phase" supply conductor to one of the outgoing contacts L1 or L2 ("1" or "2"), when it is necessary to connect to the common contact L. In this case, the chandelier will light up only when two buttons of the switch are pressed simultaneously, otherwise there will be no lighting.
- Conclusion to the switch of the conductor "zero" instead of "phase". In this case, voltage will always be present at the base of the light bulb. Accordingly, you can feel it the first time you replace the light bulb.
Always be careful when working with electricity. Otherwise, you run the risk of getting a strong electric shock, which causes dangerous consequences for the further life of the body. If you still have questions about connecting two-button switches and decoding circuits, ask them in the comments. We will definitely answer you as soon as possible.