The chandelier has long been used not only as a lighting device, but also as one of the main items of room decor. The lighting market offers an incredible number of varieties of ceiling chandeliers, lamps and sconces in the widest range of cost and functionality. However, for a number of reasons, many hand-made craftsmen prefer to design and craft various lamps on their own. In this article we will tell you where to start when creating a chandelier with your own hands, we will give advice on choosing components and materials for cases and shades, as well as tell you how to make a chandelier with additional functions for various rooms from crystal, wood or plastic.
Read in the article
- 1 Material selection
- 1.1 Materials for the plafond
- 1.2 Accessories for chandeliers
- 2 How to make an ordinary chandelier with your own hands
- 2.1 Crystal chandelier
- 2.2 Ceiling lights from wheel
- 2.3 Wood chandelier
- 2.4 Butterfly chandelier
- 3 Additional functions
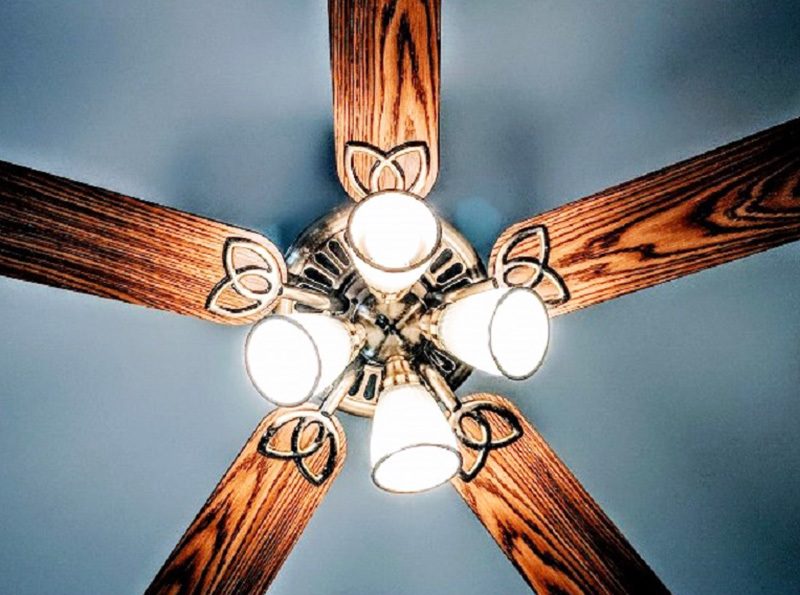
- 3.1 Fan chandelier - design options
- 3.2 DIY Chizhevsky chandelier
- 4 What chandeliers are suitable for different rooms at home
- 4.1 Living room chandeliers
- 4.2 Chandelier in the bedroom
- 4.3 Chandelier for kitchen
- 4.4 Bathroom chandelier
- 4.5 Chandelier in the nursery
- 5 How to decorate an old chandelier
- 5.1 Dyeing
- 5.2 Decoupage
- 6 How to hang and connect a homemade chandelier
- 7 Summing up
Material selection
For home crafts, as a rule, they use budget-class materials at hand. However, it must be remembered that lighting devices are products of increased fire hazard. During operation, they may become hot or be exposed to current from poorly insulated contacts.

After analyzing the recommendations from various forums, you can make an approximate rating of the safety of materials for chandeliers:
- Ceramics.
- Glass and crystal.
- Metal.
- Bone and horn.
- Wood (array).
- Wood-composite materials.
- Textiles and threads.
- Cardboard.

On such a popular material as polymers, special attention should be paid. Conventionally, polymeric materials can be divided into three main categories in terms of fire resistance:
With moderate indicators of flammability (G2), flammability (B2) and smoke-generating ability (D2). Such materials include:
- sheet polyethylene;
- polypropylene;
- plexiglass;
- polystyrene;
- SAN (styrene acrylonitrile).
The use of such materials should be limited whenever possible. And if used, then protect against high temperatures.

With weak indicators of the previously listed parameters - G1, B1 and D2:
- cast and cellular polycarbonate;
- polyester glass;
- cast and foamed polyvinyl chloride.
The use of such materials when creating lighting devices is not limited.

Composite materials with parameters G1, B1 and D1. They are a PVC core with two outer layers of aluminum foil. The trademarks that make similar products are Reynobond, Alucobond or Alpolic. They can also be used without restrictions.

Materials for the plafond
When choosing a material for a shade, you need to read the following properties.
Environmental Safety. The material must not emit strong odor or carcinogenic substances. Even with minimal heat from energy saving lamps.

Ergonomic. The surface of the material should not collect dust or be easy to clean. For example, fabric shades are difficult to clean. but paper lampshades, in view of the affordable cost of the material, you can simply replace it.

Light transmittance. Ideally, the shade material should not block or stain the light. But in practice, for some rooms (nursery, bedroom), dim lighting is better suited. In this case, the outer surface can be inlaid with various decorative elements that create a play of shadows.

Accessories for chandeliers
When creating a chandelier, various elements can be used. But the most reliable are the parts specially designed for this. Most often, for home crafts you need to purchase:
- cartridges (E27, E14, E12, G-4, G-9, B12) - are made of plastic, ceramics or cermets. Can be painted in various colors, including metallic;
- cartridge cases - used if the cover has an open structure;
- threaded tubes with threads throughout the body or at the ends. Used for hidden wiring to the socket;
- springs and cups for shades;
- switches on a chain or on a button;
- ceiling glasses (cups) for masking the place where the chandelier is attached to the ceiling.
Shown below are the various components that are used in the design of chandeliers.
1 out of 4
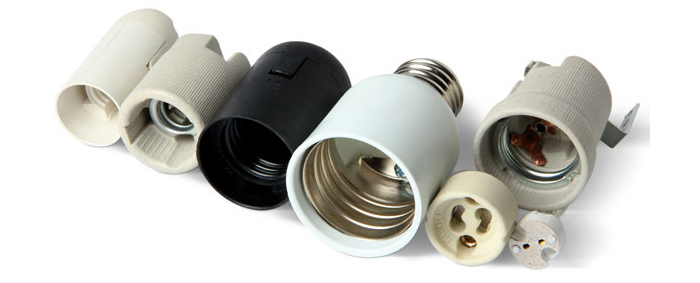
PHOTO: svetosmotr.ru
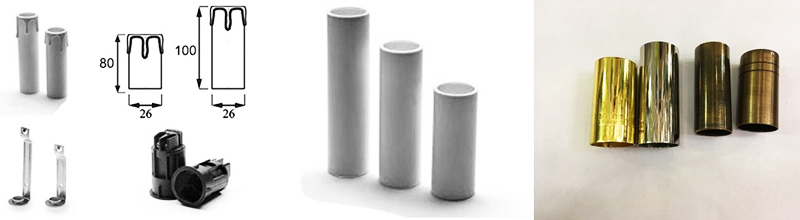
PHOTO: quadro-lux.ru

PHOTO: quadro-lux.ru
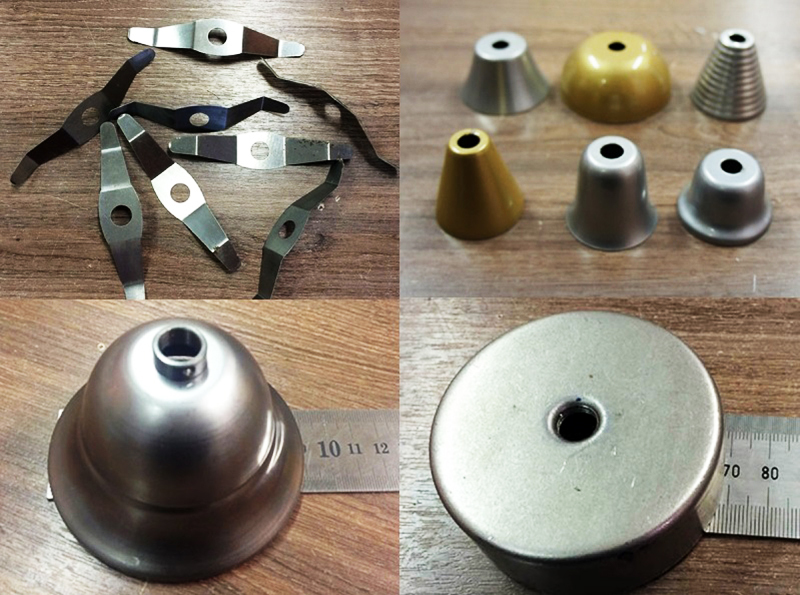
PHOTO: quadro-lux.ru
How to make an ordinary chandelier with your own hands
On the Internet you can find many workshops on creating hand made ceiling chandeliers from scrap materials. We present several of the simplest options that do not require special financial costs and skills.
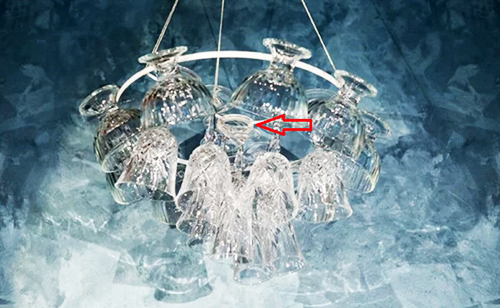
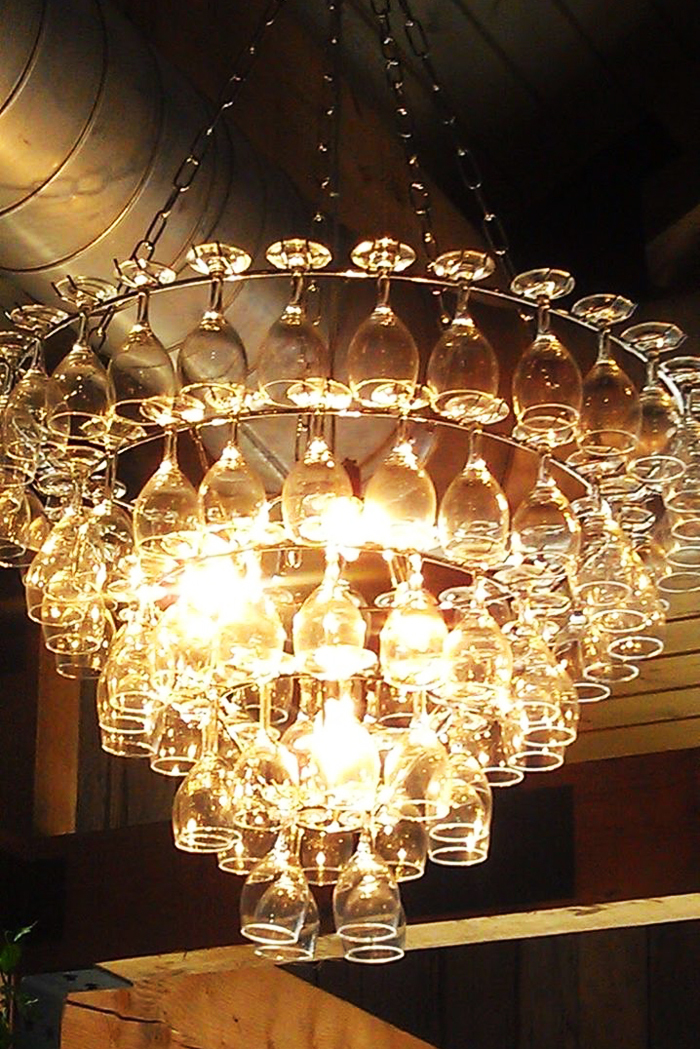
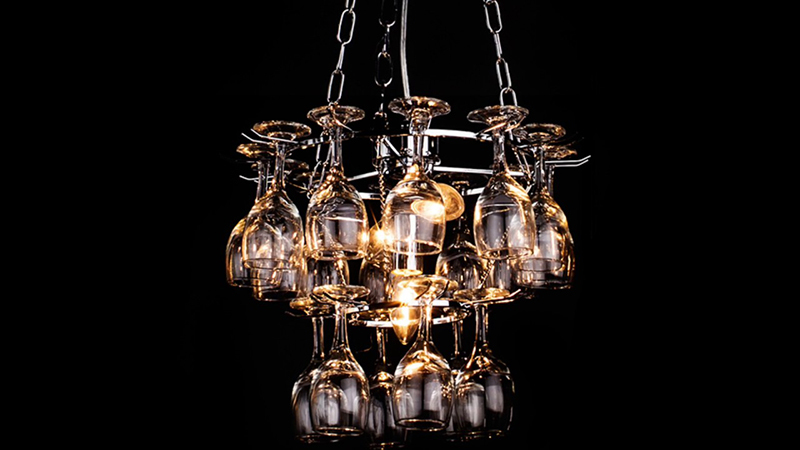
Crystal chandelier
To create a crystal ceiling chandelier you will need:
- thin steel wire and thick transparent line;
- scissors or nippers;
- metal frame from the lampshade of an old table lamp;
- glass or crystal glasses with a stem.
The frame can be made independently from thick (3-4 mm in diameter) steel wire. And the fishing line can be replaced with a steel chain made of small diameter links, preferably chrome-plated, but can be painted with silver paint.
| Illustration | Description of action |
 | We measure and cut off 3-4 pieces of fishing line or chain. The future lamp will be suspended from them. When determining the length of the cuts, it is necessary to take into account the knot for attaching the fishing line to the frame and the ceiling hook |
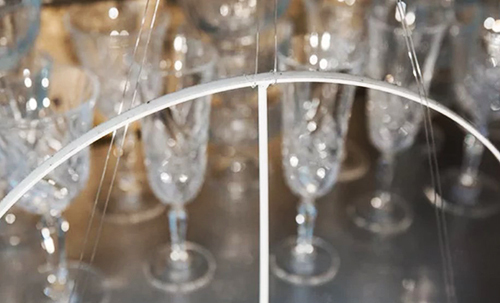 | We attach the fishing line to the lamp shade frame. If the chandelier consists of a small number of glasses, up to 10, then three fasteners are enough. If 15-20, then it is better to use 5-7 suspensions with fishing line or metal chains |
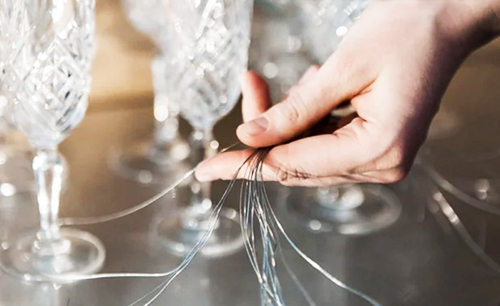 | We cut the required amount of wire for attaching the glasses. Piece length 15-20 cm |
 | We fix the wire on the stem of the glass |
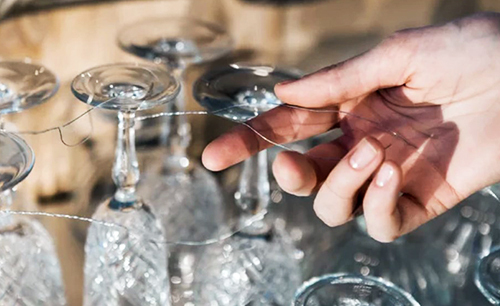
 | Then we attach to the frame of the plafond |
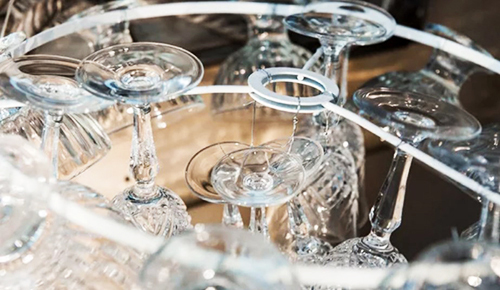
 | In the middle of the chandelier we mount the bulb holder. The ring has a suitable diameter as it is also used to secure the chuck |
Below are the design options for glass chandeliers.

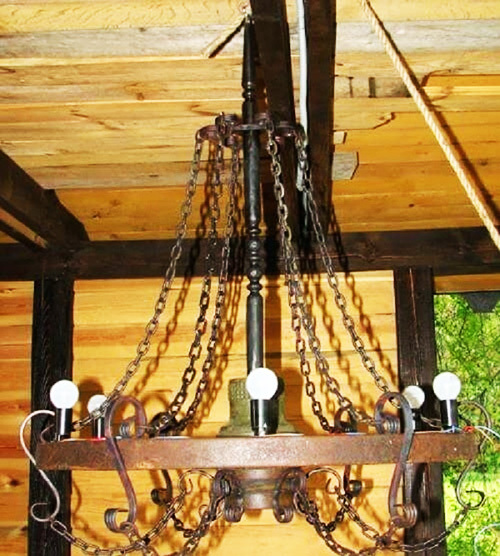
Ceiling lights from wheel
Chandeliers made from trolley wheels have become very popular lately. To make them you will need the following parts:
- a cart wheel with an iron rim;
- cartridges E14 6 pcs.;
- forged decorative elements "C" - 9 pcs .;
- forged decorative elements "S" shape - 6 pcs .;
- chain - 6 m;
- curly or ordinary pipe for suspension - 1 m.
| Illustration | Description of action |
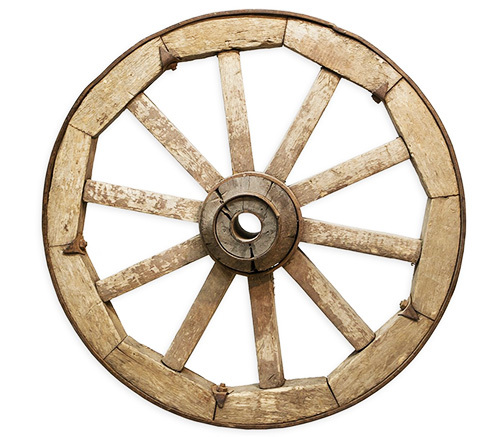 | The wheel from the cart is thoroughly cleaned of dust and dirt using a grinder with a brush attachment |
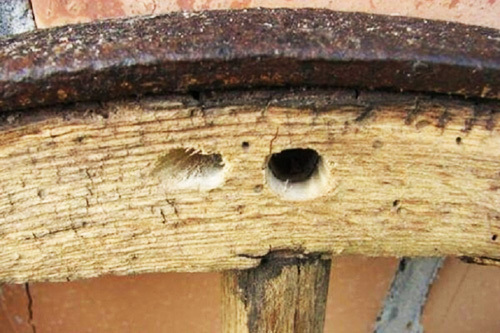 | A perpendicular hole is drilled for the chuck. And one more at 45º for the wire |
 | The decorative elements and the wheel are attached to the suspension pipe with bolts. All elements must be pre-drilled |
 | S-shaped decorative elements are attached to the wheel with screws |
 | the chain is simply put on decorative elements without any attachments |
Wood chandelier
To make a chandelier made of wood, you will need the following materials:
- edged board 20 × 70 mm, length 2-3 m;
- plaster or ceramic pots - 4 pcs.;
- cartridges - 4 pcs.;
- hanging hooks - 4 pcs.;
- screws, wire, varnish.
You will also need jigsaw, screwdriver, blowtorch (gas torch), grinder with iron brush attachment.
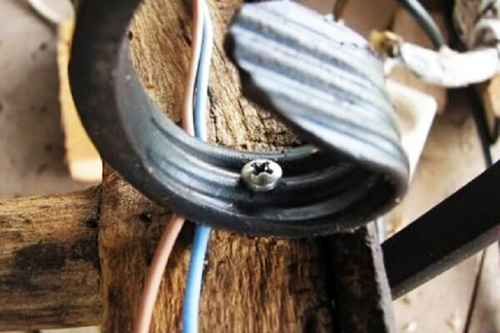
| Illustration | Description of action |
 | The board is cut into 5 parts: 2 × 70 cm, front 1 × 60 cm, 2 × 30-40 cm for fastening all elements to each other |
 | At the front boards with a jigsaw, the ends are figured out |
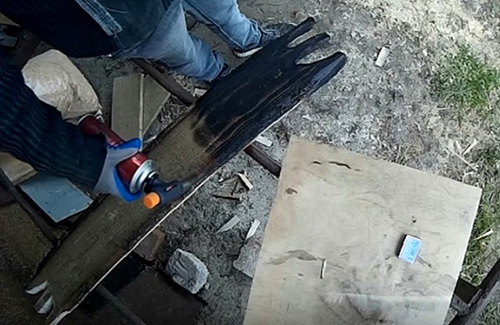 | A blowtorch or gas torch burns the outer layer of the front side of the board |
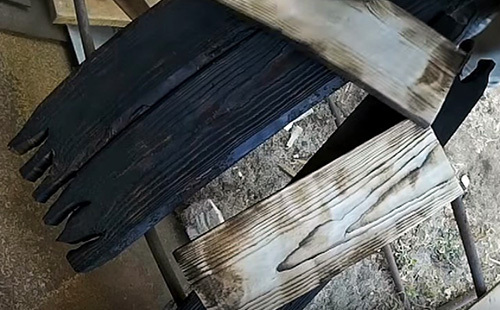 | A grinder, with an iron brush attachment, removes excess carbon deposits |
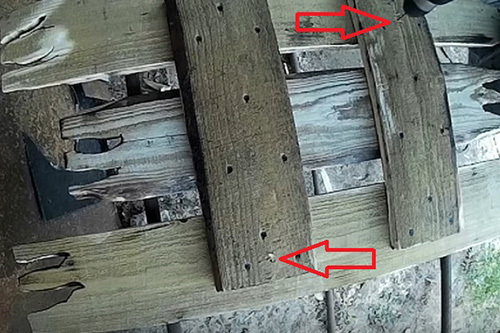 | The construction is being assembled. Hanging hooks are screwed on the back side |
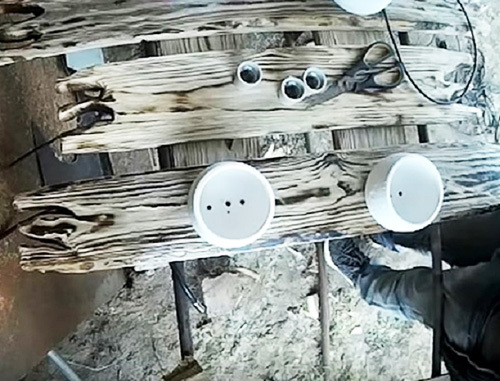 | The pots are screwed in as shades, cartridges are screwed into them |
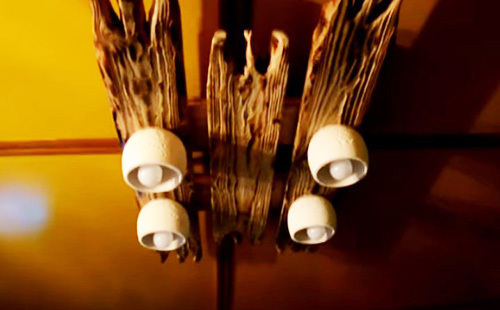 | The cartridges are connected by wires: black to black, red to red. The chandelier is hung in place |
Butterfly chandelier
This chandelier is one of the easiest to manufacture. At the same time, it looks very impressive.

As a material for production, you can use thick cardboard with a velvet or glossy texture or thin sheet plastic from cut plastic bottles. The supporting base is a metal ring of arbitrary diameter, about 30-50 cm. The chandelier is attached to the ceiling hook with a fishing line or nylon thread. The same threads of various lengths tied to the ring are used as the basis for attaching butterflies.
The photo shows options for the execution of chandeliers with butterflies
1 out of 5

PHOTO: kallibry.ru
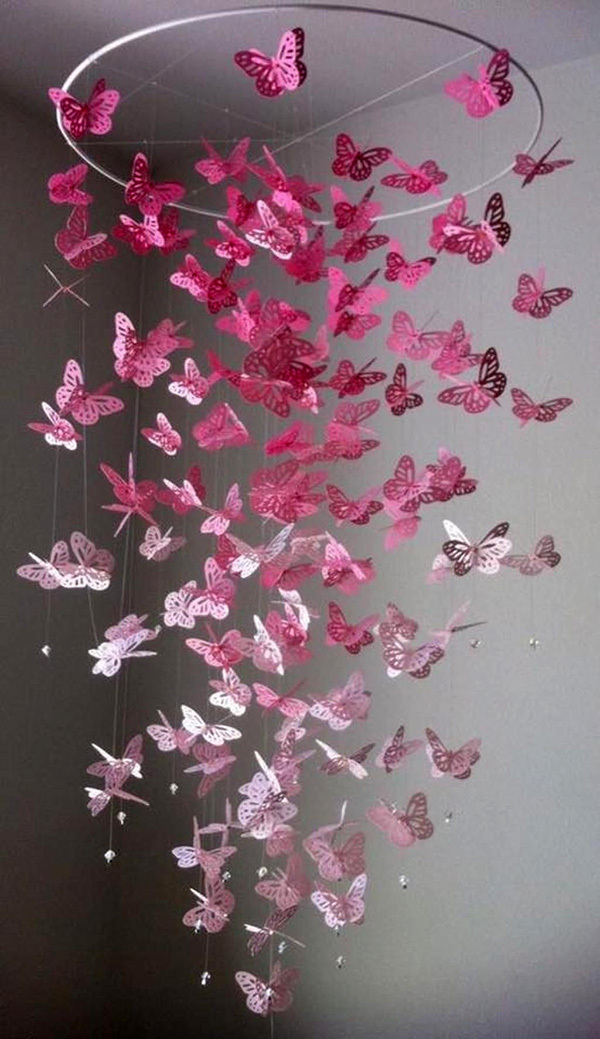
PHOTO: kallibry.ru

PHOTO: kallibry.ru
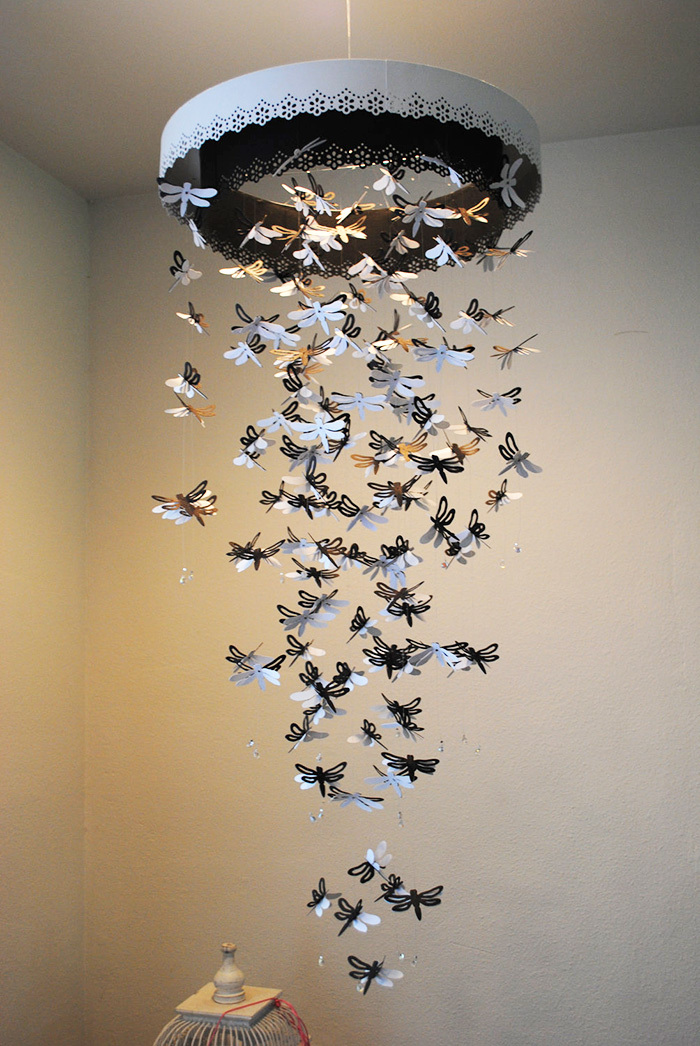
PHOTO: kallibry.ru
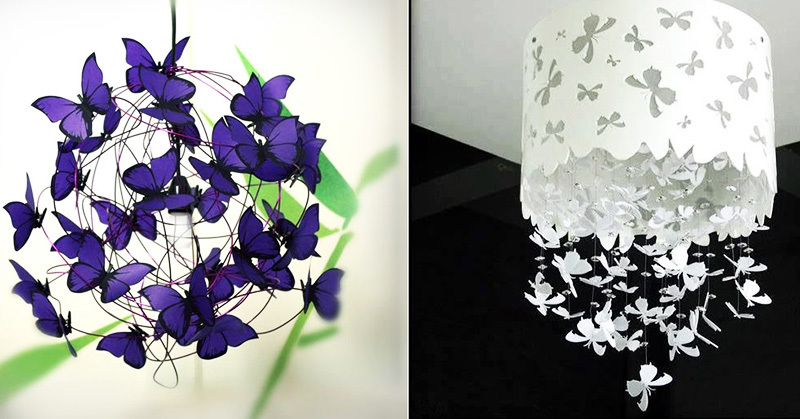
PHOTO: kallibry.ru
Additional functions
Chandeliers can be used not only as lighting fixtures. Their functionality can be expanded: ventilation, dust collector (Chizhevsky chandelier).
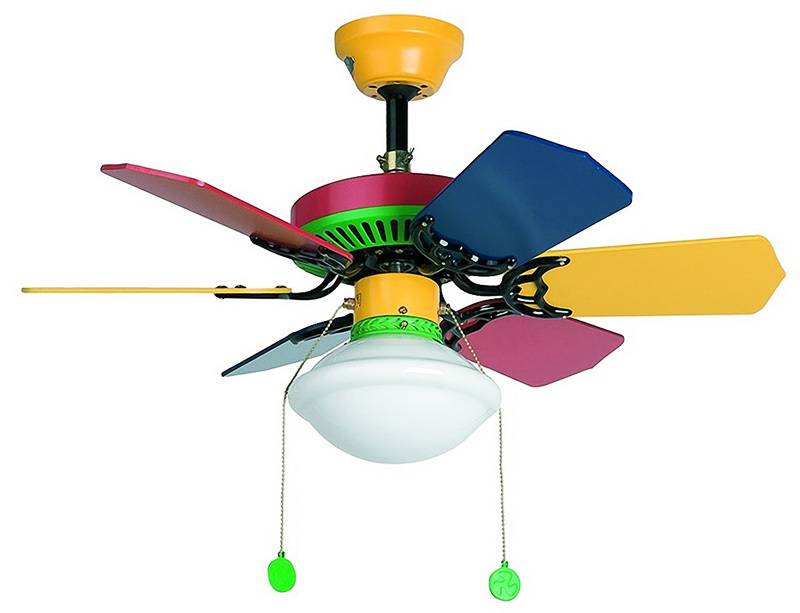
Fan chandelier - design options
It should be noted that the independent manufacture of a chandelier with a fan is not economically profitable and technically very difficult. Already at the stage of choosing components, the following problems arise:
- the motor must be very powerful and low-speed, up to 250-300 rpm;
- motors from household appliances (juicers, vacuum cleaners) are too noisy and require the use of a bulky gearbox or belt drive to reduce the speed;
- the impeller blades must be carefully balanced, otherwise the fan will be thrown from side to side during operation.
Important! The best way out is to purchase a budget chandelier with a fan and decorate it yourself to your liking.
Decorating options for chandeliers with ceiling fans:
DIY Chizhevsky chandelier
Chizhevsky's chandelier is nothing more than an air ionizer. It is manufactured as follows:
- Solder yourself according to the indicated scheme, or it is better to purchase a high-voltage DC voltage converter of negative polarity.
- Pull bare copper wires 1 mm in diameter on a metal hoop (diameter 1000 mm). The size of the cells should be 4 cm.
- In the corners of the mesh cells, needles with a length of 4-5 cm are soldered.
- 3 copper wires are attached to the rim at the same distance (120º), which are then connected to one contact.
- The contact is connected to the mains through a converter.


More details about the effect and the history of the creation of the Chizhevsky Chandelier can be seen in the video:
What chandeliers are suitable for different rooms at home
When developing the design of a chandelier, it is necessary to take into account the features of the interior and the purpose of the room where it will be used.
Living room chandeliers
Should provide enough light for uniform illumination of the entire room. At the same time, the light should not be too bright or tinted. It is necessary to provide for several lighting modes.

Chandelier in the bedroom
Compact size and laconic design. No bright colors or intense lighting. The chandelier, if possible, should be well cleaned. It is recommended to use halftones in the color scheme of the body and lampshades. Lamps should dim too bright light. It is advisable to install a remote control unit.

Chandelier for kitchen
The material of manufacture should not react to high humidity and temperature drops or be protected from them. Glass and metal are considered optimal. The chandelier should provide enough light, but it is recommended to use local light sources to illuminate the work surfaces.
Chandeliers made of kitchen utensils and dishes are quite suitable in style for the kitchen and dining room:
1 out of 4
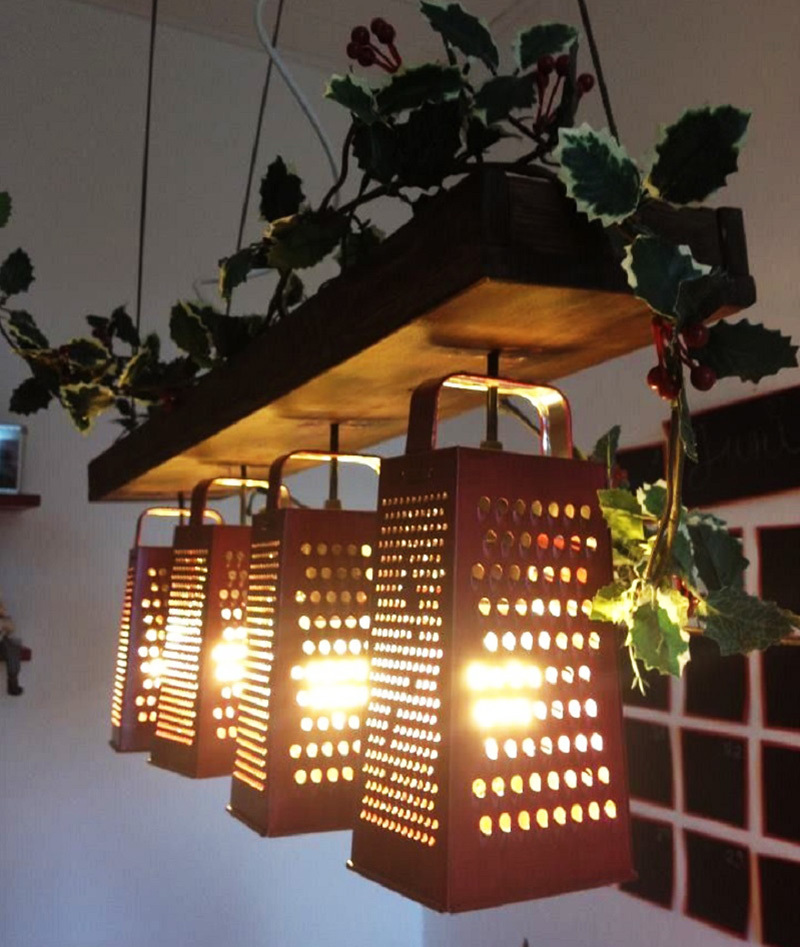
PHOTO: landshaftportal.ru
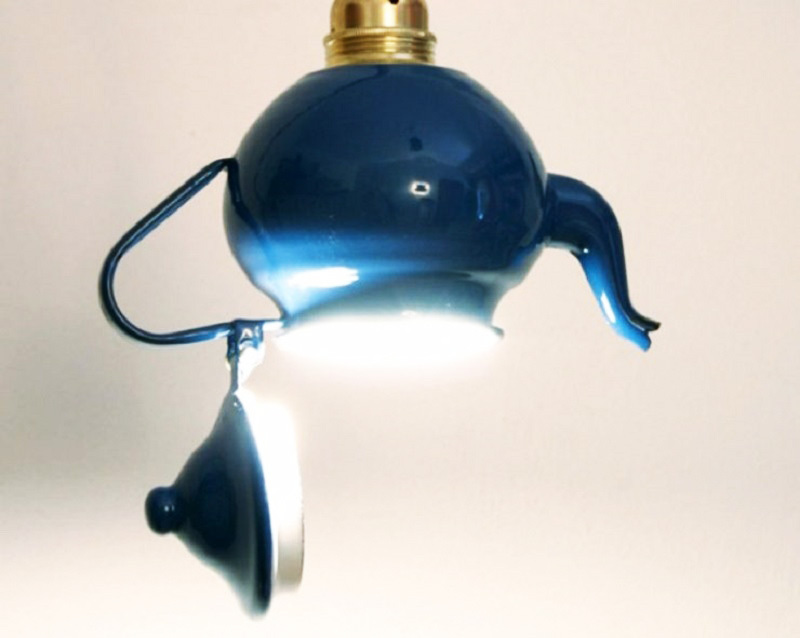
PHOTO: landshaftportal.ru
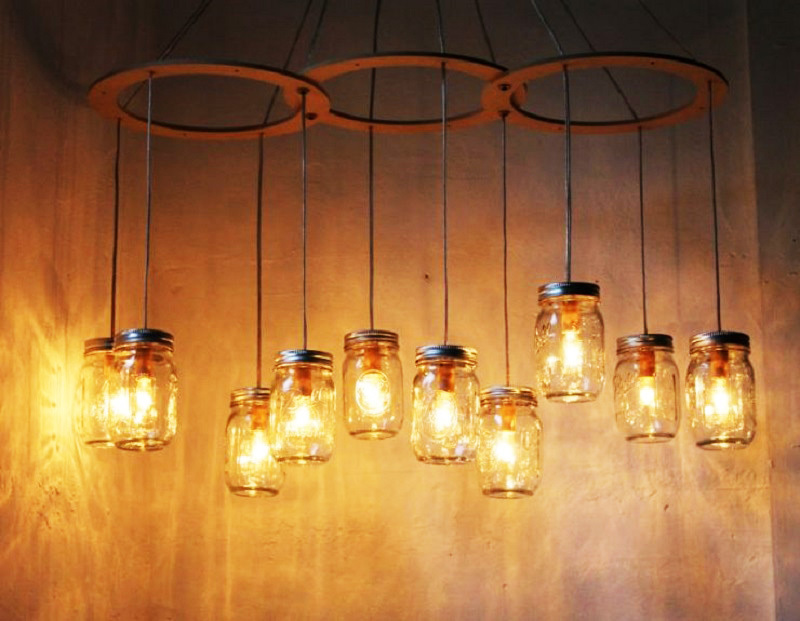
PHOTO: landshaftportal.ru
PHOTO: landshaftportal.ru
Bathroom chandelier
The bathroom is a small room, therefore, no special requirements are imposed on the strength of illumination, the choice of the material of manufacture is much more important. It should be absolutely not subject to corrosion or temperature and humidity deformation. The optimal choice is non-corrosive metal such as aluminum or bronze, glass or temperature-resistant polymers.

Chandelier in the nursery
When choosing materials and design for a chandelier in a children's room, you should focus primarily on safety and practicality. It is recommended to refrain from glass (especially crystal) and sharp elements.

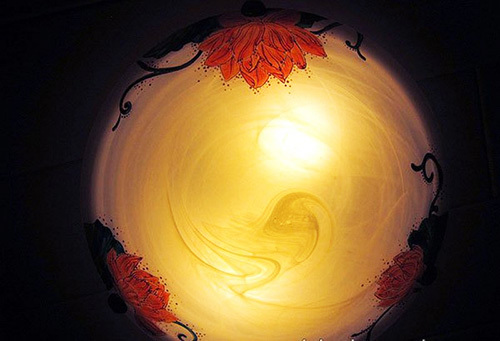
How to decorate an old chandelier
The most affordable ways to decorate purchased chandeliers are staining and decoupage.
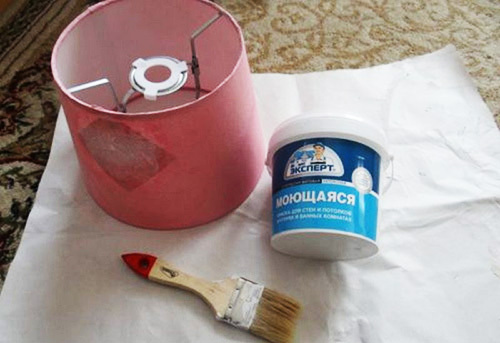
Dyeing
For coloring, you need to purchase special acrylic paints and a contour for glass and ceramics.
| Illustration | Description of action |
 | Materials for painting on glass |
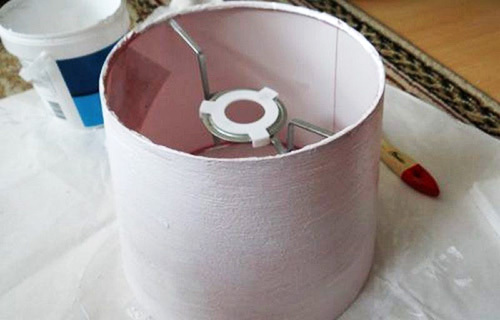
 | We thoroughly clean the surface of the plafond from dust and dirt |
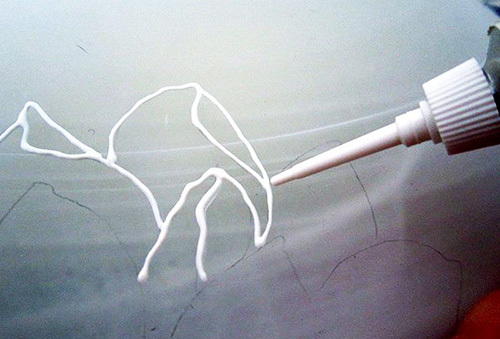 | Draw a drawing with a pencil and outline it |
 | We fill the inner space of the elements with the corresponding paint |
 | The result of the effort is worth it |
Decoupage
For decorating paper and textile lampshades and shades, it is recommended to use special three-layer napkins for decoupage.
| Illustration | Description of action |
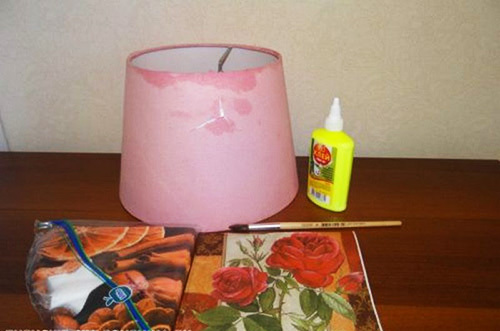 | An old worn-out lampshade from a table lamp is used as the basis. |
 | Using a special glue for decoupage or diluted PVA glue, several layers of napkins are applied to the lampshade |
 | The base is allowed to dry for a day. |
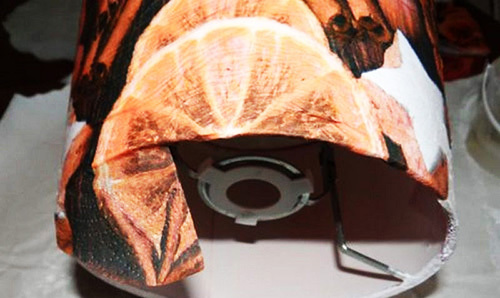 | The surface of the plafond is pasted over with special napkins for decoupage |
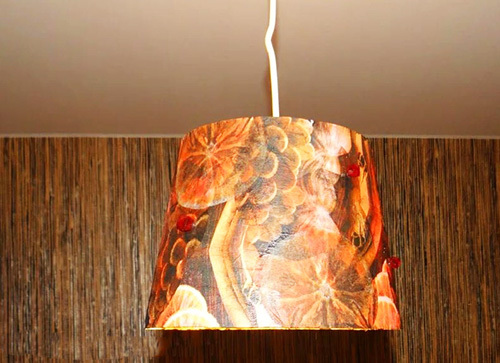 | The finished product can be used as a plafond for a ceiling chandelier |
How to hang and connect a homemade chandelier
There are several options for installing a chandelier, which depend on its weight:
- products weighing up to 10 kg are hung on an ordinary screw hook with a plastic dowel;
- chandeliers weighing more than 10 kg are hung on a metal anchor hook.
In both cases, the fastening process consists in drilling a hole of the appropriate diameter for the dowel, and then screwing in the hook.

There are several schemes for connecting electrical appliances. The simplest is a two-wire circuit that does not need any explanation. But there are more complex options:
- Connection of several groups of luminaires (two-button switch).
- Three-wire connection with grounding (one-button switch with grounding).

Summing up
With a little imagination, patience and diligence, you can create a ceiling chandelier that is not inferior in its lighting characteristics of factory models, and even much superior in decorative parameters standardized products.
If you liked the article, take part in its discussion and recommend it to your friends.