
Build a house or collect DIY furniturebut not sure how to make wood trim? In today's review, the House Chief editors will talk about five methods of wood processing, including using improvised means.
Read in the article
- 1 Wax paste for wood protection
- 2 Bleaching wood
- 3 Rusty stain for an aged wood effect
- 4 Oil treatment of wood
- 5 Secrets of painting wooden furniture
- 6 Finally
Wax paste for wood protection
Use a wax paste to protect the wood and improve the appearance of the finished product. This is an ideal coating option for an item that serves as a decorative function and will not be used often. This coating is suitable for wooden photo frames, vases and boxes.

Wax paste consists of several main components:
- diluent - after adding it, the paste takes on a consistency that is convenient for applying to wood;
- soft wax - a tool that facilitates the process of wood polishing;
- hard wax - covers wood, forming a beautiful shiny finish.
If you decide to wax wood, open the windows in the room beforehand, and wear gloves and a mask. Apply a thin layer of the paste - one tablespoon is enough to completely cover the countertop.
Try to choose a paste that matches the color, so you can not only give the wooden surface a beautiful shine, but also cover up small cracks that appeared during the operation of furniture.
Bleaching wood
In order to even out the color of the wood or change the original, you can apply a coating that will imitate the shade of valuable wood species. Another name for the wood bleaching procedure is wood bleaching.

You can purchase a ready-made lightening compound in the store or make one yourself.
To lighten wood, you can use three composition options:
- Hydrogen peroxide 20% - Apply the solution to the wood and complete the surface treatment.
- A mixture of hydrogen peroxide 20% (100 g) and water glass (10 g).
- A mixture of hydrogen peroxide 20% (100 g) and ammonia water (10 g).
Wear protective equipment, including gloves, during work.
Rusty stain for an aged wood effect
Rusty stain gives the wood an old look and is used to decorate furniture and various wood products. Peculiarity rusty stain in that it gives good pigmentation and does not fade even in the sun.

For work you will need:
- white vinegar, undiluted. For warmer wood tones, you can use wine or apple cider vinegar;
- metal wool;
- coins - about 30-40 pieces;
- rusty nails or metal.
To make a rusty stain, follow the instructions:
- Place coins and nails in separate containers. Pour vinegar into each container so that the liquid covers the material.
- Leave the nails and cotton wool in the vinegar for 24 hours.
- After a day, take a regular paint brush and start painting over the wood with the rusty stain you have prepared.
- After you've applied the mixture to the wood, wait 10 minutes. During this time, the first reaction of the dye with the tree will go.
- Leave the painted board to dry overnight - during this time, the color will diminish, the stain will be completely absorbed, and the board will take on its final shade.
If you want to give the wood a beautiful shade and still save money, find old rusty nails in the scrap yard, or buy a sheet of iron wool and prepare the stain yourself.
Related article:
Wood stain: the purpose of the composition and its main varieties, advantages and disadvantages, color solutions, leading manufacturers, features of application using various tools, recommendations for choosing a suitable composition and eliminating the resulting defects.
Oil treatment of wood
When making furniture or other wood products, you can use oil for processing - with its help, you can significantly extend the life of any wood product.

Impregnation of wood with linseed or treated oil is often much more effective than treatment varnish. This is due to the fact that the varnish very often cracks, and water gets into the cracks that appear. Wood products covered with oil acquire a special bright shine, which is retained even after prolonged use. In addition, when using oil, you can treat wood with various antiseptics, and the integrity of the coating will not be compromised.
There are several ways to apply the oil, but one of the best options is to impregnate the wood with linseed or transformer oil.
Using sandpaper, rub the oil into the surface of the wood. Do it with light but firm movements. You can use a cloth napkin instead of sandpaper.
The peculiarity of this procedure is that you need to apply oil 3-4 times in a row, leaving intervals for the surface to dry completely. In general, processing may take you two days.
Despite the fact that it is a long time, when the work is finished, you will get a great effect - a smooth, even, shiny wood.
Do not use sunflower oil for processing, it contains few polyunsaturated acids and will not bring much benefit to a wooden surface.
Related article:
Wood varnish: how to choose a composition with the desired properties, the main types depending on the base, advantages and disadvantages, popular manufacturers and compositions, application features - in our publication.

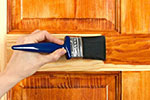
Secrets of painting wooden furniture
The first thing to look out for before painting wood is surface preparation. When paint is applied to the wood, all defects become visible, including even small notches and cracks. Try to prepare the wood in advance, sand the board with an abrasive, and apply a primer to fill in small scratches. After grinding finished, go over the edges of the board with sandpaper. Before applying paint, additionally treat the surface - wipe the board with a swab dipped in a mixture of linseed oil and white spirit.

The second important rule is that you need to choose the right primer for pretreating wood. It is best to use a shellac-based primer - it perfectly binds all cracks. After you have applied the primer, highlight the side of the tree, so you can notice all the irregularities and process again. When the preliminary preparation is completed, you can start the main stage - painting.
Nuances that are important to consider when painting wood with a brush:
- Draw paint on your brush and start applying paint a few centimeters from the edge of the board, but not from the edge. This is important in order to prevent the formation of smudges and unevenness. Place the brush in the center of the board and move slowly towards the edge.
- If puddles and smudges do appear, squeeze out the brush well, and then remove excess paint, proceed very carefully.
- Try to apply paint in even long strokes. After applying the first coat, immediately apply the second to smooth and evenly distribute the paint.
- Work best on a horizontal surface. If possible, lay the board sideways so you can paint evenly.
- It is best to apply two even thin coats of paint rather than one thick coat. If you notice that the paint is wrinkling, increase the pressure of the brush and decrease the amount of paint on it.
By following these simple tips, you can paint wood furniture just as well as a craftsman in a professional workshop. Find a good quality paint that will lie flat on the board and will not leave streaks or streaks.
Finally
By following a few simple rules, you can finish your board beautifully and apply an even finish. Be sure to follow safety precautions and work with gloves, many materials used for wood finishing are very harmful to the skin of the hands. After you paint the countertop, cabinet doors or bedside table, be sure to leave the furniture for 24 hours to dry, and after this time you will be able to evaluate the result.
What wood finishing methods do you know? Have you ever tried to make your own wood stain?


