Decorating the exterior slopes - the last and necessary moment in the installation procedure Plastic windows. At the final stage must hide rough surface of the walls, mounting, assembly foam. Do not be put off "for later" this important moment. Facing the slopes outside the window and gives entrance group visual appeal and completeness. She disguises unsightly foam strips and cracks formed during the installation, and more importantly - helps to protect the structure from the side of the street from destruction. Retains its original properties, it ensures durability.
Content
- Function and the need to trim the outer slopes
-
Materials for the slopes
- Plaster
- Plastic
- Siding
- gypsum plasterboard
- Sandwich panels
- Styrofoam
- metal slopes
- Slopes of natural stone
- The need for insulation - what and how to insulate
-
Self finishing slopes plaster
- Materials and tools
- Selection and Preparation of a mixture of plaster
- A step by step process of plastering
- Master class finishing slopes polystyrene
-
Features finishing slopes plasterboard or sandwich panels
- Steps for mounting sandwich panels
- Installation of gypsum boards
- The problems associated with irregular finish slopes
- conclusion
Function and the need to trim the outer slopes
Apart from the purely decorative component, external slopes perform the following tasks:
- provide additional insulation of walls and windows;
- protect the foam layer from exposure to sunlight, moisture and temperature fluctuations. Moisture-laden foam during freezing destroyed and loses its thermal insulation and sound insulation properties;
- to prevent occurrence of condensation and the formation of mold frames;
- provide additional protection against external noise.
Do not delay the execution of these works for the long term. During this time, irreversible changes may occur in the structure, which would entail the need to repair and even replacement windows.

Materials for the slopes
For exterior slopes on the windows using a variety of materials. The most popular lining:
- plaster;
- plastic;
- polystyrene;
- metal;
- vinyl siding;
- plasterboard;
- natural stone;
- sandwich panels.


Each of these options has certain advantages and disadvantages. Therefore, before taking a final decision, you should be familiar with their characteristics.
Plaster
Plastering - the most economical way to finishing slopes. For outdoor applications are recommended special preparations for facades with thermal insulation additives. The material is applied to the prepared surface in several layers, each of which is necessary to dry thoroughly. The solution should completely cover the foam core and reach the frame. When this thickness can not exceed 2cm. Therefore, this material is suitable for relatively flat slopes. The resulting coating is carefully polishes and painted.
The advantages of this type of finish are:
- fire resistance and strength of the material;
- low cost of plaster mixtures and the necessary tools;
- possibility of independent work performance.
Minuses:
- the process takes a long time - 3-4 days;
- cover is quickly spoiled, the formation of cracks;
- This type of finish has low thermal insulation properties;
- the execution of works related to the formation of a large amount of dust and dirt.


Plastic
Using a plastic sheet allows you to make finishing work quickly and accurately. The panels have an aesthetic appearance, are durable and practical. They do not require additional finishing, as perfectly with the frame material and form in tandem harmonious and complete solution.
Advantages of PVC slopes:
- long service life;
- extensive color palette;
- low thermal conductivity;
- no condensation occurs;
- resistance to moisture and mildew.
Weaknesses plastic:
- the need to replace in case of damage - can not be restored;
- low noise and thermal insulation properties.

Siding
For facing the outer slope is perfect vinyl siding. It is presented in the form of hollow plastic panels, which are attached to each other by means of special locking systems. Material allows to quickly create aesthetic coating having a certain level of thermal insulation and soundproofing. Lamella does not require additional finishing and complex care. As an additional insulation space between the siding and the wall is recommended to fill mineral wool or foam, and decorative joints execute corners.
Advantages of vinyl siding:
- can be mounted with their hands;
- slopes are easily cleaned from dirt and dust;
- on plastics do not appear fungal education;
- many options of color solutions;
- will last for a long time with careful treatment.
Disadvantages:
- you can change the color with intensive ultraviolet radiation;
- lack of resistance to shock.

gypsum plasterboard
Another inexpensive option - finishing drywall. Typically, this material is used for internal work, due to insufficient moisture resistance. But it is quite suitable for blouses and outer slopes in the event that overlook the glazed loggia, a balcony or terrace. For this purpose, suitable moisture-resistant drywall. It allows you to quickly create a perfectly flat surface, which facilitates the process of applying plaster.
Before installing the panels should be carefully handle the surface of the antibacterial composition.
The advantages of plasterboard finish
- Affordable price of the material.
- Easy installation.
- Light weight, making it easier to carry out works.
- Good ability to insulation.
See also:Panoramic windows in a private house
Disadvantages:
- Shallow strength - not even a very strong shock can lead to the formation of gouges, nicks and chips.
- Low humidity.

Sandwich panels
For facing slopes used three-layer plastic panel, 10 mm thick with a "filling" of expanded or extruded polystyrene. They have a low thermal conductivity and do not require additional finishing. The plastic that is used as the outer layers, similar in color and appearance to the window profile. An assigned panel must be protected from moisture plastic area. This will not only preserve the integrity of the material and does not allow him to exfoliate, but will give a finished design and aesthetic appearance.
Advantages of sandwich panels
- Long life - around 25 years.
- Easy maintenance.
- Quick and easy installation - for 1 day.
- Light weight.
- High moisture resistance.
- Resistance to UV and high temperatures.
- Good soundproofing ability.
- High thermal insulation characteristics - additional insulation, such as mineral wool, as is the case with ordinary plastic panels are not required.
- A wide range of different colors and surfaces with an imitation of natural wood or stone.

Minuses:
- with prolonged exposure to high temperatures can change the color of the product.
- difficulties in transportation due to the impressive size of the panel.
Styrofoam
Slopes covered with foam, will save the heat in the house and protect against external noise. And not necessarily to reinforce the plate, cover them with several layers of plaster and painted. To buyers features offered modern material with a waterproof coating of the marble chips and the acrylic binder component. This layer has sufficient strength and flexibility simultaneously. The coating does not crack or crumble. Material is discharged as finished termootkosov - angular elements 2 cm thick. Corners can be used for insulation in conjunction with or separately thermopanels. You can choose to bend the slab to form angles with the help of special devices for cutting polystyrene.
Styrofoam slopes to protect against:
- street noise and cold;
- dampness and mold;
- the need for frequent repairs - termootkosy have smooth rounded corners, which will not chipped.

The undoubted advantage of the material is its ease of installation, simplicity of calculations number of components necessary for trim window originality appearance of the composition.
Termougly with the addition of a flexible clinker perfectly suited for the design of window and door openings private brick house.
metal slopes
The choice of metal as a finishing material for the outer window slopes - reliable, aesthetically pleasing, durable solution. This durable coating which is not afraid of no moisture, no abrupt temperature changes. Iron is an excellent protection against cold and noise, and thanks to a special anti-corrosion coating will serve for many years. The variety offered shades will pick up a harmonious setting for any window that will successfully fit into the facade of any color.
Advantages of metal slopes:
- Have unsurpassed resistance to precipitation.
- Serve as a reliable protection from mechanical damage to the walls.
- Characterized by solidity and aesthetic appeal.
- Quick and easy to install and do not require complex care.


The disadvantages of such structures only their relatively high cost can be attributed. But during the operation will not have to regularly invest in their repair.
Slopes of natural stone
Finishing natural stone - it is immaculate, stylish and exquisite appearance of slopes, unsurpassed durability and guaranteed durability. The variety of materials offered - coquina, sandstone, limestone, dolomite, natural stone provides ample opportunities for a variety of design ideas. Stone for many years retains its original immaculate appearance. It is very easy to maintain and does not require additional investments.
Stone products are not afraid:
- abrupt temperature changes;
- exposure towards the sun's rays;
- interaction with aggressive chemical compositions;
- mechanical effects.


Minus this type of trim is only in its high cost. But if you count the amount of time that will last stone coating, its acquisition will seem more than a practical and cost-effective step.
The need for insulation - what and how to insulate
Winterizing slopes contributes to the conservation of heat in the room and prevents increase humidity indoors. Consider options for insulation, which is appropriate to apply in this case:
- mineral wool - is different moisture resistance, thermal insulation of windows and provides reliable protection against the penetration of external noise. Insulation should be recorded on a special mesh that adheres to the wall;
- foam - has good thermal and sound insulation properties, easy to install. You can buy ready-made slopes from foam. Mounted on metal profiles;
- EPS - aerated water resistant material having high thermal insulation properties;
- sandwich panels - option for finishing, endowed with heat-insulating properties - the middle layer is made of extruded polystyrene.
See also:A wide window sill in the interior: creating comfort


Self finishing slopes plaster
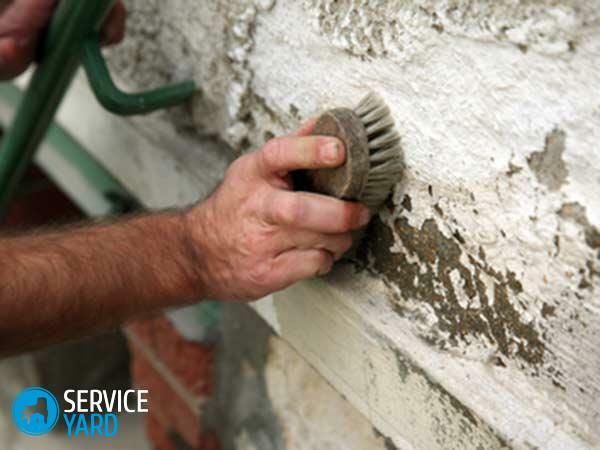
Grout outer slopes follows immediately after curing foam. It is necessary to completely eliminate the possibility of impact on the integrity of its environmental factors.
Materials and tools
Speed and efficiency depends not only on the ability to master, but also on the availability of all necessary materials and tools. So prepare them in advance so that they were all at hand.

You will need:
- Food container for the plaster mixture;
- building a mixer or a drill with a special nozzle for mixing the components;
- Kit spatulas of different widths. It needs also corner embodiment;
- Master OK;
- building level;
- square;
- wide brush with soft bristles;
- Grater for plaster;
- mortar for facade work;
- putty for exterior use;
- decorative plaster;
- fiberglass reinforcing mesh;
- primer solution.
Selection and Preparation of a mixture of plaster
B may be a conventional sand-cement mixture as a base material for the plaster. However, such a composition does not differ durability and has no "insulate" properties. Therefore, for such a special facade plaster work better experience, it is desirable - "warm". The composition of these materials in addition to the cement and gypsum are added reinforcing components, loose insulation from natural origin and plasticizers.

Such mixtures have good waterproofing and sound insulation characteristics. Finished compositions are distinguished by good adhesion. Due to the homogeneity and consistency of fine excellent solution adheres to the surface. Of course, such a mixture of more concrete solution, but to design the slopes it is necessary not so much.
If the composition of the material present plaster, careful observance of solution preparation instructions - required condition for the preservation of the material characteristics. In addition, the plaster hardens quickly, so better to knead the mixture in small portions.
A step by step process of plastering
- Clear the slopes of the old plaster. It is advisable to completely get rid of the remnants of the coating in which cracks may appear later.
- If the cleaned surface will be too smooth, it is necessary to improve its adhesion characteristics by means of incisions.
- To remove surface dust.
- Apply first - starting layer of plaster, and align its rule. On the upper slope it is recommended to apply several thin layers.
- Forming a beautiful corner of the corner spatula.
- Glue the reinforcing mesh.
- Align putty surface and causes the primer.
- Apply the topcoat material and colored. You can use decorative plaster.

Master class finishing slopes polystyrene
Finishing slopes polystyrene allows you to simultaneously align and insulate the openings. For this purpose, the plate of 15-20 mm. When working with this material it is necessary that the surface was smooth as possible, polystyrene is different ductility, but on the contrary, has a high hardness and friability. Therefore, significant swells it may crack or even break. Plus this method of decoration - for his performance does not necessarily have a deep knowledge of the construction and installation can be made with your own hands.
To carry out the work will need:
- a knife for cutting polystyrene plates;
- a mixer for preparing tile adhesives;
- a set of different-sized spatulas;
- building square, ruler;
- level;
- 15-20 mm thick foam;
- tile adhesive that is suitable for outdoor use;
- plaster mesh;
- Perforated metal corners.


finishing stages:
- Properly prepare the surface - cleaned from dust and residues of cement mortar, plastered existing cracks and crevices putty or cement.
- I cut out the details of future slopes of the foam and connect them together with glue.
- Apply glue to the surface and fix the parts produced. You should not save the glue, since voids may be formed between the slopes and polystyrene. It is better to remove the excess with a cloth composition. In the process of bonding check the correctness of the installation via level. After drying, the adhesive material can be additionally fixed by means of anchors. Drill holes in advance or better after a couple of hours after bonding plates. The main thing - to prevent the foam displacement.
- Coat with adhesive surface on which is mounted a windowsill.
- The next step - starting inflict layer putty, plastered qualitatively all joints and cracks. Impose masking grid-serpyanku.
- Mount the perforated corners and causes topcoat putties.
- After drying, the surface can be painted with paint for the facade. It should be applied in several layers.

Before applying the paint paste over the glass along the contour strips of masking tape. This will protect the window from entering the paint, and you will eliminate the tedious scrubbing spray.
Features finishing slopes plasterboard or sandwich panels
finishing slopes equipment these materials is similar. The difference is that the drywall needs finishing as sandwich panels do not need it. Therefore, they are ready for use immediately after installation.
See also:Glazed verandas and terraces: the options and methods
To work needed:
- Sandwich panel or drywall sheets (water-resistant);
- L-shaped profile - a metal or plastic;
- glue;
- outer perforated angle or F-shaped profile for decorating projecting angle of slopes;
- Construction knife - for cutting panels;
- level;
- screwdriver or drill;
- line;
- building square;
- marker.

Steps for mounting sandwich panels
- The surface being cleaned. Remove dust, fragments chipped plaster solution droplets. Gruntuem surface and treat it antibacterial composition. You can use the two in one. It is necessary to wait for the complete drying of the surface.
- By the fixed frame starting profiles, in which plastic or gypsum panels will be installed later. Installation of the profile is carried out around the perimeter of the window with the help of screws. Clamps are installed in steps - 20-25 cm. Depending on the material chosen required section width.
- Along the outer slope angle mounted wooden rake. Its width is 10-12 cm, thickness - 1 -1.2 cm. This rack serves as a leveling lath, to which is attached an external profile. It hides and the distance between the wall and the finishing material, and also hide the unsightly edge of the panel. The profile consists of two elements. One of them is mounted on a wooden rail, and the second - on the face plate. They are connected by a locking system - tongue and groove. In the case of plasterboard to specify normal area.
- Mount insulation - mineral wool is fixed to the adhesive so that its thickness is varied. Closer to the frame have a thicker material, but along the outer edge - thin. If used as insulation foam, we put it directly on the panel before installing.
It is important to not "overdo it" with the number of foam - it can be too much and then it will inflate. And if she gets on the outside, it will be difficult to remove.
- At the upper end of the side portions using a sealant fix the internal angular profile. It serves to connect the horizontal and vertical panels.
- Set the side plates.
- On the upper horizontal panel plot the foam layer, insert it into the grooves of the corner profiles and good presses.
- We make the upper end plate via F-profile or decorative corner.

Installation of gypsum boards
Sheathing slopes plates GCR is even easier, as there are several options for mounting:
- crate on - at a sufficient slope width;
- a special profile;
- directly to the wall - if the latter has a relatively flat surface.
When installing the screws are screwed right through the plate. Their hats need not be in disguise, as the material in any case require finishing. Layers of paint and putty reliably hide the joints and fasteners. If you plan to do a "warm" slopes, rock wool is laid on the same principle as in the previous version. The foam may be wound through the hole drilled after installation of the panels. Plasterboard needs reinforcement, so at the stage of spackling he strengthened masking grid.

The problems associated with irregular finish slopes
The main rules that will avoid problems in the operation of plastic windows and doors - timely finish exterior slopes. It is unacceptable to leave permanently open seams. Under the influence of moisture and UV foam crumbles, collapses, and as a result - losing insulating properties.
There are a number of errors during the installation, which can lead to undesirable consequences.
The most common mistakes:
- excessive removal of foam from the seam;
- too rigid fixation of the panels to the profile;
- use for facing of the opening of unsuitable materials.

What consequences can lead to the above shortcomings?
Errors can cause the destruction of foam shedding walls and as a consequence - the penetration of moisture and the formation of mold in spite of the regular airing. Some problems may occur within a few days, and on the other you will find only a few months later. Determine the exact cause of their occurrence, without violating the integrity of the slopes, it is impossible. But some signs that the finish of the opening mistakes can be identified by the formation of:
- condensate;
- ice in the winter;
- whistling and howling wind.
conclusion
To maintain a comfortable microclimate in the house need modern windows. And the first thing to do after installation - to properly arrange the outer slopes.