- What are slopes for?
- An alternative to plastic - is it?
- Types of window slopes made of plastic
- How to sew plastic slopes?
- Slopes RTD - innovative solution
- How to properly care for plastic slopes?
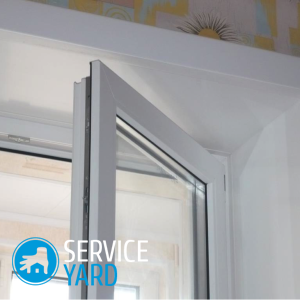
An important moment when installing a plastic window is the design of the window opening. Materials for the slopes choose the same as for the window itself, or make the design in a different way. However, plastic slopes, which well hide all the shortcomings of the window opening and mounting foam, are an excellent option. If they are installed correctly and correctly, the window, and the whole room, immediately acquires a complete look.
to the contents ↑What are slopes for?
There are several reasons why it is very desirable to install slopes, regardless of the configuration, size and material of the window. The main ones are:
- We can assume that the window is installed correctly, if all the sealing rules are observed, cold bridges are eliminated.
- In addition, the slopes, executed by all rules, look beautiful.
- They partially take on the heat insulation load - while the installation seams do not get fogged up.
Important! If negligence is allowed during installation, dampness destroys building materials, the window opening looks unattractive.
to the contents ↑An alternative to plastic - is it available?
Finishing of the side surfaces of the window opening with plaster does not provide a full seal. Sound insulation also leaves much to be desired. Over time, under the influence of external factors, plaster and putty fail, so you have to start all over again.
A slightly better option is the use of plasterboard structures. However, even moisture resistant versions of drywall are not able to withstand external influences( in particular, the constant presence of condensate).In addition, drywall for greater strength should be puttyed and topcoated with paint.
Plastic, in addition to external appeal, has a number of other advantages:
- Externally, plastic is combined with the color and texture of the window frames. Due to this, the window looks like a solid and monolithic construction.
- Slopes on plastic windows are easy to insulate, if you provide heat and vapor barrier. If the insulation is done correctly, the condensate will not annoy the owners.
- A pleasant bonus is also reliable soundproofing. This is especially true for people who live near busy streets.
- Arrangement of slopes from PVC does not require a large number of building materials.
- In the process of work there is no strong noise, there is a minimum of debris.
- Plastic slopes can be fitted both indoors and outdoors.
- Immunity of plastic to increased humidity.
- Long service life without changing the performance.
- Resistance to temperature changes, small values of temperature expansion.
- Ease of care. Plastic slopes can be washed using a variety of household chemicals.
Important! The shortcomings of plastic slopes include the inability to partially repair them. If the plastic is damaged, you will have to replace the entire structure. This disadvantage is partially offset by the fact that modern plastic has good strength properties. To damage it is not so easy.
to the contents ↑Types of window slopes made of plastic
In the modern market, there are plastic slopes of two types.
- Wall products.
- Sandwich panels.
According to experts, the option with sandwich panels is more preferable. Sandwich panels are a structure of 2-3 plastic sheets, between which are stiffeners and a thermal insulation material. Compared to wall panels, the "sandwich" is much better tolerated by low temperatures.
Of course, even in this case, do not interfere with the layer of insulation or a thorough blowing installation foam. Foam provides additional grip of the slope with the surface of the window opening.
Important! Another question, which one to choose the slopes for plastic windows - from a matte or glossy material:
- The gloss looks good, but it gets dirty faster, it clearly shows fingerprints.
- Families with children are more suitable matte option. Slopes will have less frequent washing.
How to sew plastic slopes?
As a rule, slopes on plastic windows begin to be processed the next day after the installation of double-glazed windows. The work is not particularly complicated, so with minimal building skills you can do it yourself.
Important! The plastic does not separate and does not need additional staining. If you want to change the appearance of the slopes over time, then you can use a self-adhesive film. You can choose any picture or imitation of different materials, wood, ornamental stone, ceramics, etc. It does not matter - you decided to replace the old slopes with new ones or for the first time do their installation, you must adhere to one standard algorithm of the main stages of work.
What tools will you need?
For the arrangement of slopes of PVC plastic you will need such tools:
- A good construction knife.
- Ruler, measuring tape and square for measuring work( preparation and adjustment of panels for installation).
- Building syringe for sealant or gun for the use of building foam.
- Wide brush for surface priming.
- Scissors for metal using profiles and corners of metal.
- Construction level for monitoring horizontal and vertical surface removal.
Important! According to many builders, a preliminary priming of the surface is necessary to strengthen it. In any case, the side and ceiling parts of the window opening must be cleaned of debris and degreased.
Required material set:
- Plastic panels.
Important! Given that the lower part of the window opening will be closed with a window sill, it is necessary to measure the side and ceiling part of the opening. To buy material is necessary with a margin of 10-15%.
- Starting rack made of plastic with a U-shaped section.
- F-shaped rail.
- Profile for the inner corner, which is installed in the joints of the panels.
- Material for thermal insulation( mineral wool or expanded polystyrene).
Important! If you use sandwich panels, slopes do not need additional thermal insulation.
- Self-tapping screws.
- Silicone white for gaps between panels.
- Sheath made of wood or plywood with a thickness of 10-12 cm.
- Mounting foam( it is advisable to purchase a professional foam).
- Mounting brackets.
- Primer.
Important! If you mount slopes on plastic windows from sandwich panels, U-shaped and angled slats are not useful for you. Without F-shaped bars, you can also do by decorating the outer corner with a putty mix. Which option to use - it all depends on your personal preferences.

Surface preparation:
- First we remove the old coating. The whitewash is easily removed, if several times moisten it with warm water. If the slopes were painted with oil paint, then it is best to remove the spatula by preheating the surface with a construction hair dryer.
- Surface treatment with a primer is mandatory, as this avoids the appearance of fungus and mold. Fungus not only damages the walls, but it is also dangerous to health, so do not neglect this stage of work. Primer is applied in several layers, waiting for the previous layer to dry. Process the entire surface, down to the most difficult corners.
Important! The most laborious option is the complete removal of the plaster from the slope. This is done when a thick layer of solution does not allow the installation of even ordinary plastic panels. Remove plaster with a perforator, equipped with a special nozzle.
- Work on the preparation of materials for the installation of plastic slopes begins with the adjustment of panels to the width of the wall. For cutting plastic, it is advisable to use an electric jig saw.
Important! Panels are attached to the prepared surface with the help of PVC glue or the composition "liquid nails".If the panels are equipped with special grooves, then you will need to use rails with special angles for mounting. It remains only to install and lock the panel.
Suppressing the slopes
If the construction foam is used for the installation, the action algorithm is as follows:
- The installation begins with the ceiling part of the window opening.
- For better adhesion of surfaces, spray the ceiling part of the opening with water.
- Apply foam over the surface of the bonded part with a thin strip, as the construction foam expands very much.
- Press the material against the surface for 5-7 minutes. After this, install the supports and hold the structure until the foam is completely dry.
Important! For supports, you can use conventional planed boards.
- Side parts are mounted similarly.
- The remaining gaps between the panels are additional. After the foam dries completely, its remains are cut with a construction knife.
- At the junctions between the finishing material and the wall, trim frames are installed.
Important! The platen has a section in the form of a corner and is available in different widths. The clypeus is glued with liquid nails.
- If there are any crevices between the panels at the end of the installation, they are closed with a white silicone.
Important! You can also use wooden slats, which are pre-fixed using screws or dowels. The panel is attached to the rail by staples.
to content ↑Slopes RTD - innovative solution
This is a universal design, which is becoming more and more popular every year. The main advantage is the convenience of installation. You collect slopes like the details of a child's designer.
Important! This option is ideal for those who want to replace the windows without planning a global repair. This design is best combined with the VEKA windows.
Features
Joints between walls and slopes reliably and neatly hidden by special edging. Dimensions of them are:
- Length - 600 cm.
- Width - 60 cm.
- Thickness - 1 cm
- Rib thickness - 0.52 mm.
Advantages of the RTD design include:
- Durable and reliable manufacturing material( high quality hard PVC).
- There is no need for additional painting, varnishing and special care.
- Environmental safety. The material from which the plastic slopes are made, does not contain harmful and toxic compounds.
- Resistance to ultraviolet radiation.
- Ease of installation.
- Good compatibility with other materials for finishing slopes.
How to take care of plastic slopes?
Although plastic is much more durable than gypsum plasterboard and plaster, it needs some care:
- Plastic is unpretentious, but it is advisable to use special detergents that are suitable for frames and slopes.
- If household products are at hand, use a normal soap solution.
Important! Do not use abrasive cleaners to clean the plastic. The surface will be scratched.
- To care for glossy slopes, napkins made of microfiber are perfect.
- To avoid the accumulation of condensate on the slopes, use a mixture of glycerin and alcohol( the ratio of alcohol and glycerin 20: 1).
Now you know what plastic slopes are: what are they, what are their advantages, how to properly install them - in general, everything necessary to make your home more attractive and reliable with the help of such material.


