
- A variety of siphons
- How to choose a siphon?
- How to replace the siphon?
- Repair of the siphon
- Useful advices:
The bent pipe under the sink is called a siphon. The main purpose of this plumbing element is to prevent sewage gases from entering the room. Many believe that plumbing is an incredibly complex process and is only available to specialists. In fact, anyone can handle this job. It is only necessary to find out which siphon for the sink to choose, and how this important part of the sewage system is assembled.
to content ↑Siphon type
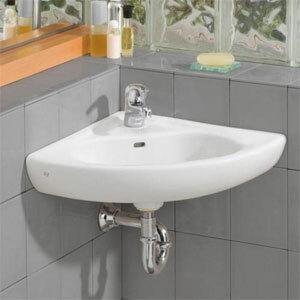
At its core, the siphon is a curved pipe under the sink, in the knee of which there is water, which performs the function of a water seal. Such plumbing elements are supplied to almost all devices connected to the sewage system. Therefore, if you plan to replace the washbasin or other sanitary ware, then the siphon is also subject to replacement.
Important! On sale there are siphons for various sanitary equipment:
- Toilet.
- Sinks.
- Shower enclosures.
- Baths .
The bent pipe located under the sink can be seen in every kitchen. The siphon performs the following functions:
- Through the knee, sewage enters the sewer system.
- The siphon prevents unpleasant smells from the sewage system.
 The siphon device for the sink differs depending on its type. The constructions are the following: bottle, corrugated or tubular.
Pipe
Such models are often used for baths, but they are also sometimes installed under the sink. Siphon is a knee-bent pipe in the form of the letter "U" or "S".Such pipes under the sink were very common in the Soviet times, when the drain was made of cast-iron pipes. This is a fairly simple model of a siphon, but it is more difficult to install than other types of pipes, because unlike corrugation, it does not stretch.
Important! Disadvantages of the model:
- Dimensions. Takes up a lot of space.
- You can clean only from large debris.
So, if you need a small siphon for the sink, then choose another model.
Siphon-corrugation
This type of pipe under the sink resembles the previous design, but the sink is soft and with pleats. Zigzag bending is fixed with a plastic clamp.
Advantages of this type:
- Mobility. Allows you to move the car wash for short distances.
- The minimum number of joints, and therefore, reduces the risk of leakage.
- Ease of installation. The corrugated pipe is well stretched and bent, so you will not have difficulty in connecting the siphon, even if you need to move the sink from its original location.
- Low price.
Important! Disadvantages of the corrugated pipe under the sink:
- A rippled surface that is quickly clogged with fat.
- To clean the corrugated siphon, its complete dismantling is required.
Bottle
The design was named because of the shape reminiscent of the bottle. This is the most common type of knee for the shell. The sanitary element has a flask that functions as a settler. The pouring pipe is located inside the bulb, thanks to this design a water seal is formed. If necessary, it can be easily untwisted and cleaned, so if you accidentally drop a ring or other object into the drain hole, it can be easily removed by opening the lid of the sump.
The advantages of this model include:
- Possibility to additionally attach a branch pipe to the siphon. This property can be used when connecting a drain hose from the washing machine.
- Possibility of cleaning the siphon without completely dismantling it.
Important! To the drawbacks of the model can be attributed a large number of connections, and hence - there is a possibility of leakage.
Other variants of pipes under the
sink. On the sale there are also combined models:
- Bottle-type siphon equipped with a corrugated pipe for sewage connection.
- Double siphon if the sink has two bowls, or siphons with a branch pipe for connection to the washing machine.
- Constructions with automatic drain and overflow opening. Such designs allow you to dial into the water wash, and then, if necessary, down it by pressing a button. Such products are used much less often.
How to choose a siphon?
There are different kinds of siphons available on the market, so you need to choose the most suitable one.
Material
First of all, determine the material for the pipe under the sink:
- Metal. Plumbing elements are made of cast iron, as well as alloys of brass and bronze. The metal version of the siphon will cost more, and mounting the siphon out of metal is much more difficult than plastic.
- Plastic. An excellent version of the siphon. Cheap and practical. In operation it is strong enough, it is not subject to corrosion, it is easy to install, and it will last a long time.
Appearance
 When choosing a siphon, decide whether the sanitary element will be located openly or "hidden" in the curb or pedestal of the sink. If the siphon is in sight - select a decorative model. It can be an element of non-ferrous metal, or a chrome plated version. If the siphon is hidden, then give preference to the simplest plastic models.
Functionality
Depending on the model of the sink and the planned use of the siphon, consider the availability of additional equipment. For example:
- if the washbasin has a hole for overflow, then the pipe under the sink must be appropriate;
- if it is necessary to connect the siphon to the siphon from the washing machine, then select the option with an additional branch pipe.
Section
Be sure to pay attention to the capacity of the model. It should be taken into account depending on the planned volume of wastewater. For example, if the indicator of the capacity of the model is low, the siphon will not cope with the incoming drains, and a flood may form in the bathroom.
Important! When buying a siphon, be sure to check its equipment, since you can not count the gaskets or instead of the necessary cone get two flat ones.
to the contents ↑How to replace the siphon?
It is much easier to install a corrugated siphon than a bottle construction, since it has much fewer details. In fact, the main element is a corrugated pipe, so the installation is reduced to connecting one end of the pipe to the sink, and the second to the sewer. Nuts and sealing washers fix the whole structure, and the bend of the pipe is fixed with a plastic clamp.
We will consider in more detail the installation instructions for plastic siphons of the bottle type.
Preparation of
If you need to dismantle the old siphon, proceed as follows:
- Turn off the water supply.
- Place a bucket under the old siphon. It will collect dirty water, draining from the pipe.
- Unscrew and remove the sump-sump of the sanitary element.
- Disassemble the connection from the sink drain.
- Remove all gaskets.
- Disconnect the pipe from the sewer.
Checking the
kit Before you begin installing the plastic-type siphon, check that it is complete. The design should include:
- Outlet nozzle. The part is made of plastic and pressed into it by a metal threaded part.
- Siphon housing.
- Plastic nuts.
- Tightening screw used to fix the decorative grille.
Important! The most practical model is the one in which the clamping screw is made of stainless steel.
- Decorative steel cover for drain hole.
- Gaskets:
- Rubber gasket thickness of 3-5 mm, worn on the outlet pipe.
- Rubber cuff in the form of a cone. Used when connecting the outlet pipe to the housing.
- Rubber decorative white gasket. Installed on the drain hole on the front side.
- Rubber ring gasket, which is put on the bottom branch pipe of the siphon.
Important! Other elements may also be included in the kit, for example, a plug for closing the drain hole of the sink and the like.
Installation of the
siphon Mounting must be carried out in accordance with the manufacturer's instructions. Each model is accompanied by an assembly instruction with a detailed diagram.
 The general outline of how the pipe under the sink is installed looks like this:
- Check the grate fit on the sink drain hole. If the grid is too high, the water will not go to the end, which means that there will be pools around the drain hole. Normally installed grating should be somewhat "recessed".
- In the outlet pipe, install a thick rubber cuff( pre-lubricate it with a sealant).
- Check the thread surface on the parts. If you notice burrs or bumps, then remove the defects with a sharp knife.
- In the sink, install the grille together with the white gasket.
- Fit the outlet from the back of the sink. Tighten the docking screw.
- Insert the gasket into the groove of the sump body.
- Screw the bottom of the glass to the top.
- On the outlet pipe, first put on the shrink nut from the plastic, and then the conical gasket( between the gasket and the edge of the branch pipe, the distance should be 3-5 mm).
- Insert the nozzle into the siphon flask and tighten the nut( tighten the nut by hand, as with a key you can easily pull it down, and this will damage the siphon).
Important! The nozzle must not be inserted as far as it will go into the wall. Otherwise, the water simply has nowhere to go.
- If the siphon housing has a connection for connecting the drain from the washing machine, then install a stub on it, since it will not be used until now.
- Attach a rigid or corrugated discharge pipe to the siphon housing.
- Connect the exhaust pipe to the sump funnel.
Important! If the diameter of the parts does not match during installation, then use the adapter cuffs made of rubber.
- Check the build quality: turn the water on full power. If the connection is made qualitatively, no drops will be seen on the floor.
Repairing the siphon
If you notice that the pipe is flowing under the sink, and the replacement of the siphon is not expected, then try to repair the old model yourself. Typically, a leak occurs at the junction( if there is no mechanical damage to the pipes).
In bottle-type models, leakage may occur at the location of the settler connection. To solve the problem:
- Disconnect the parts at the location of the defect.
- Remove the gasket.
- Wipe all parts dry.
- Apply a coat of sealant.
- Place the gasket in its original position.
- Apply the sealant again.
- Apply sealant and thread.
- Screw the connections.
- Turn on the water and check the work quality.
Important! If the siphon is leaking, replace the gasket with a new one if possible. In case of serious damage, replace the siphon.
to the contents ↑Useful advices:
- When sealing the sanitary equipment, also "wind up" the thread, especially when there is a loose fit. Use a patch or silicone special tape - wind them on the thread to improve the tightness. Nut, in this case, should go tight.
- During the operation, take care of the siphon regularly. If you need to pour dirty water into the sink, be sure to install a strainer on the drain hole, which will prevent large particles from entering the siphon.
- The sink must be used constantly to ensure that there is always water in the siphon. If you plan to leave for a long time, pour oil or glycerine into the sink so that the water in the siphon does not evaporate.
We hope that our advice and recommendations will help you choose the right pipe model under the sink, properly install it and ensure proper care. As a result, such a necessary sanitary element will last you a long time and will not require replacement.


