Contents:
- Secrets of perfect ironing
- Temperature mode - the main nuance of
- The whole thing in the technique of
- How to iron the collar of a shirt?
- Let's move on to the rest of the
. Young guys and grown-up men, dressed in costumes, often do not know how to iron a shirt. This, of course, is not a catastrophe, although many, so that they are not considered to be inept, are justified by the fact that this is not a masculine affair or phrases such as "under the jacket will not be visible."
But still a representative of the stronger sex should not only perform male work, but also be able to sew a button or pat yourself things, if necessary. In addition, a crumpled shirt is clearly visible under the jacket, especially the collar. So do not fool yourself with illusions.
But if husbands cope with this matter, then the wives simply have to know how to iron the shirt properly. And not only know in theory, but in practice do it without a single fold. After all, every woman is important that the "second half" looked well-groomed and neat.
Approximately knowing the procedure for ironing, it's hard to learn how to do it perfectly, here you need training. Gain experience, but to begin with, once again read all the secrets and subtleties of how to properly iron men's shirts.

Secrets of an ideal ironing
- Drying men's shirts is necessary on the shoulders, and ironing is still a bit damp. In this case, the ironing process will be easy and pleasant. But if the fabric is still dry, before ironing, it is necessary to moisten it well using a spray gun. To moisten it was even, the shirt can be wrapped in a towel and placed in a plastic bag.
- It's different with silk shirts. They are better to iron dry, but through a damp cloth. Traditional gauze is not used, it can leave prints. Artificial silk does not like splashing, otherwise you will not get stains.
- Not all women will record ironing for their favorite household chores. For this process to be comfortable, the equipment must be appropriate: an ironing board and an iron with a stainless sole and a thermostat. The ability to control the temperature regime will allow you to iron things from different materials.
- The iron needs cleaning and changing water filters. And all this needs to be done regularly, and not occasionally. When steaming, it is better to fill in the usual non-standard tap water, but distilled water. With its use, salt deposits will be minimized, which means less chance of planting a stain during ironing.
- Shirts should be ironed on the front side, except for shirts of dark color and decorated with embroidery. If the shirt from a dark cloth is ironed from the front, it will shine from the bands left by the iron. There are times when you have to iron your shirt, without turning inside out, then you need to do it carefully, only gently touching the iron. To avoid tarnishing from the wrong side, shirts made of shiny fabrics are also ironed.

Temperature mode - the main nuance of
The type of fabric dictates the temperature regime. If you ignore this fact, you can burn and spoil your favorite thing.
So, cotton shirts require in the care of themselves:
- strong iron pressure;
- wet steam;
- 150-degree temperature.
If polyester is added to the cotton, then such products can withstand a slightly reduced temperature regime - 110 degrees. And a lot of steam when ironing them is not required.
The mode set for ironing linen shirts reminds of the care of a cotton cloth: strong pressure and a lot of steam, but the temperature is an order of magnitude higher: 210-230 degrees. The same is true with a mixture of flax and cotton - set the temperature from 180 to 200 degrees, and for the cause!
For viscose shirts, the temperature regime is only 120 degrees. And the use of steam is acceptable in the most minimal quantities.
It is not recommended to use steam when smoothing shirts with the effect of squeezing, and the temperature is small - 110º.

It's all about the
technique. To get a good grip on the shirt, you need to follow a certain sequence:
- collar;
- sleeves;
- cuffs;
- strap;
- shelf;
- backrest.
Tip
First iron out the small details, and only then go to larger ones, and then the result will surpass all expectations.
When ironing, the fabric may become warped or stretched. To avoid this, move the iron along the share thread, do not hold it for long in one place.

How to iron the collar of a shirt?
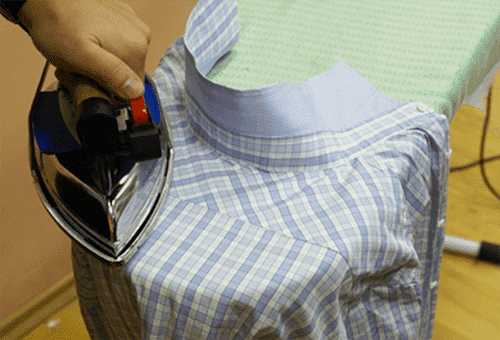
The collar is part of the shirt, which should be given a lot of attention in order to iron out and give the perfect shape. It should be ironed from the corners to the middle, and must start from the wrong side. On the front side, this is also necessary, and in an absolutely identical way.
Advice
You can not bend the collar on the rack strictly, as well as iron this fold. If the shirt is wet, the collar needs to be smoothed until it is dry.
You'll have to move around with soft collars at the buttons, there's no special equipment here, just add patience to everything mentioned above. A lot of patience!

Let's move on to the other parts of the
Long sleeves start to iron with cuffs. Just like the collar, they are first ironed from the wrong side.
A more refined technique for ironing a double cuff. To iron it out, following the sequence of actions:
- unfold the cuff;
- iron from both sides without folds;
- folded;
- give the desired width;
- to make amends on the fold.
We go to the sleeves, with them, too, have to tinker. The algorithm is simple, but time-consuming:
- fold the sleeve in half;
- to smooth the seam in the middle;
- flip over the sleeve;
- iron on the other side;
- to fold the sleeve along the seam;
- iron from seam to edge, leaving no bends.
For the convenience of ironing sleeves, a special board is invented. If you have it, then simply pull the sleeve on it and stroke it in a circle.

The front of the shirt is also an area for smoothing. There are a lot of subtleties in working with this part.
- Spread the right part of the shirt. The choice of the side depends on the fabric.
- Smooth the top and the yoke.
- Smooth the rest, remembering the gaps between the buttons.
- The right and left shelves are smoothed the same way. The left, as practice shows, is faster: it lacks buttons.
It is necessary to iron the product, gradually moving from the right seam to the left. Shirt we turn and we undertake to iron here in this order:
- lateral seam;
- along the seam of the sleeve;
- right side of the yoke;
- is the middle of the product;
- the left side of the yoke;
- along the seam of the left sleeve;
- down to the side seam.
The heap of crumpled shirts is not at all terrible, if there is enough knowledge in the question of how to iron the shirt properly. Training will help to bring this process to automatism. And the time for ironing one shirt will decrease significantly. Have enough patience to master this necessary skill.
Read an article on how to iron a jacket with an iron at home


