Contents:
- Simple node, or Four-in-hand
- Windsor
- Half-Windsor
- Pratt
- Orient or small knot
- Prince Albert( Prince Albert)
- Useful tips
- How to takeand store?
The ability to tie a tie nicely is one of the necessary skills of a man who prefers a classic style. How to tie a tie? There are more than 80 ways, which are suitable for both business and everyday image. All sorts of schemes, instructions with photos and videos allow this to learn. Even if in your everyday life you prefer a style in which this accessory is not particularly appropriate, it is not superfluous to study the photos and master at least a couple of ways.
Consider a few popular ways. And you, based on the characteristics of your image and personal preferences, will be able to choose the most optimal option and learn how to tie a tie the easiest. And this information will be useful not only to representatives of the stronger sex, but also to some ladies, for example, collecting husbands for work or simply loving this accessory.
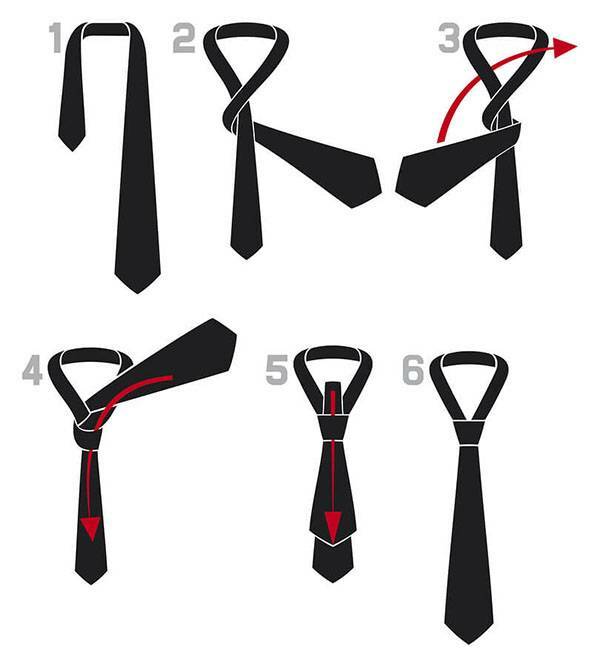
Simple node, or Four-in-hand
It's easy to guess that it's extremely easy to work with such a node. This scheme is perfect for beginners. The knot can be considered universal: it looks great on a variety of neckties. The collar of the shirt can also be anything, most importantly, that it does not cover the base of the tie.
Here is a step-by-step instruction. It should be noted right away that in all the described "working" methods there will be a wide side of the tie.
- Place the accessory under the collar, which can be raised for convenience. In this case, the shirt should be buttoned on all buttons. The narrow part of the tie should be on the right.
- Cross the sides by placing a narrow bottom.
- Pull the wide part under the narrow left, then - to the right already above the narrow( it should wrap the narrow part).
- Insert the wide part into the loop at the base from the wrong side and stretch it, going from bottom to top. Below the front side, another loop must be formed. Through it, thread the wide part. Pull it, supporting the formed knot with your fingers.
- If you did everything correctly, a cone-shaped knot will be formed. If in the process it is slightly moved down, just pull it to the collar. For this method, slight asymmetry is allowed. If necessary, secure the accessory with a clamp.
After learning how to tie a tie with a light knot, you can go on to study more complex photos and diagrams.
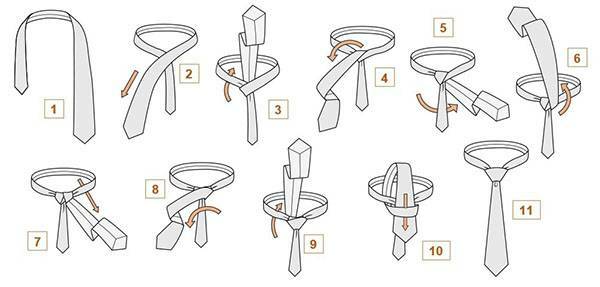
Windsor( Windsor)
This is a large and voluminous unit, which is recommended for a medium-sized tie. It is considered classic and flawlessly fits into the business dress code. Beautifully looks with a shirt, which has an English gate, the corners of which are widely spaced.
- Hang a tie, cross the sides, placing the narrow one below.
- Pull the wide part under the narrow one and thread it into the loop under the collar. As a result, the wide part should be located directly above the narrow one.
- Pull the working side under the narrow part to the left, then to the right now over the narrow part.
- Place the wide part in the loop and pull it up. Pull it down and thread it into the assembly that should be formed as a result of the previous steps.
- Final step: Tighten the new assembly and, if necessary, adjust it under the collar.
Performing Windsor is not as easy as the previous version. Not everyone can understand the first time how to tie a tie with such a knot, and remember the sequence of actions. But here the main thing is "to fill your hand".Over time, you will learn how to perform these actions automatically.
Board
Some materials are curled during socks, which does not look very presentable. When buying, put the tie in a wide part on your arm. The "right" model freely hangs from the palm of your hand, without twisting. When you put on such a tie, it will lie perfectly.
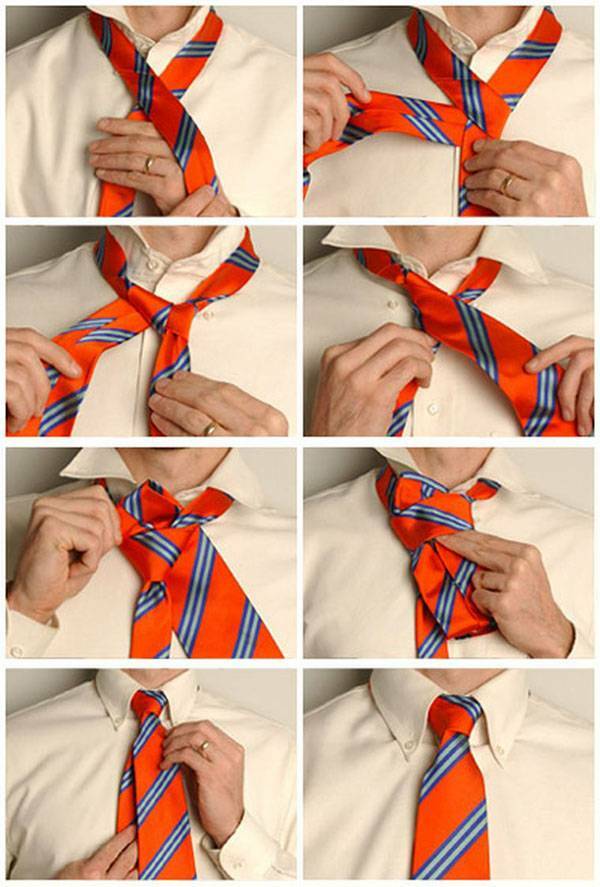
Half-Windsor( Half-Viewer)
It is considered universal, therefore it is suitable for a tie of any size and made of any fabric. It will be great to combine with any shirt and perfectly fit in both the official and informal manner. To understand how to tie a tie in such a knot, step by step instruction will help.
- Cross the sides so that the narrow one is at the bottom.
- Pull the wide part under the narrow left.
- Lift it up and pull it through the loop at the bottom from top to bottom. After that, the wide side should again be on the left side.
- Move it over the narrow part to the right side. Then, from the bottom up, stretch it under the collar and insert it into the formed loop to form a knot.
- It is not necessary to straighten and smooth a knot, folds are allowed for this method. In any case, it will look just fine.
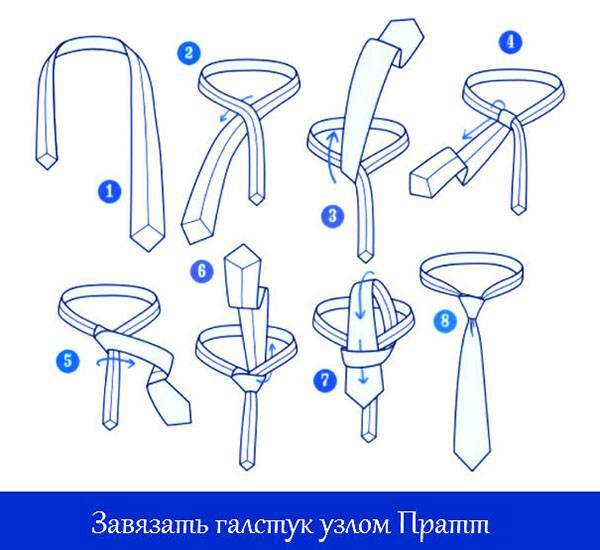
Pratt( Pratt)
Suitable for short ties with filler, which are heavier. Not bad with shirts that have a thin collar.
- Place the necktie under the collar with the wrong side out. Bring the sides crosswise so that the thin end is on top.
- Pass the wide part under the collar from the top and pull it down.
- Move it to the left, extending it over the narrow side. Then stretch the loop under the collar from the bottom up.
- Slightly lower on the front side should form a loop. Thread the wide end into it and tighten under the collar.
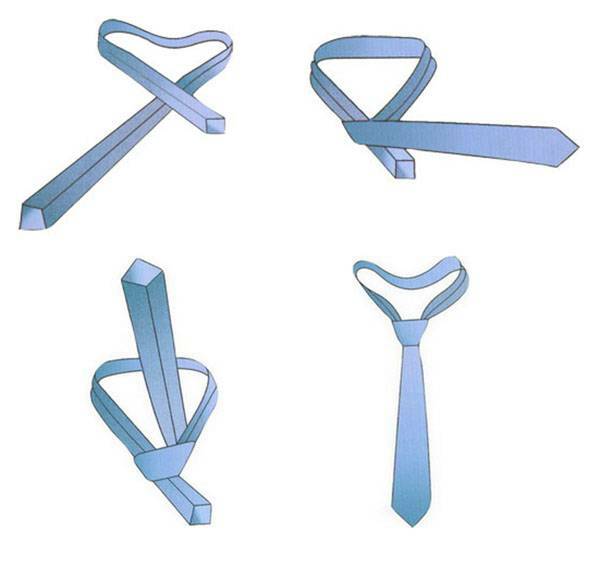
Eastern, or small, knot
Thanks to its compact dimensions, it accentuates the advantages of accessories made from dense and heavy materials, including woolen and woven ones.
- Fit the necktie on the shirt with the wrong side out. The wide part should be located on the left, below the narrow one.
- Cross the sides so that the narrow one remains on top.
- Move the wide part above the narrow to the right and pull it through the loop under the collar from the bottom up.
- Pull it into the formed tab from the outside. Then you just need to tighten the knot.
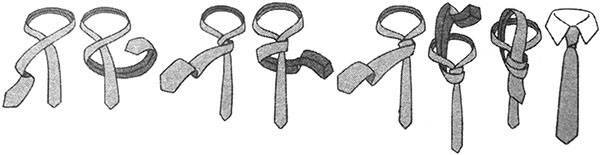
Prince Albert( Prince Albert)
Due to several turns, an additional thickening is formed, which will perfectly complement the thin necktie.
- Hang the tie face-to-face. The wide end should hang on the left just below the narrow one.
- Cross the sides so that the narrow part is at the bottom.
- Pull the wide part of the tie to the left under the narrow one. Then stretch it to the right, laying it on the narrow part. At the same time, try not to stretch the material too tightly, otherwise it will complicate further actions.
- Once again, sweep the wide side around the narrow one, as described above.
- Now stretch the wide part through the loop under the collar from the inside to the outside, heading from bottom to top.
- Pull the tie through both loops formed from the outside.
- Final touches: form the knot and straighten it.

Useful recommendations
So, you have acquired a quality and beautiful accessory, studied photos and videos with a sequence of actions and understood how to tie a tie correctly. But this may not be enough, because in this issue there are a lot of subtleties, which must be taken into account.
- If you can not determine which methods are right for you, pay attention to your physique. Large men with a massive neck and broad face will be approached with a tie with a wide knot, thin - a thin and compact knot.
- It is necessary to take into account the material. If you prefer intricate and voluminous knots, choose neckties from light fabrics. Small nodes, on the contrary, emphasize the features of the accessory of dense materials.
- A properly formed knot is strong and tight, it should not look friable and weak. True, for an informal style is acceptable, if the knot is tied a couple of centimeters below the collar.
- The knot is formed directly under the collar, not on the arms. Otherwise symmetry can be broken, which will not have a positive effect on the result.
- In tied form, the tie should not be very long or, conversely, short. Suitable length is about 2 cm below the waist.

How to shoot and store?
If you want to look presentable, your tie should be in perfect condition. A common mistake of many men is that at the end of the day they do not untie the tie, just remove it from the neck and hang it. At the folds, the fabric is rubbed and dust accumulates. After the socks, you need to untie the tie, even if it was tied simply perfect. So you will be able to preserve its original appearance much longer. Untying a tie is simple: do it in the reverse order to the one in which you tied.
Store the accessory better in a suspended position, for example, on a special hanger. Before you clean it, straighten it with clean hands. During storage, do not expose the sunlight to things, otherwise the material will quickly lose its original color and gloss. If you have to travel regularly on business trips, purchase a special case with which you can save the look of the tie.
This wardrobe item is not to be washed and ironed. In case of spots, it is better to turn to a dry cleaner. If the fabric is wrinkled, simply roll the tie into the "roll", avoiding the formation of new folds, and leave it for a few hours or at night. There are situations when you can not do without ironing. In this case, insert a cardboard in the tie, exactly repeating its shape, and cover with a damp cloth. If you have a steamer, you better use it.
At first you might think that tying a tie is a difficult task, which not everyone can cope with. But after a few attempts you will realize that doing this is not so difficult. In the future, the entire process you will take no more than 5 minutes.