
Window - an integral element of any building, be it a residential building, bath or summer kitchen. But no matter how well the windows are installed, it will not be possible to do without the appropriate additional finishing. And it's not just aesthetic appearance. In today's article, we will talk about how to properly carry out the internal and external finishing of slopes. windows, what materials should be used and how difficult it is to do such work with your own hands.
Read in the article
- 1 Internal and external window decoration: what is it for
- 2 Finishing options for internal and external slopes in houses and apartments
- 3 Finishing slopes with plaster
- 3.1 Step-by-step instructions for finishing slopes with plaster
- 3.1.1 Trimming surplus
- 3.1.2 Removing "shells"
- 3.1.3 Assessment of the final result
- 3.1 Step-by-step instructions for finishing slopes with plaster
- 4 Sheathing slopes using drywall
- 4.0.1 The nuances of installing drywall
- 5 Slopes made of plastic or PVC panels: advantages and installation features
- 5.1 Step-by-step instructions for finishing slopes with plastic panels
- 6 Decorating slopes with tiles: what you need to know
- 7 Let's sum up
Internal and external window decoration: what is it for
The aesthetic component of the finishing of the slopes is an unimportant component. Protection plays a huge role:
- windows from excess moisture, the appearance of condensation;
- polyurethane foam, which quickly collapses under the influence of direct sunlight;
- insulation against atmospheric precipitation.
It turns out that the aesthetic component of the installation of slopes is only the tip of the iceberg visible to humans.

Finishing options for internal and external slopes in houses and apartments
Window slopes can be finished in various ways. Much depends on the financial capabilities, as well as the skills of the master. The most common finishes are:
- plastering and painting;
- plastic sheathing;
- finishing drywall;
- mounting sandwich panels;
- decoration with ceramic tiles.
There are other methods of finishing with wood, metal or decorative stone, which are used less often. But today we will consider only the most popular ones.

Finishing slopes with plaster
This option can be called the simplest. For its implementation, various building mixtures are used based on cement or plaster. External slopes are finished with special facade plasters.
The advantages of such a finish include the ease of doing work with your own hands, even without any experience, availability, fire resistance and low cost of materials. But, as with any work, there are also disadvantages here, among which the duration of the work can be noted. In addition, only more or less flat surfaces are suitable for plastering.

Let's try to figure out step by step how to make slopes with plaster.
Step-by-step instructions for finishing slopes with plaster
For today's example, we will use the inside of a window opening. The first thing to do before you start plastering the slopes is to put beacons around the perimeter. Many builders use pieces of metal profile, they are fixed on the inner wall with dowel-nails.

Further, the entire slope is filled with plaster so that there are no voids left inside. It is better to use gypsum plaster, which hardens quickly, which means that it shortens the work time. In this case, it is necessary to stain the window frame as little as possible, from which the protective film has already been removed. It will be problematic to wipe off the hardened plaster from it.

Then the plaster is leveled. Do this with a wide spatula or small a piece of laminate. They do not pay attention to the "shells" formed on the surface. They will subsequently be filled with a second layer.

Trimming surplus
When the plaster has dried, the remaining excess is trimmed. This can be done with a wide spatula or with a rule. It is very important here not to overdo it. Otherwise, more material will go to the layer, which can lead to surface cracking. But you cannot leave hillocks on the slopes either.

Removing "shells"
Then a thin second layer is applied and all the remaining "shells" are filled with it. The surface is prepared for finishing. The task of the layer is to smooth out the remaining irregularities. The material used is the same plaster that was used for the first, main layer.

After completing this work, the lighthouses are dismantled - they are no longer needed. Then the corners are tweaked.

Assessment of the final result
So, if all the work in the room was performed correctly, ideal slopes should be obtained, which now require only finishing. In time, such work will take no more than a day.

Sheathing slopes using drywall
This option can also be called a budget one; large costs for such finishing will not be required. The only thing worth noting is that drywall is more often used for interior decoration because of its hygroscopicity. Although some craftsmen use moisture-resistant drywall intended for outdoor use. But it is thoroughly protected: treated with antiseptics, covered with plaster.
The advantages of this material can be called the fact that with its help you can hide even significant irregularities. But drywall is fragile and non-moisture resistant.

The nuances of installing drywall
Plasterboard slopes are performed in various ways. The simplest and most common is fixing with assembly compounds such as "liquid nails" or even plaster. The second common method is fastening to a frame made of a metal profile with self-tapping screws. Another option is to fix it directly to the window frame using an L-shaped corner. At the same time, the space between the wall and drywall is filled with insulation.
This method of finishing the slopes allows you to bring out perfectly flat surfaces, but the best option is the sheathing of the slopes. decorative panels, which will be discussed below.

Slopes made of plastic or PVC panels: advantages and installation features
In addition to the aesthetic appearance, such materials have other undoubted advantages. Their installation is done very quickly, while the slopes will be durable. If we talk about plastic, then it is extremely easy to care for, mold will not develop on it. Interestingly, the craftsmen do not notice any significant shortcomings of this material, with the exception of cases of purchasing cheap, counterfeit products. Let's try to figure out how to assemble slopes from plastic panels with our own hands.
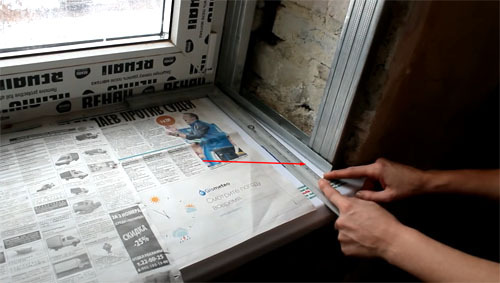
Step-by-step instructions for finishing slopes with plastic panels
Most often, window frames are produced in white, which means that it is better to select plastic to match. In order for the slopes to look more aesthetically pleasing, it is better to choose plastic in a matte finish.
| Illustration | Instructions |
 | The first thing you need to decide on is the angle of the slope. It is desirable that it is not straightforward. You should get a slight slope towards the expansion inward. The second side must match the first |
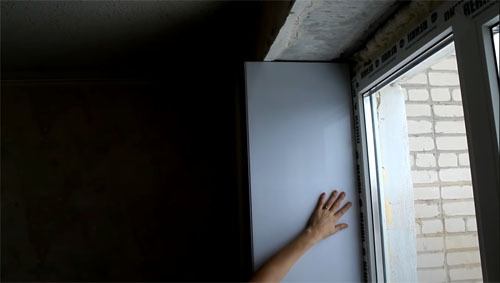 | The plastic panels are first tried on in height. The master will deal with the width later. If the height of the panel is a little short, it's okay. After all, the box will also be assembled there, which means the upper part will disappear |
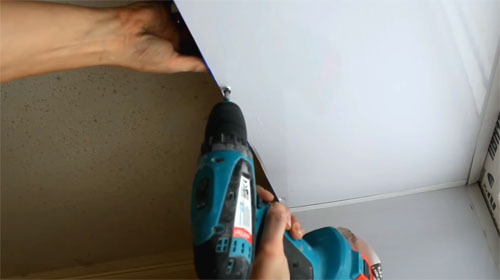
 | An L-shaped profile must be put on the part of the plastic panel that will be adjacent to the frame. It will help to hide the fixing screws later. |
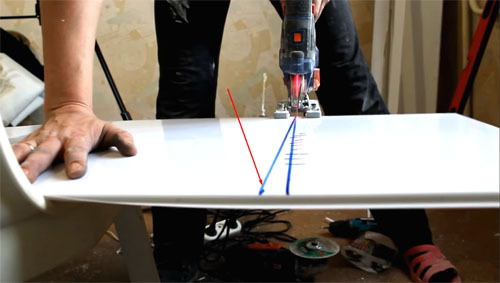
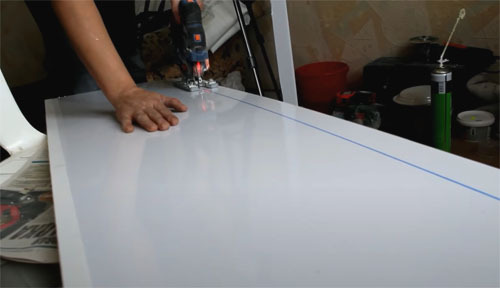 | Now you can measure the width of the plastic panel and cut it off. This work is best done with electric jigsawalthough some craftsmen prefer to use a clerical knife |
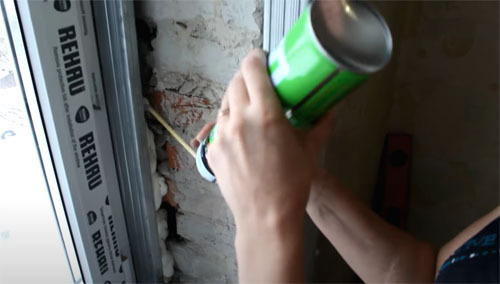 | The remaining cavity between the rough slope and the profile closest to the window must be filled with polyurethane foam. However, there is a nuance here. Regular semi-pro foam (with a tube) can expand a lot and squeeze out metal, so you should be careful when working with it. In general, it is better to use professional formulations that require the use of a special pistol |
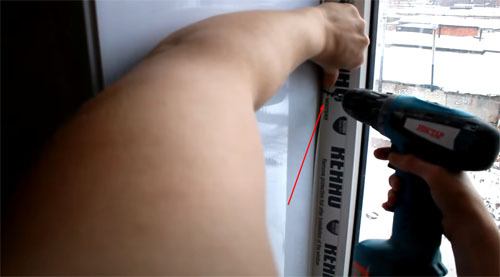 | In order to secure the panel in place, you will need to bend the L-shaped profile and screw in a self-tapping screw under it. If everything is done correctly, the plastic profile will completely cover the hat. |
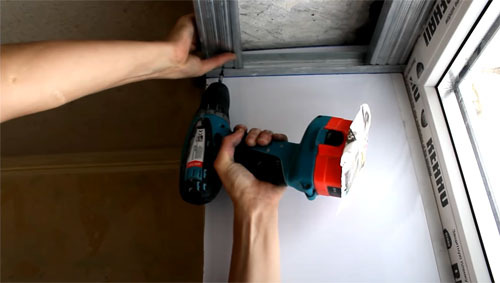
 | When both sides are ready, you can proceed to the upper slope. It also needs to be done with a slope. To do this, first you need to mark the location on the level, and then shift it to the same distance that the side slopes moved |
 | It makes no sense to dwell on the assembly of the frame. It is only worth noting that the profile closest to the window will be slightly shorter than the internal one. |
 | For the same reason, the plastic should not be cut perpendicularly. Here you have to make certain calculations. But if you want special work, this work will not be |
 | The L-shaped profile on the upper slope must be put on three sides, excluding the inner, room one. Fixation should be made on self-tapping screws, similar to the side slopes, under the L-shaped profile |
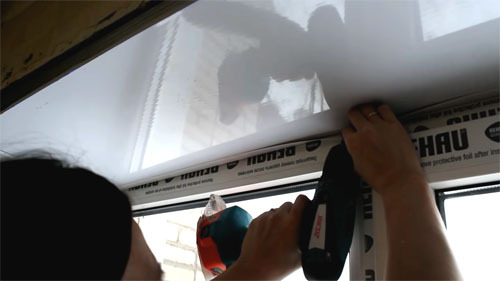
 | Where there is no profile, self-tapping screws must be screwed in from the edge of the plastic panel. They will be hidden by a decorative corner later. |
 | The main task is to screw in the screws so that they are slightly recessed into the plastic, but at the same time they do not go through it. For some "masters" such a task is impossible. |
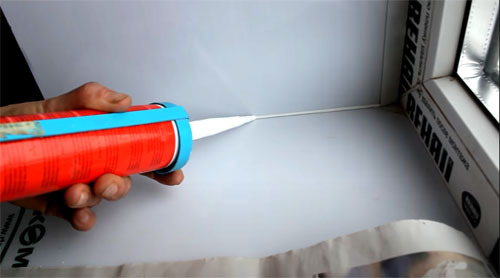 | The slots can be filled with ordinary sealant to match the plastic. But this work must be done at the end of all the finishing. It is shown here for example only. |
It may seem that finishing the window slopes with plastic is a very complicated and time-consuming process, but this is not the case. One has only to start and be careful. After all, surely everyone remembers the saying: "The eyes are afraid, but the hands are doing."
Decorating slopes with tiles: what you need to know
It is not so easy to finish the slopes with tiles. It will be problematic for a master with no experience to lay ceramic tiles on a vertical surface, not to mention the upper slope. In general, there are no peculiarities in this work. First, the slope is covered with ordinary plaster, as described above, then tiles are laid on the finished surface.
Such finishing of slopes is mainly used outside. And some craftsmen revet the slopes with decorative stone or metal.
Let's sum up
The decoration of the slopes, both internal and external, can be called the most important stage in the installation of windows. And what material is chosen depends not only on the appearance that a home craftsman can achieve, but also on the durability of the surface. Therefore, you should not initially save on such a finish. It is better to make high-quality slopes initially than to redo them every two years and spend money on them.
We hope that the recommendations for finishing the slopes of windows inside and outside, presented today, will be useful to our dear reader. If you still have questions on the topic, feel free to ask them in the discussions below. HouseChief editors will be happy to answer each of them.
Have you had to deal with the finishing of the slopes yourself? If yes, then write what problems you encountered in the production of this work. The information will be useful for novice home craftsmen.
Did you like the article? Then do not forget to rate - your opinion is extremely important to us. And finally, we bring to your attention a short video that will help you to more fully reveal today's topic.