
Contents:
- Tools
- Method 1
- Method 2
Of course, repairing a leather jacket is quite a painful task, but in this process there is nothing that you could not do. Without a minimum of experience in how to seal a leather jacket, your patch may look a little less accurate than in the atelier, but self-sticking not only saves money, but also gives you the knowledge that you can use to repair other leather products.
Tools
For both ways to repair the jacket yourself, you do not need anything special: skin for patch and substrate, glue and toothpick.
- If a piece of skin is torn off by an angle, then the patch material usually remains in place. If the piece is completely torn out, it will be necessary to pick up a small piece of similar thickness and texture, equal in area to the formed hole, if, of course, the detached piece is not preserved.
- For the substrate, you can use not only leather and suede, but also a dense fabric, although the latter is glued worse.
- You can not glue a leather jacket with any glue: super-glue and some variations of the "Moment" harden when hardening. Use the classic "Moment": it has sufficient plasticity after drying.
Method 1
The first way to seal the jacket with your own hands is more suitable if you need to repair the gap with an angle, however, in it to the tools you will need to add a small piece of tape.
- In order to fix the jacket at home, we need access to the gap, not only from the front, but also from the wrong side, which means that we will have to break the integrity of the lining. It can be opened on the seam in any convenient place, but it is best to do this along the sleeve in the place where the factory external seam is located.
- So, first, fix the gap from the front side with the help of an adhesive tape so that the torn piece is laid back as accurately as possible.
tip Very sticky tape can leave marks after removal, so glue it to your hand before gluing the rupture to slightly loosen its stickiness.
- Now, from the inside, we glue a patch made of cloth, leather or suede according to the glue instructions. It is important to decompose the material as accurately as possible so that folds do not form at the moment of gluing. Despite the fact that when gluing "Moment" is important force, and not the time of pressing, put on the already glued section of the cargo to avoid deformation and maximize the smoothing of the site. By the way, the patch should at least 1 cm to go beyond the edges of the gap in order to completely close the hole.
- When the patch is completely dry, remove the adhesive tape and use a toothpick to apply glue to the joint of the torn area. It will take a little bit of glue: all the excess should be cleaned with a cloth until it dries.
- The last stage of repairing a jacket with your own hands will be tinting a patch with liquid skin, a special paint or at least an ordinary skin cream in the tone of the product.

Method 2
You can also repair the jacket with your own hands and with the help of another tactic: first fix the hole from the inside, and then glue it on the front side. The second method is more suitable for repairing a jacket with a completely torn out piece of skin.
- In advance, provide access to the fracture from the inside, as in the first method.
- Glue the patch from the inside in the same way as in the first method, pressing the place of rupture with something heavy.
- After complete drying of the inner patch, repair from the front side, gluing an external piece of leather. The most difficult stage is cutting out a piece of skin that resembles the shape of a hole as much as possible. It is important that the piece should not extend beyond the edges of the rupture, but the places where the edges are not docked easily can be filled with a small amount of glue.
Tip
The internal patch can be any color, and even for the front tab you can use a piece of another color if you paint it with paint or liquid skin. But if you are going to use only a cream, then the color of the outer patch should be chosen as close to the color of the jacket.
- When the outer patch has dried, you can start painting the repaired area.
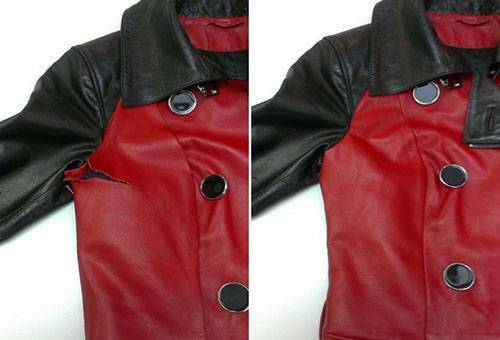
These methods differ only in the sequence of actions and will have an equally accurate result if you approach the repair process with patience and accuracy, which will make the patch place almost invisible. And yes, do not forget to sew up the lining!