Contents:
- How to facilitate the folding of shirts with long sleeves?
- Shirt folding algorithm
- Option 1
- Option 2
Men's clothing vendors and dry cleaners were not born with the knowledge of how to fold the shirt so that it does not wrinkle, and gained skills through systematic practice. Therefore, each hostess is able to achieve the same and not suffer from repeated ironing of products. It is not so difficult to correctly perform the necessary actions, it is only necessary to familiarize yourself with the appropriate version of the approach and apply it in practice. If you rationally approach the process of washing, ironing and assembling things, you can noticeably ease your life and make your wife happy with well-groomed products. The acquired skill also will allow to open a case, after all the folded shirts take much less place, than hung on hangers.

How to facilitate the folding of shirts with long sleeves?
The process of folding shirts is directly related to the correct approach to ironing and pre-processing. There are nuances that will allow you to approach the manipulation correctly from the very beginning, thus easing the domestic chores.
- After ironing the product must cool down. If you add them at once, the formation of bruises is guaranteed. Things need to be carefully weighed on the hangers, while fastening the upper button. Half an hour later, you can start assembling.
Council
In those cases when it is necessary to process several shirts at once, it is not necessary to run from one case to another. It is better to first pat and start assembling, then the first shirts have already cooled down and there will be a noticeable saving of time and energy.
- In the process of folding, you must always adhere to parallel lines. Some landladies do not pay attention to a slight narrowing to the bottom and as a result get skewed products.
- It's the most reliable way to fold your shirt like it does in a store. Just cut out of a thick cardboard rectangle of the appropriate size and put it on the back of the thing before starting the assembly. So the product will keep the right shape even in those who have a bad eye.
- Expensive things from whimsical fabrics before cleaning for storage or in a suitcase need not only be properly rolled up, but also wrapped with soft paper( better - parchment) to protect the moody matter from stains and punching with other things.
- For people forced to often be on the road, a special bag was designed to transport shirts. A very convenient device for those who value their efforts and those around them.
It should be noted that it is possible to combine products with long( and short) sleeves qualitatively, only by knowing how to correctly estimate the distance between individual sections. If this is the problem, then you should stock up a centimeter tape or ruler in advance, at least for the first attempts. Over time, the skill will be fixed, and everything will start to work out correctly even without auxiliary tools.

Algorithm for folding the shirt
There are many techniques with which you can fold your shirts. To learn basic knowledge, you can resort to one of the following simple schemes.
Option 1
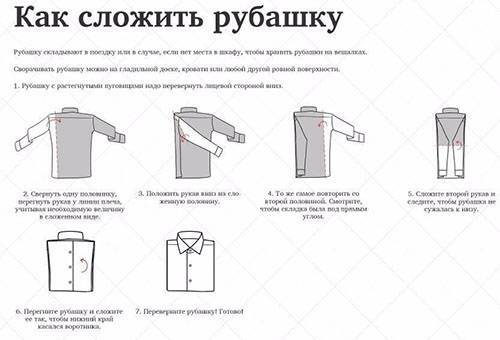
- The product is turned to the front side, we button up all the buttons, put it on a firm flat surface with the back up. We smooth all the creases and irregularities, we proceed to assembly.
- Work starts from the left edge. Fingers grab the middle of the shoulder, mentally hold the line down, down we take the cloth at the same point. Separating in this way a third of the shirt, wrap it on the back. Straighten the fabric to avoid wrinkling.
- The diagonally facing sleeve is bent and laid parallel to the side. The same manipulation is carried out on the second side of the product.
- Having received an equal rectangle, measure from its bottom edge the width of the palm and bend it on the back. Next, carefully fold the product in half, so that the lower part is at the level of the collar.
- It only remains to turn the shirt over and lay it on the shelf.

Option 2
- The product is also buttoned on all the buttons, spread on the front, level and begin to fold.
- Take one side, bend it to the center of the product, level it. The sleeve is folded three times, with the cuff should be maximally opened and smoothed, then there will be no wrinkles left on it.
- The other side is also folded to the center, covering the previous part literally a couple of centimeters to smooth the surface. At this stage it is important to smooth everything out.
- Sleeve lay out along the length and wrap up up to the collar, the cuff should be buttoned. Its edge should be brought clearly to the edge of the collar.
- The lower part of the product is bent to the width of the palm and folded in half, covering the sleeve. If everything was done correctly, then the edge of the sleeve will just be at the level of the fold.
In practice, all this looks even easier than in theory. Just a few classes - and you can not worry about the safety of shirts and their quality after transportation. Just remember that these skills are recommended only when working with ironed things. If so fold the crumpled shirt, then the folds and furrows just fixed, and save the appearance of the product except that prolonged aggressive stripping. In some cases, it does not help, the item has to be re-washed and dried, and even then it's all done according to the rules.


