- Selecting glass
- Selecting glue
- Adhesive process
- Making an aquarium from a can of
Home fish in an aquarium is the dream of almost every child and at least half of adults, but not everyone can afford to buy expensive aquariums in stores. In this article, we'll talk about how to make an aquarium with your own hands made of glass. After all, the well-known fact that making it with your own hands will be cheaper than buying a ready one. And if in detail with all to understand, it turns out that, in principle, nothing particularly complicated in this process there.
to the contents ↑Choosing a glass
Picking up materials for a future aquarium is not too lazy to do it with great care, because the right material is the direct way to success. Glass for a small house to fishes should correspond to aesthetic and functional qualities. And this means that before you buy material for work, you need to know the following.
Glass type:
- For your purposes only silicate glass is suitable, organic in this case is not suitable because of a number of reasons. First, Plexiglas can release chemicals that are not known to affect the inhabitants of your aquarium. Secondly, the appearance of such material also leaves much to be desired.
- In turn, our silicate glass is also divided into 2 types: window and showcase. The first for our purposes is absolutely not suitable, as it is very fragile, distorts the image, and also has roughness and roughness. So do not throw money away! It is better to immediately buy display glass, the quality of processing which meets our requirements. It is worth a bit more expensive than the window, but more than once will pay off when you use your product.
- Each glass has such a measure as its grade. In total there are 8 types: from M1 to M8.The higher the number, the less quality glass. Thus, M1 represents the highest quality. In order to make an aquarium with their own hands made of glass, experts recommend choosing the highest grade. If for some reason it is not available to you, take the quality slightly lower, but not lower than the M3 mark - it is used in extreme cases. All the glasses with a label above M3 simply can not withstand water pressure and burst.
Important! When choosing a glass for an aquarium, carefully consider it from all sides. The surface of the product should be smooth, transparent and without any defects, because even the smallest crack can lead to disastrous results.
Determine the thickness of the glass
If the length, height and width are clear, then the thickness of the glass should be determined, remembering school physics. First, you need to determine the volume of the future tank, and then look in the table, which is just for such purposes. Find it can be easily on the Internet, driving into the search engine query: a table to determine the thickness of the glass for the aquarium.
Also for large aquariums, stiffeners are used, and they are also with screeds for even larger aquarium sizes. This is done to increase the strength of the product.
Important! If you do not have experience in cutting glass, you better entrust this process to a professional - take the glass to the workshop.
Now that you know how to choose the perfect material for an aquarium, let's talk about how to choose glue for aquarium glass.
to the contents ↑Choose glue
A wide range of all kinds of glue solutions is provided in the building stores. Before choosing one of them, you need to know a few specific points:
- The chosen tool should completely ensure the tightness and water resistance of the structure, because no one needs a leaking aquarium.
- The second point assumes the existence of a thoughtful design of the aquarium. Glutinous compounds are of two types: black and transparent. For beginners it is recommended to use transparent, as an inexperienced hand can lubricate a smooth seam, and with black glue this will be noticeable. From such an impaired aesthetic appearance of the product.
Important! The only correct option for gluing aquaria is a silicone sealant. There are a number of reasons why this glue for aquarium glass is best taken. Among them:
- fine insulation;
- absence of antibacterial impurities.
The second is especially important, as representatives of the flora and fauna in your product will not be pleased with this chemistry in their habitat.
List of the most common adhesives
When answering the question of how to glue an aquarium from glass, many specialists allocate the following tools:
- Dow Corning 911 - the leader of trace adhesives on the market for a long time.
- Tytan - in no way inferior to the first place, except for one nuance: it has an unpleasant smell, which will be eroded for several days.
- Soudal Silirub AQ is also often a recommended sealant for gluing materials such as glass.
- Chemlux 9013 is a German brand of glue, which is also in demand among specialists.
Important! When choosing a glue, consider that a suitable silicone will provide quality and reliability, and the money saved for cheap and low-quality glue will have to be spent on repairing the same aquarium.
to content ↑gluing process Now that we have selected the right material and glue for the aquarium glass, be patient and get to work.
Tools
This will require the following tools:
- Soft grindstone.
- Syringe with a volume of 20 cubes for applying glue to the surface.
- Stationery knife or other sharp blade.
- Wipes for removing excess glue.
- Degreasing agent.
Methods of gluing
There are a couple of ways to glue the bottom and walls of the product together:
- Directly fixing the walls to the bottom.
- Wall fastening around the bottom.
Both methods are good in their own way, and practically do not differ in the reliability of the design, its appearance. Also, both methods do not differ and the technology of gluing.
In order to make an aquarium with your own hands from glass in the first way, you need to do the following:
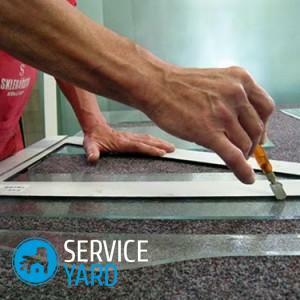
- In order to secure the work with glass, it is necessary to sharpen the edges of the walls and the bottom. This will help to avoid incautious cuts. To do this, put a terry towel on the bottom of the bathroom - this will save you from scratching the bathroom, put the glass on it. Collect the water. With a moistened stone, which we prepared before starting work, treat the edges of the glass. Try not to cut the cut, as this may affect the adhesion of the sealant.
- After this procedure, dry and degrease the glass. Do this procedure with great care.
- Now proceed to the most important and difficult stage - the bonding of the structure. Choose a place where your product can stand for 24 hours. Put a newspaper on the surface. First glued front wall. For this, the sealant is applied to its butt with a neat even layer, the part is pressed down to the bottom of the aquarium.
- Now the side wall is similarly fastened, at the same time not only the end of the glass is smeared, but also its lateral edge. According to the following scenario, the other faces are glued.
- Now leave the structure to dry for 24 hours, unless the reverse is specified in the glue instructions.
- If necessary, after the time has elapsed, the stiffeners are installed, and the aquarium dries for another 24 hours.
- After complete drying from the product, remove the adhesive remnants, along the surface of the glass.
- Next, the aquarium is checked for strength. To do this, it is necessary to collect the necessary amount of water and check whether there are leaks. If such were formed, then it can be eliminated without "deconstructing" the design. To do this, some sealant should be pressed into the place of leakage from the inside of the product.
- If it is not possible, the walls are peeled off, cleaned and the process is repeated.
Important! The second method of gluing follows the same principle.
to the contents ↑Make an aquarium from a can of
If you are not sure that you can make an aquarium with your own hands made of glass, try making it from an ordinary 3 liter can.
You will need:
- Bank or a bottle. The product should not be less than 3 liters, and in fact - the more, the better. You can also accommodate a large glass pot.
- Primer. Buy a beautiful multi-colored primer for the aquarium can be in the store. Also you can use as a primer small pebbles, pebbles and other materials. Before placing them in our aquarium, you should boil all the elements.
- Compressor. The necessary thing is to provide the fish with oxygen.
- For decor you can use a seashell.
- Fish and plants.
The process of creating
Making an aquarium from a can is very simple. To do this:
- Wash thoroughly with a jar. No detergents, except soda. Bat it with boiling water.
- Fill the prepared soil, install decorative elements.
- Pour water and plant the plants.
- Connect the compressor.
- Start the fish.
A few nuances of
When you are going to make an aquarium from a can, consider some of the nuances that a beginner needs to know:
- The larger the capacity, the better for you and the fish.
- Do not use plastic products as an aquarium.
- If the bank is small, the filter can not fit into it. Hence - its functions should be performed by you, pouring fresh water, siphon the bottom, wiping the jar from the inside.
- Use only standing water for infusion and substitution.
Important! There are also a couple of moments about leaving, so that the fish feel comfortable, and the aquarium always looks beautiful:
- Do not place the aquarium in direct sunlight, the aquarium will blossom, and your pets will die.
- Maintain the correct temperature in the aquarium.
This article prompted you how to make an aquarium with your own hands made of glass. In doing so, we examined all the subtleties of creating this product, as well as a concrete example of creating the first aquarium from a simple can. Now you can confidently start fish, because with the help of our tips you have no difficulties.