- Advantages of corrugated paper
- Features of making colors from corrugated paper
Any holiday needs appropriate design, in particular, it concerns the premises. An excellent decoration of the hall can be bright and beautiful flowers, made of multi-colored corrugated paper. Outwardly they look very natural, so many often take them for living plants. These crafts seem to look quite complex in terms of execution, but in reality the technology of their manufacture is simple. Today we learn how to make flowers from corrugated paper yourself. The main thing in this business is to observe consistency, be patient and tune into a long, monotonous work.
to content ↑Advantages of corrugated paper
Why is this material used to make artificial flowers? The most important thing is that both children and adults can work with it. Kids really like to experiment with materials that are pleasant to the touch, and create beautiful masterpieces on their own. Making flowers from corrugated paper with your own hands is possible with the participation of the child, which will allow not only entertaining and fun to spend time with it, but also to create original decorative ornaments for the upcoming holiday.
In addition, the advantages of this process include:
- Financial availability of the material. This paper is sold in large rolls, you can find it in any store at an affordable price.
- Storage. Since the material is packed in rolls, it is convenient to store it for a long time, while the attractive appearance is not lost. And in the cabinets a lot of space it does not take.
- Easy to use. To create compositions alone, only glue and scissors are needed, which indicates ease of use of the material used.
- Ability to instantly eliminate errors. If the first time you can not connect or glue the details, then you can quickly make new workpieces and all the remake.
- Brightness of textures and paints. Fortunately, manufacturers are always pleased masters a wide variety of textures and colors of the material, which significantly increases its popularity.
Peculiarities of making corrugated paper colors
Are you interested in how to make a flower from corrugated paper? It's quite easy to collect them. In this section, we will consider separately the various manufacturing options for these decorative elements. Here you will find options for twisting paper strips and cutting out individual parts for subsequent assembly into whole compositions.
Important! It is very important in the process of work not forget to show your own imagination and observe the accuracy during assembly.
Next, we'll look at detailed instructions for making the most popular color options.
Creating roses by yourself
There are several options for how to make flowers from corrugated paper with your own hands, which will be as similar to real roses. These methods are significantly different, so the results are different. The easiest option involves the compilation of bouquets of ready-made paper flowers. And to make them, you need the following materials:
- Paper of the required color.
- If you plan to create leaves and stems, then you need green paper.
- Scissors.
- Wire.
- Adhesive PVA.
- Pliers.
- Simple pencil.
- Thick cardboard.
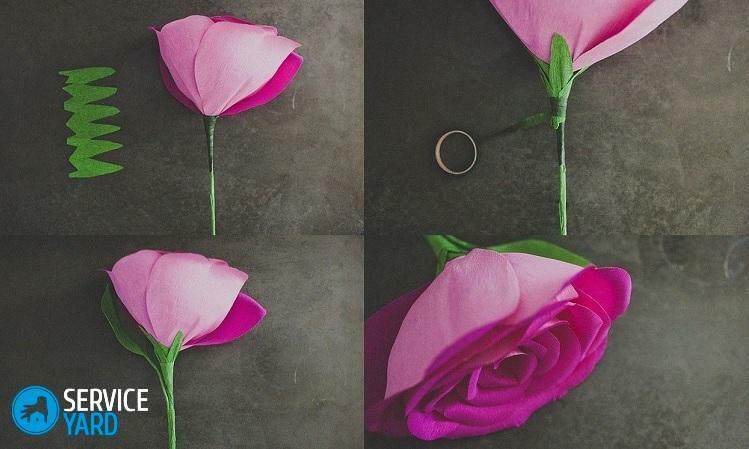
Method 1
Now let's start making roses from paper and sweets. The first method involves creating petals based on petals. The process itself implies special diligence, observance of accuracy and endurance.
How to make florets of corrugated paper with your own hands:
- Draw rose petals of several sizes on a thick cardboard. It is better to use 3-4 templates to make the rose look more beautiful.
- Cut out the drawn petals and prepare the scarlet, red, pink or white paper.
- Given the width of the largest petal, fold the paper with an accordion.
- Put all the blanks to the paper, cut the petals out of it in the right amount. Prepare them for assembly. Stretch the edges of each piece of paper, grabbing them by two rounded corners. With your finger, make a notch inside the future bud in the middle of the petal.
- If necessary - by the same principle, make leaves. Only to stretch their edges is not necessary, since it is better to attach the shape to them already at the moment of joining or at the very end of the work.
- Cut several lengths of wire from the wire. In their hand, connect them, use a pair of pliers to bend one end, so you will have the heart of the bud.
- Wrap the wire core with the smallest petal, pre-attaching the lower part of the workpiece to the future stem with glue.
- Form bud, gradually gluing the petals according to the sizes, starting the smallest and ending with the largest.
- To create a sepal, wrap a thin strip several times from the green corrugated base paper of the bud.
- Starting from the sepals, continue to wind the entire stem, pre-glued to the wire leaves in the right places.
- At the end, fix the material with glue to form the stem.
- Straighten all the leaves and petals. Allow the flower to dry completely.
Important! Here you can make such flowers as you like, then you can put them in a vase. As a result, you will have an original bouquet.
Method 2
The second method involves making roses by twisting paper strips. You will take the entire process for no more than 10 minutes, if everything is done according to the instructions below:
- Make a long strip of red paper from the corrugated paper so that its width is about 7-10 cm.
- Process one edge, giving it the shape of a pie. That is, rip the edges of the strip with your thumb.
- Prepare the strip in the bud.
- To the ready bud carefully glue the edge or wrap the flower with a thread of the same color as the paper itself.
- To create a sepal, wrap the green bud in the bud.
Using the presented methods, you can create huge compositions of chic roses for their subsequent application in the design of any holiday.
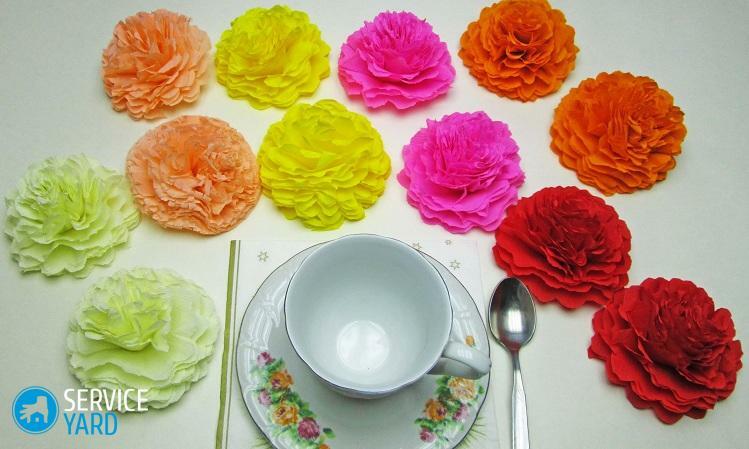
Peonies with their own hands from corrugated paper
It's hard to find a person who does not like peonies. These flowers can not be called traditional and bored, they are original and adorable in their own way. But the most important thing is their sizes, their buds differ in impressive dimensions and volume. Therefore, now we learn how to make large flowers from corrugated paper with our own hands.
To create peonies you will need the following tools and materials:
- Corrugated paper in different colors.
- Attachment media of small size or the most ordinary paper clips.
- Wire.
- Fine thread.
- Scissors.
To create a bouquet of peonies, you need to do the following:
- From each roll cut one sheet of the required size.
- Each element, fold an accordion of the same width.
- Measure each workpiece so that the difference from the smallest to the largest size is 3 cm.
- With a paper clip in the middle, hook each accordion.
- Fit the workpieces with the shape of the petals, cutting their edges in the desired manner.
- Align all the blanks in the middle, gently unfold them.
- Collect all the leaves in one accordion, rewind the thread in the middle.
- Form a bud, giving the appearance of the petals to the accordion, bending the edges up and to the sides straightening.
- Paper peonies are ready.
As a result - you will get a magnificent beautiful peony bud.
Important! If you take more colors, you can create an incredibly original transition from dark to light shade, or vice versa. To make a full flower, you need to take green paper, in the process of making a bud lay the workpiece from it down all layers. As a result, the green lower layer will act as a sepals.
Volumetric paper lilies
How to make a three-dimensional flower from corrugated paper to create afterwards a beautiful bouquet of lilies? We will use the same principle of bud assembly. Work begins according to the already known scheme: first you need to make cardboard blanks, cut out petals from white paper.
It will be more difficult to make a white pestle with a yellow tip to create a flower. And it happens like this:
- Prepare several lengths of wire of small diameter, pre-bending the ends with pliers.
- Take white or yellow paper, wrap the workpiece from the wire.
- The end of the future pistil is dipped in the glue with a curved tip. Then lower the orange into the orange mange or the black paint.
- So make 5-7 pistils.
- The created pistils should dry, then you can collect a bud from them.
Now you know how to make flowers from corrugated paper in stages. And if you need to arrange a room for a holiday with your own hands, then there will be no problems. You will need a maximum of accuracy, patience and manifestation of your own imagination.