Repair in the kitchen is a special event for which a lot of effort and time is spent. We also need to think over the design to be liked by every member of the family, the guests were surprised that the room was functional, convenient, easy to care for. But good preparation is the key to the success of any undertaking. Today, we'll look at how to prepare for the repair properly and draw up a kitchen drawing that will please you. With the help of our useful tips, you can easily cope with this so laborious task in the best way.
to the contents ↑Doing it yourself
Often going to a furniture store brings one breakdown. Inexpensive variants of kitchens look ridiculous, and that the most ideal variant costs more expensively, than week rest abroad. Of course, you can order furniture, but it will be even more expensive, plus you have to spend a lot of time looking for a good workshop.
But do not worry about trifles, because there is always the option to make a kitchen with your own hands. Here you can choose for yourself the best option and create your own cozy corner. At the same time, lack of skills is a small problem. If you ever tried to put together a shop, and you came out, then you can make a kitchen, it just takes a little longer than when you order.
Advantages of a stand-alone project:
- Saving, because the cost of the finished kitchen or the one made to order is very high.
- You yourself can model your kitchen, taking into account all its nuances.
- The furniture created by your sketches can rightly be called a unique, collected in a single copy.
- You can not choose a ready design, but create your own.
- The functionality of your kitchen will depend only on your plan.
But a little try still have to. The first thing you need to do is paint a little.
to the contents ↑Making a sketch
So, take a piece of paper, a pencil and imagine our future ideal kitchen. In this case, it is worth remembering one convenient rule - the working triangle. A little more about it below.
Rule of the triangle
Typically, designers divide the kitchen in the drawing into three main sections:
- cooking zone;
- food storage section, crockery;
- zone for cutting food, washing dishes.
Important! If you represent these sections in the form of a triangle, then access to each of them should be at a distance of not more than three steps. This arrangement is considered the most convenient, functional.
At this stage, also consider whether it will be possible to open windows, doors without interference to work.
Then you can start drawing.
Drawing
It's always difficult to start, but here it is necessary to show imagination:
- First imagine what and how it will be located in your kitchen, from what materials it is made.
- Next, you will need to make a sketch of everything you invented. And you will not need art education. The main thing is that you understand what objects you draw.
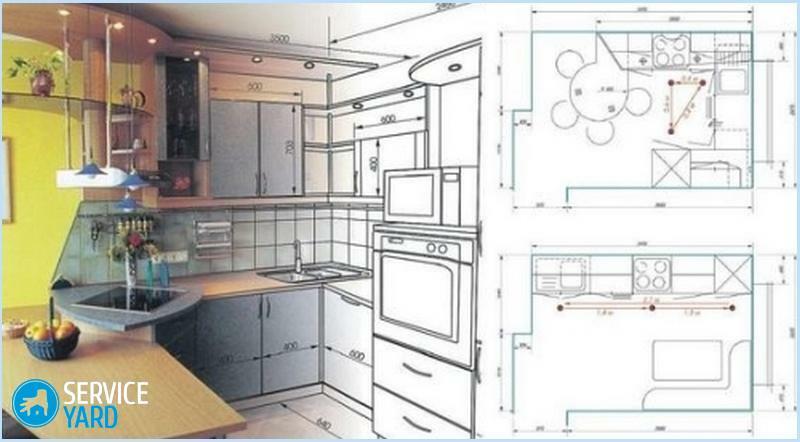
- Next, you need to carefully measure the room and start working on a kitchen drawing.
Important! You can make a drawing manually, or you can install a special simulation program on your PC.There are free versions available on the Internet, which are quite suitable for non-professionals.
Software:
- Pro 100;
- Sweet Home;
- Aston dizayn.
Important! The advantages of computer modeling are the ability to see the breadboard model of a practically finished kitchen in color, from various angles. And these programs allow you to place not only furniture, but also communications, doors, windows.
This is convenient, but there are times when even the simplest programs turn out to be incomprehensible. Then the drawing can be done manually. Here the following recommendations should be taken into account.
Tips:
- Be sure to designate the scale for yourself, strictly adhere to it. A convenient option is a scale of 1:10, and a unit of measurement of 1 mm.
- Measure the dimensions of the room, put its perimeter on the drawing.
- Mark all dimensions in the drawing, taking into account the difference in the walls at the floor and at the ceiling.
- Mark the places where different communications will take place.
- Note the sockets and ventilation.
- Specify where the window opening, its dimensions and the corresponding door dimensions are located.
- Do not forget about the plinth, otherwise - in the scheme error is possible.
Important! Measure the room not only in width, length and height, but also:
- in height from floor to window sill;
- from floor to ventilation;
- from corners to windows; from walls to communications and stuff.
Next, you should place large household appliances on the kitchen drawing.
to the table of contents ↑Instrument placement
Large equipment refers to a refrigerator, stove, dishwasher and other items that require different types of communication and are difficult to move. In their location it is important to consider the following tips.
How to arrange a technique?
- Do not place the refrigerator close to the cooker - the appliance will quickly fail from severe heat.
- The slab and the sink should be kept apart from each other at a distance of at least 50 cm. The water from the sink can easily get into both the equipment and directly into the outlet. In this case, a short circuit can not be avoided.
- Dishwashers and washing machines should be installed as close as possible to the supply and discharge of water.
When arranging equipment it is important not to forget about sockets.
to the contents ↑Placing the sockets
If you place the sockets with the mind, then any kitchen will please you with functionality. In the absence of a clear plan for the placement of equipment, you will have to use many extensions, and they often look unattractive, and it is not always possible to safely use them.
There are some useful tips on this:
- Remember that you can place sockets in the kitchen not only on the walls, but also mount them in an apron or in the countertop.
- If you use the built-in technique, consider the manufacturer's recommendations when planning.
- For small appliances, you also need to provide a separate output of electricity.
Important! Usually enough three outlets in the apron, but if you want you can leave space for the extension cord. Remember and about safety precautions.
Prohibited:
- mount sockets in the vicinity of the sink;
- connect electrical appliances over the cooker;
- install power from the rear of household appliances.
Important! Especially accurate is the exact calculation of the placement of sockets in small kitchens.
Next, consider the advice on the location of furniture in the kitchen drawing.
to the contents ↑Furniture
At this stage you should already understand exactly how you want to place the kitchen.
Variants of placement:
- with the letter "P" - kitchen with two corners;
- with the letter "G" - a kitchen with one corner;
- linear version;
- accommodation peninsula and island.
It is also important to provide space for the table and chairs, if necessary. Consider in the sizes that the chairs should move freely. After - consider the options for the location of cabinets, as well as determine the optimal number of them. After that you can plan the arrangement and transfer it to the drawing.
Important! Simulator programs are again convenient in this case. There are even programs that tell you how to make the kitchen more functional.
At this stage, take into account even the smallest details:
- in which direction the cabinets are opened;
- how far the drawers extend;
- , note and the placement of the lighting cabinets, if available;
Tips for
With the elements in place, do not forget about the following:
- sink and curbstone;
- cabinets and niches near the sink;
- dishwasher;
- oven or stove;
- wall cabinets and shelves.
Next, let's talk about how to determine the right size of kitchen cabinets. Drawings will help us in this.
to the contents ↑This stage is very important, because if you make a mistake in the calculations, the headset can simply not fit in the space for it.
As a rule, the kitchen set has several levels:
- The upper level is hanging cabinets and shelves. Their size is determined by the size of the room. In the height of the cabinets can be up to 100 cm, and the standard depth and width to 50 cm and 80 cm, respectively.
- The lower level is the floor structure. Their height is selected in accordance with the growth of the user. Standard sizes reach 90 cm. In the lower part of the headset is often installed and embedded equipment. The standard cabinet depth is 60 cm, and the width depends on the model.
Important! If you find it difficult to determine the standard dimensions of kitchen cabinets, drawings from the Internet to the dimensions of your premises can alleviate the task.
Let's analyze the nuances of placing the hood.
to the contents ↑Extract
On the size of the hood, the width of the upper cabinets will depend.
On the plan, note that the height from the electric cooker to the hood should not be less than 70 cm, for a gas stove the distance is increased by a meter.
Next, we'll look at how to properly draw kitchenette drawings with dimensions.
to the contents ↑We measure
For correct drawing it is necessary to make correct measurements. And then we also have some recommendations:
- When you measured the length of the proposed kitchen, subtract from the received length of 2-5 mm - this will avoid trouble, in case of an error.
- Also be sure to check whether the corners are even. If the angle is not 90 degrees - these differences should be taken into account in the plan. Especially relevant this moment will be when creating corner kitchen.
- Check the walls by level. Uneven surfaces may become an obstacle, and the hinged structures will not fit securely.
- Separately calculate the dimensions of each cabinet and its components: boxes, shelves, doors, panels, walls.
- Check the dimensions left for household appliances.
- Indicate how much space the furniture takes.
Important! The final design of the kitchen should include as much as possible all possible sizes, since any error can ultimately lead to inconveniences.
to the contents ↑And a couple of nuances
- With the finished drawing, you can also create a separate nesting chart. It marks the size and the number of necessary parts for self-creation of the headset. Then you can go to the store and buy materials.
- Preparation of materials for the kitchen requires a lot of time, effort and a separate room. Therefore, it is easier to apply for help in the furniture department, where you will prepare the blanks on the map for your kitchen qualitatively and quite inexpensively.
- The further stage of works includes repair work in accordance with your plan and furniture assembly.
Make the kitchen yourself easy if you know the basics and act step by step. With the help of computer programs you can create a corner kitchen drawing with dimensions and detailing, or any other layout of your ideal room. But if it's hard for you to deal with this task yourself, you can turn to the designers for help.