- Doing screens with your own hands
- Making a floor screen from cartons
- Folding screen from DVP
- Desktop screen with your own hands
Small children believe in miracles, they dream to get to a fairy-tale country and meet their favorite characters. You can give him this opportunity and make a puppet theater with your own hands. Puppet theater is an amazing world of art, loved by children and adults. Everyone can feel like an actor, playing with puppets. But for a full-fledged performance, in addition to actors, puppets and spectators, a screen will also be needed. Of course, at home you can use chairs instead of a screen or pull a rope with a cloth. But if you often put on performances, the real scene with the scenery and the curtain will look much more attractive. Such a partition can be bought in a specialized store, but a screen for the puppet theater with its own hands will also be quite successful. This is especially true for kindergartens, where there are many potential actors and spectators. How to do it?- Now tell.
to the contents ↑Doing screens with your own hands
There are very simple options - they are suitable for home performances, they do not need to do anything specifically. These are the "hastily" partitions:
- You can close the hole under the table with a piece of cloth. Tie the corners to the top of one and the second leg of the table. The impromptu partition is ready! The child can sit on the floor and show his performance, leading the heroes of the fairy tale just above the level of the table.
- You can take an old curtain or sheet, put it on a rope and pull it in the doorway. At the top in the center you need to make a rectangular cutout. He should be at such a height that the puppeteer standing behind him could not be seen. Decorations can be attached to such a screen using linen clothespins, which can be masked by tinsel cut out of paper.
Important! On the rope you can hang paper clouds, the sun, the moon, the stars.
- The partition can be made from a normal ironing board, having covered it with a cloth.
We make the floor screen from the carton boxes
Of course, all these options for the house may be of use, but are hardly suitable for setting in kindergartens or schools. That need a more impressive version. You can make a floor screen for the puppet theater with your own hands in the kindergarten of cardboard. It will not be expensive, easy, convenient to use.
The main thing is to take into account the size of the room. So, let's get down to:
- The height of the screen should be determined, based on which actors will perform and which dolls will be used for the performance.
Important! Two-thirds of the dolls should be above the septum and the actors should not be seen.
- Cut a sheet of cardboard for the front side of the partition. For strength on it, we glue the corrugated cardboard in several layers. We glue this all with PVA glue and press it. You can put the sealed partition together and tamper it with your feet. Leave to dry for a day.
- In the same way we make sidewalls and sides.
- In places of folds, the cardboard must be single-layered.
- After drying all parts, proceed to assembly. The joints are first glued together, and then stitched with an awl and lace. Stitches make large, at a distance from each other, since closely located stitches can break through the cardboard.
- The sashes need to be pasted with decorative paper on both sides. You can also use wallpaper. Try not to take bright colors, so that they do not distract the attention of the audience.
- The back wall is pasted with white paper, the edge of the window is trimmed with wallpaper curbs.
You're done! Now you can check the screen for stability.
to the table of contents ↑Floor screen of
Fiberboard There is another way to make a floor screen for the theater with your own hands. This time, as a framework, a thin sheet of fiberboard will be used. Such a partition will be stronger and more stable than cardboard:
- Draw a sheet of fiberboard and cut out the necessary details.
Important! If you do not have a jig saw, you can do it with a saw or a kitchen knife.
- The ends of the parts are treated with lightly emery paper, and then drill small holes for connecting ribbons.
- All the details are best painted in white.
Important! It is better to take ecologically safe water-based paint for this.
- Now you need to choose a bright fabric for the cover. It is better to make it removable so that you can wash it.
Important! It is better to take an opaque synthetic, such as polyester, so that it does not crumple, and the actors do not appear during the performance.
- The cover consists of a roof and pockets. Use the finished structure as a template. Put it on a cloth, circle it with chalk. Do not forget to add a few centimeters to the seams. Carefully cut out the contour.
- The roof will be in the form of a hood. To do this, fold the fabric in a triangle, cut out the edges with denticles, and attach the foam rubber from the inside. He will give details of the volume.
- In the center of the roof, sew a velcro. With its help you can change the design of the roof.
- The lower part of the screen consists of three pockets connected together. You can decorate these details with beautiful flowers, bows, buttons, in general, everything that is at hand.
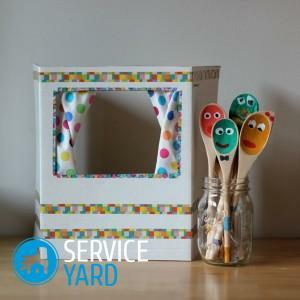
Desktop screen with your own hands
For a finger theater the desktop screen is more suitable. How to make a desktop screen for a puppet theater? It can be made from sheets of chipboard or from good cardboard.
Important! For such a case, you need to buy in the office store tight cardboard. For the septum, you need to take two pieces and glue them together for greater density.
Procedure:
- Draw a rectangle from the selected material. In the middle, you need to cut out the window. This can be done with a jig saw or a knife.
- For side flaps, you can take the remains of the board, laminate or the main material. Cut out two pieces of the same width and height.
- The ends of parts from the chipboard should be treated with sandpaper. Using a drill, make holes to connect the parts together.
- We paint all the details in white. Leave everything to dry.
- Next goes the decoration process. Can be pasted with a cloth, paper, paint or sew a cover.
Act in any convenient way for you, show imagination and patience, call for help of children, they will gladly help you in decorating the screen and making decorations!