Acquisition of a new kitchen unit today is a rather dubious investment. After all, tomorrow it may turn out that you want a completely different style, color scheme. But what if you want updates, and the sooner the better. As it turned out, there is a less expensive way than replacing the wall. It offers its own update option Oksana Matyash, who decided to repaint the facades of MDF with her own hands. Looking ahead a little, we can say that the result was worth it.
Read in the article
- 1 How it all began: material procurement
- 2 Commencement of work, dismantling of handles, facades
- 3 The work is in full swing, the facades take on a new look
- 3.1 Surface painting, varnishing
- 3.2 Installation of renovated facades and interim assessment of the result
- 4 Top facades and interesting ideas
- 5 Podium plank and its transformation
- 6 Another touch in the renovation of the kitchen
- 7 Overall assessment: the result exceeded expectations
- 8 Let's sum up
How it all began: material procurement
The most common light colors in the kitchen become boring very quickly. Plain kitchens are becoming boring, although recently it seemed that this is exactly what you need. Therefore, it is best to add contrast to it when redesigning a room. This will allow household appliances to fit into the interior normally. And the classic "black / white" is ideally combined and at the same time contrasting colors. If you add a small touch of gold to them, then it will be absolutely perfect.
White primer, black paint and matte varnish were purchased as consumables. The rest was decided to purchase during the process.
Commencement of work, dismantling of handles, facades
The first step was to remove the handles from all the cabinets, as well as the facades themselves. In fact, this is a ten-minute affair, but as always, you want to go even faster ...

It was decided to try to strip the first door of the cabinet on the spot. After all, on a factory film, the paint will hold up worse. For this, it is very convenient to use a construction hair dryer. When heated, the film begins to peel off, after which it is no longer difficult to pick it up with a knife.
 PHOTO: YouTube.com
And now the first facade, after a little warming up over the entire area, easily "gives away clothes." However, the problem is that it is in place, and it is rather difficult to remove the film from the edges. Here it was decided that this is the first and last facade, the film from which is removed on site. The rest of the doors were removed from their hinges.
 PHOTO: YouTube.com
The work is in full swing, the facades take on a new look
After removing the film, the facades are ready for painting, but they must first be primed. An adhesive primer is ideal for this purpose. It has a rather thick consistency, so it is quite enough to apply just one layer, which will significantly speed up the work.
 PHOTO: YouTube.com
The primer is applied with a roller. In this case, you need to make sure that it lies in an even layer. To do this, after it has been applied, you can walk over the surface with a squeezed roller, which will remove the excess. On average, such acrylic-based formulations dry for about two hours.
 PHOTO: YouTube.com
And while the facades are drying, you won't have to sit idle either. There are still many surfaces to be painted. These are the side walls and the inner parts of open cabinets for household appliances. Do not forget about the gas pipeline, which is often in the most conspicuous place.
 PHOTO: YouTube.com
Surface painting, varnishing
It is better to choose paint, like varnish, also on an acrylic basis. You can work with such compounds at home, there will be no toxic smell from them. First, the already dried doors are covered, after which the rest of the elements of the kitchen set are covered. The only exception is the podium strip under the wall. She has completely different plans, but more on that later. It is better to apply the paint in 2 layers, of course, waiting for the previous one to dry. This will produce deeper blacks.
 PHOTO: YouTube.com
The finishing coat, as always, is varnish. When applying matt acrylic lacquer on a black surface, it seems that the color changes, but after drying this effect will disappear. The strips must be removed with the same roller, carefully wringing it out. And yet, matte varnish should not be applied in more than 2 layers, unlike glossy. This can spoil the appearance of the facades.
 PHOTO: YouTube.com
Installation of renovated facades and interim assessment of the result
When the facades are completely dry, they can be hung in place. It was originally planned to keep the old black pens, but later the concept changed.
 PHOTO: YouTube.com
But first it was worth taking a look at what happened. And the first to appreciate the work was our beloved baby.
 PHOTO: YouTube.com
Top facades and interesting ideas
The question now arose about the color of the upper facades. If you paint them black, then the kitchen will become too dark, and therefore it was decided to make a semblance of the popular today "terrazzo" material, of course, in an arbitrary performance. And here there was already a space for fantasy to roam. The background layer was the same adhesive primer.
 PHOTO: YouTube.com
There were slight fears that it would turn out clumsy, but nothing happened. At this stage, the question arose of the choice of pens. And the golden color turned out to be the best solution. He gave a touch of smoothness to the hard contrast of black and white.
 PHOTO: YouTube.com
Podium plank and its transformation
Now it's time to plank the podium. It was not stained or primed. Here came the idea to add a headset of lightness. Therefore, mirrors were cut to size, which can be easily glued to wood with special glue or liquid nails. If it is not possible to cut off the mirror strips on your own, there is no material or skills, such strips can be ordered from glass workshops. Such work will not cost too much.
 PHOTO: YouTube.com
The glue dries, the planks are put in place, and the miracle happens. The kitchen literally hangs in the air. It looks truly incredible.
 PHOTO: YouTube.com
Another touch in the renovation of the kitchen
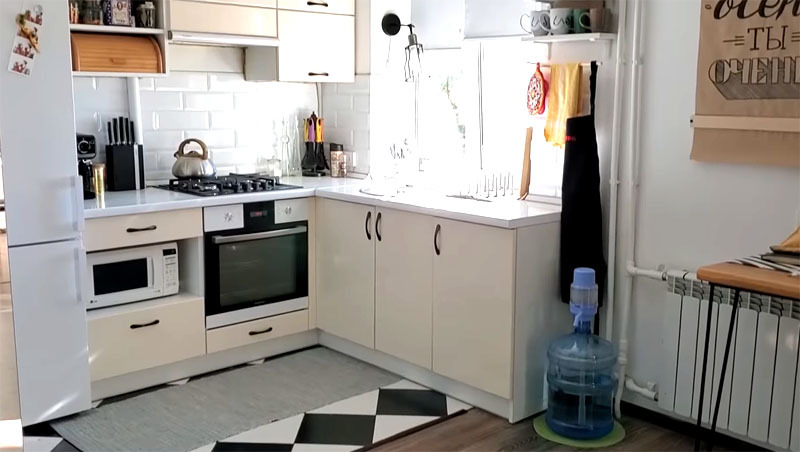
But in the renovated kitchen, the "white crow" still has a bottle of drinking water.
It also needed to be adjusted to the overall interior, and therefore the following was done:
- A cover is sewn from eco-leather that covers the upper part.
- The outer shell was made from a bucket of mastic, the bottom of which was cut with a jigsaw, and the walls were painted the same black. It was decided not to remove the pen, but to paint it with golden paint.
This decision was correct, now the whole kitchen is made in the same style.
 PHOTO: YouTube.com
Overall assessment: the result exceeded expectations
In the process of work, new interior details were invented and added, so it was impossible to predict what would happen in the end. But the result was really amazing. The kitchen has changed beyond recognition. Readers can compare the results of the work with what happened at the very beginning (in the first photo).
 PHOTO: YouTube.com
 PHOTO: YouTube.com
 PHOTO: YouTube.com
Let's sum up
It is clear that with such a renovation of the kitchen, it will not be possible to do without costs at all. However, they don't compare to buying a new headset. In addition, the experience gained will give confidence that if after some time you want something new again, such an upgrade will not be difficult to do. The results can be judged by the photo. In addition, the hostess gets used to the arrangement of cabinets and shelves, which means that the new kitchen set will be inconvenient for her at first. And here there are shelves with cabinets in their usual places, and the interior has been updated almost beyond recognition. And this means that such an upgrade with your own hands is the best thing that can be done with a boring kitchen interior.
We really hope that today's article will be useful for home craftsmen and craftswomen, and they will take this method of updating the kitchen into service. If you have any questions while reading, you can ask them in the comments below. The HouseChief editorial team will definitely answer them as comprehensively as possible and as quickly as possible. There you can also express your opinion about such alterations, whether it is worth doing such work or it is easier to purchase new furniture, as well as share personal experience of interior renovation, if any available. Did you like today's article? In this case, do not forget to rate. Your feedback is very important to us.