- Advantages
- Practical hints for the cladding
- GKL paneling
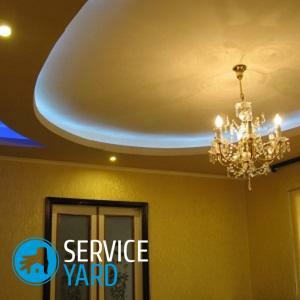
- Multi-level ceiling from the flexible profile
Most often, when referring to the higher forces, people look up and the home arch above the head is no exception. Imagine the beauty of the blue sky, and now imagine the same beauty on the ceiling of your house. Think, what is better - plastering falling off or gypsum cardboard blue above a head, after all from the ceiling the general kind of the room represented before us depends. All these metaphors to the fact that today we will talk about how to paint the ceiling with plasterboard with our own hands.
to the contents ↑Advantages of
The first thing we will talk about the advantages of such a ceiling. So, here's the list:
- Leveling the surface of the ceiling without laborious roughing.
- Ability to install various luminaires, including point and other light sources.
- The ability to hide in the design of electrical wiring and communications.
- Drywall provides sound insulation and insulates the room.
- Ability to mount ceiling structures of any complexity, the use of various decorative elements and colors.
- You can sew the ceiling yourself, if necessary.
- Availability of the material - its cost is quite acceptable even for a modest budget.
Important! Concerning the shortcomings, it is worth noting the fact that such a system will take up some useful area. Therefore, for rooms with very low ceiling use this material is undesirable.
to the contents ↑Practical hints on the skin
Applying these tips, the work will be faster, better and more efficient, and if you decide to fix the ceiling with drywall yourself, you must know the advice of professionals:
- Equip all the tools you need: drywall,punch, roulette, hangers, guiding and supporting profiles, level, plane, construction knife.
- Before you start work, cover the doorways with film. This will subsequently reduce the time spent cleaning.
- Clean the ceiling of the old finish.
- Suspension design will save you time, as there is no need to pre-level the ceiling.
- When leveling the ceiling, use the level.
- The distance of the bearing profiles from the base ceiling directly depends on how and where it is planned to install the fixtures.
- The markings must be made in such a way that the GCL joints are on the profile.
- Suspensions must be installed in staggered order.
- Before fixing the ceiling with gypsum board, it is necessary to check the quality of the connections of the frame, the wiring of the wiring.
- GKL are attached to the frame using self-tapping screws.
- After the plating, fill and stitch the seams.
GKL paneling
Now that you know what you need and how to prepare everything, go directly to the skin itself:
- Determine the height of the ceiling, taking into account what will be built in and hidden behind the GKL.
- Using a level and an ordinary pencil, we transfer the drawing to the ceiling, marking the places where the profiles and luminaires are fixed.
- We already set the basic profiles for the entire perimeter of the room.
- Then straight lines are drawn across the room, at a distance of 0.6 meters from each other. Along them, mounting brackets are fastened, the distance between which should also be about half a meter. They will serve as suspenders for load-bearing profiles.
- Set the intermediate profiles at a distance of half a meter from each other. Choose one of the long walls of the room and parallel to it on the ceiling, we apply lines with a step of 60 cm.
Important! Before starting the process, check the location of the intermediate profiles and the strength of the connections.
- Begin to fasten the sheets in staggered order from the very flat angle( that is, the angle corresponding to 90 °) of the room with the help of screws. Other masters recommend pre-laid wires in the profile, which will reduce the risk of closure.
- After finishing the carcass plating trim the excess with a knife neatly.
- Sew the seams with a suitable mixture. The first layer of putty is applied to the joint of the sheets - it is convenient to work with a spatula with a width of 150 mm. At the drying stage, apply a second coat. When the substrate dries, treat it with a grout, without damaging the facing cardboard.
- Prime the ceiling and place the last layer of the final putty with the grout.
Now you know how to make the roofing of the GKL ceiling at home, but that's not all.
to content ↑Multi-level ceiling from flexible profile
As you guessed by the name, we will make a multi-level ceiling:
- We lay the profile on the floor and collect the required length. We will shift the workpieces, so that the joints do not coincide and snap the profile. Pay attention to that all the bends are in the grooves.
- Mount the fixing corners along the perimeter of the future construction. Then fix the flexible profile and make the bend you want. Fix the profile, scissor over the metal to process the grooves.
- From profile 60x27 make the crate. For more reliable fastening of drywall sheets to the end, add corners.
- Now you can fasten the GCR.With the help of a saw cut the excess around the perimeter, as you trim the edges.
- Facet the ends with strips of plasterboard. First, make rolling with a needle roller and wet the surface of the sheet with water. After a while, the strip can be bent.
- We are already starting to create the third level. We fix the corners through the surface of the plasterboard coating to the frame of the previous sheet.
- The profile is collected in the same way as described in the previous level. In the right place, secure the profile. Make a frame-lathing, on which it will be necessary to fix the GKL.
- Cut the end of the third level with strips from the GCR.Do not forget to roll them with a roller and sprinkle with water. The design is ready, it remains only to primer and perform a finishing finish.
Important! Installation of the ceiling should be performed during the finishing works before the floor repair, but after the sanitary and electrical installation works.
Of course, the most advantageous option is a single-level ceiling. If you do not have the skills of such works, but there is perseverance and resources, then be as cautious as possible, and you will need to do everything with your partner. But if you are not ready to take such a risk, call a team of masters who will cope with everything as it should.