- Tools and materials
- How to make a bread bottle from a plastic bottle?
Today things are very popular "hand-made", that is all that is done with own hands. The simplest and cheapest materials are transformed into beautiful and useful house things. One of these is a breadbasket made of plastic bottles with their own hands. At first glance, it seems that such a thing can only be used at the dacha. But in fact, such a product can become a decoration of the kitchen, designed in the light of the latest fashion trends.
to the contents ↑Tools and materials
In order to make a bread bottle from plastic bottles with your own hands, you will not need to run to the store and spend money on additional materials. You can find everything you need at home.
So, the list of items that you will need:
- Five-liter empty plastic bottle;
- Newspapers;
- Thermocouples;
- Adhesive PVA;
- The most common wipes;
- Three-layer wipes;
- Varnish and acrylic paints.
How to make a breadbasket with plastic bottles?
To produce such a useful object will be able to even a person far from creativity.
Procedure:
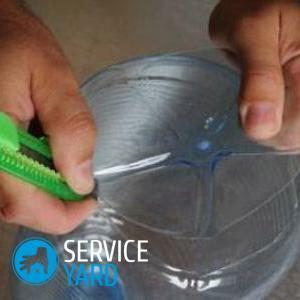
- Take an empty five-liter plastic bottle, cut the upper and lower parts of it in a circle. You should get a cylinder with the same diameter in terms of diameter.
Important! Both parts are best cut off on one of the waves of the bottle, because we still need these details.
- Put the resulting plastic cylinder on its side, measure it with a ruler of 8 cm. Make a cut along the entire length of the cylinder.
- Do the same on the other side. Thus, you should have two deep vessels.
- Take the cut bottom of the bottle and mark the middle with the marker. Cut out the center of the bottom. As a result, you should get the central part of the bottom of the bottle and two-month-old details.
- The resulting parts in the form of a month, using adhesive tape, attach to the edges of the deepened vessel.
- Cut the neck from the previously cut top of the bottle. The detail without a neck will become a support for our breadmaker.
Important! Correct the shape of this part so that it is stable for the whole breadbasket.
- Cut the newspaper in small oblong strips, using PVA glue, glue the outside of the future breadbox completely.
Important! Pay special attention to the edges of the plastic. They should also be pasted with a newspaper - so you will make them safer.
- Lubricate both sides of the vessel with PVA glue.
Important! On the outside you will lubricate the newspaper layer, with the inside - plastic.
- When the glue dries, determine the center of the bottom of the bread pan bowl, try to place the stand against it. Circle the place of attachment of the stand on the contour.
- Draw a hot melt on the drawn contour and glue the stand to the bread pan.
- Take a coin of large size, draw a wave at the top of the bowl and the bottom of the stand with it.
- Cut a superfluous cut on the applied contour - you should get a bowl with a wavy edge and with the same decor the stand.
- Cover the internal and external surfaces of the breadbox with a PVA with a conventional napkin.
- Take the three-layer napkin, separate the outer layer with the pattern.
- Cut the remaining white two-layer part into long strips.
- Dampen a towel in water and lay it on a table.
- Place the strips of napkins on the towel, thus slightly moistening them, and twist the flagella from them.
- Lubricate the wavy edges of the breadcrumbs with glue and glue the flagellum around the contour. Do this along the entire length of the bowl and the bottom of the product.
Important! With the help of small scissors, it is possible to adjust the grooves of the waves by thrusting the flagellum into it.
- The outer surface of the breadbox in the wave zone can be decorated with peas. Lubricate pointwise with glue in the right places and glue the peas.
- Draw an ornament on the outside of the product - these can be plant branches, leaves, or some other motifs.
Important! You can draw only on one side - this will be the front side of the product for bread.
- Draw the glue along the drawn contour, glue the flagella from the napkin to those places.
- Paint all the breadbox completely with acrylic paint.
Important! Convex decor elements( these are glued flagella and peas) can be distinguished by another paint applied over the main acrylic layer.
- Cover the breadcrumb with acrylic lacquer.
- Wait until the varnish dries.
Thus, easily and quickly you made a breadbasket from plastic bottles with your own hands. Putting a napkin inside the bowl, you can use the original and beautiful object for the purpose.
If you have unnecessary five-liter eggplants from under the water, do not rush to throw them away. Of these, you can get the perfect item for table layout. Following simple instructions from the article, you can quickly turn unnecessary things into a household into a useful, beautiful and original item. A similar thing can be made for a gift. Connoisseurs of original things are sure to be pleased with such a present.
