CONTENT
- 1 Varieties of the D-Link DIR-300 router and their characteristics
- 2 How to connect a D-Link DIR-300 router
- 3 How to reset the D-Link DIR-300 router settings
- 4 How to configure the D-Link DIR-300 router
- 5 What to do if router firmware is required
- 6 Features of setting up the D-Link DIR-300 router using the example of the Beeline provider
- 7 Features of setting up the D-Link DIR-300 router using the example of the Rostelecom provider
- 8 Prices for DIR-300 routers on sale
Varieties of the D-Link DIR-300 router and their characteristics
The model turned out to be really good, and at one time many liked it. Perhaps that is why several modifications were later released, or, as they say, revisions. Let's take a closer look at each one.
DIR-300 A1
The very first router, which has been produced since 2007. Laid the beginning of the series. Equipped with 1 external antenna, 1 WAN port and 4 LAN ports. Atheros AR2317 with a frequency of 182 MHz was used as a processor. It had 16 MB of RAM, and 4 MB of memory for storing data.
DIR-300 B1, B2, B3, B4
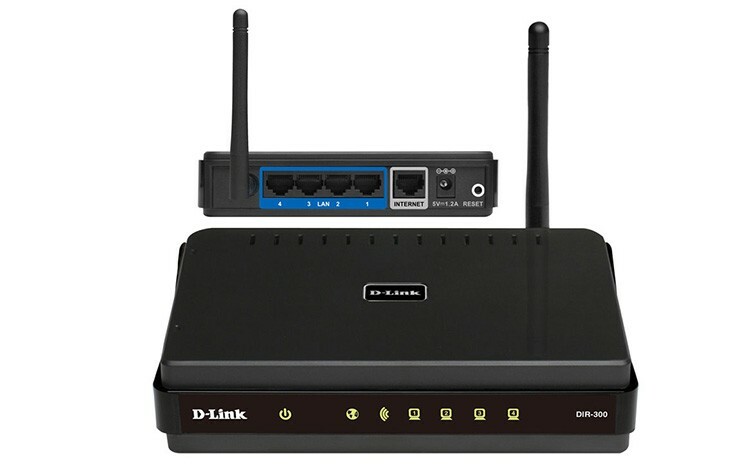
Produced since 2009. The same A1, with a new 384 MHz Ralink RT3052F processor and doubled RAM. Connectors and appearance remained unchanged. By the way, these very revisions were sold in Russia under the DIR-300NRU marking.
DIR-300 B5, B6, B7
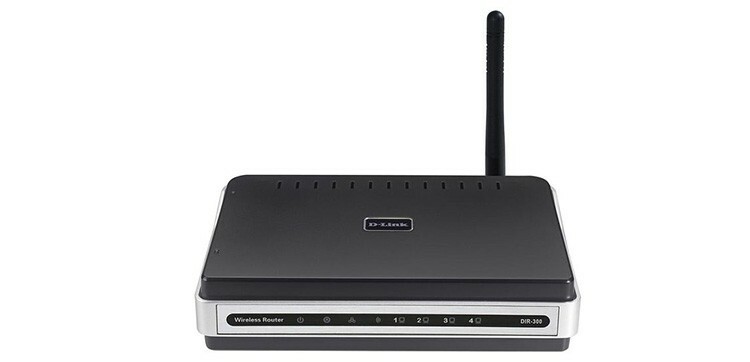
New hardware, relative to previous versions: 360 MHz Ralink RT5350 processor. The same amount of RAM and flash memory. The hardware devices do not differ from each other. Outwardly, the B5 and B6 are similar to the previous ones, but the B7 came out in a new design and was produced only for the Russian market since 2012. Also marked with NRU.
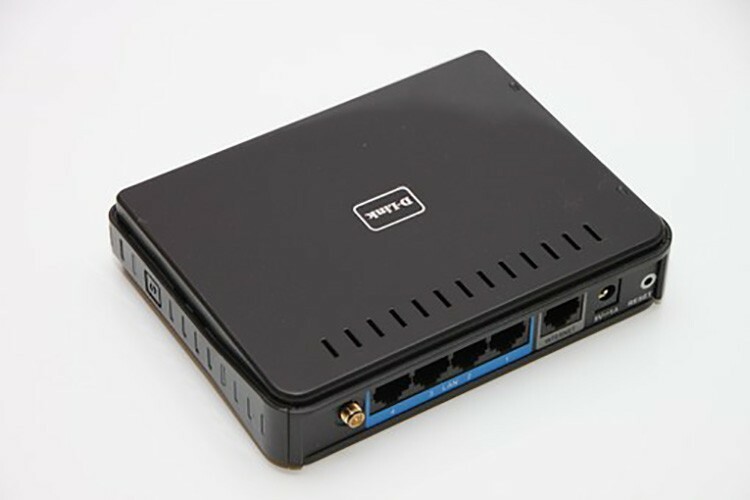
DIR-300 C1
Outwardly, the ventilation grill has changed slightly. Internally - there is a new 400 MHz Realtek RTL8196C processor. The ports, connectors and features remain the same.
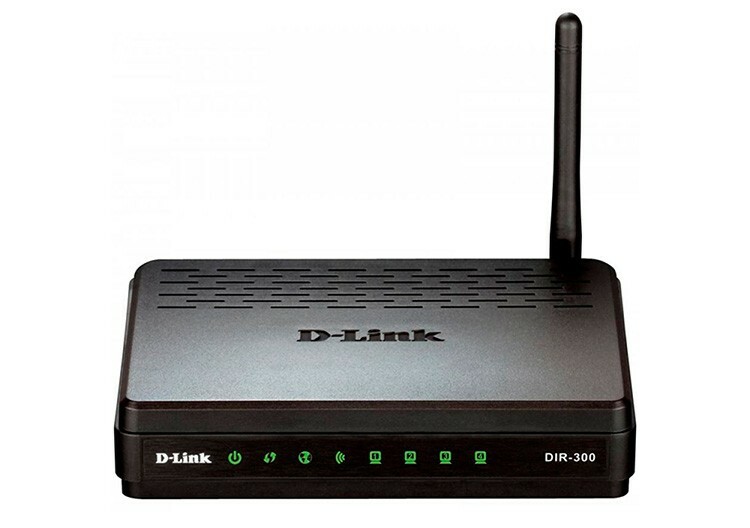
DIR-300 D1
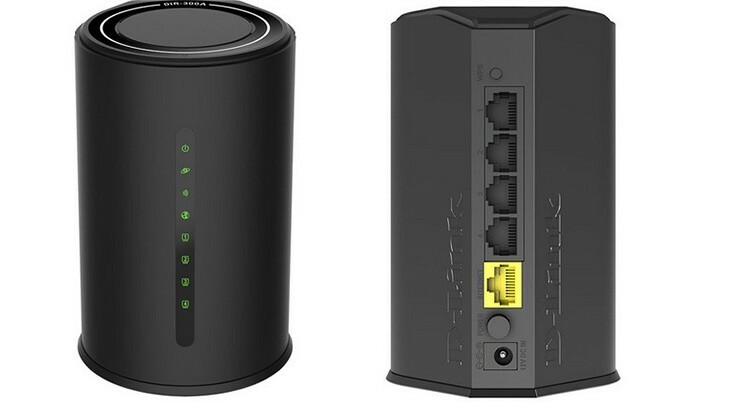
The processor index has changed - Realtek RTL8196Е, but the frequency remains the same - 400 MHz. The appearance and, in fact, the form factor have undergone drastic changes. The router got a "standing" position. Produced since 2013. Now you can buy a D-Link DIR-300 D1 router for 800 rubles.
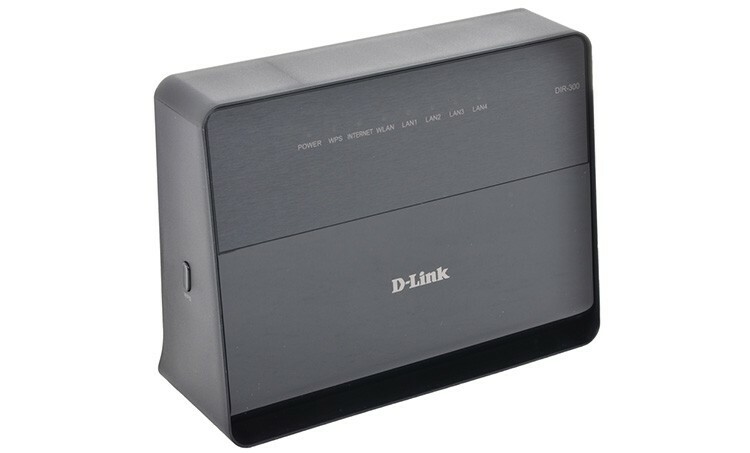
DIR-300 S / A1
Brand new look. The device got the processor from D1. The amount of flash memory has been increased to 8 MB. Otherwise, the characteristics are the same as those of the D1. Produced since 2013.
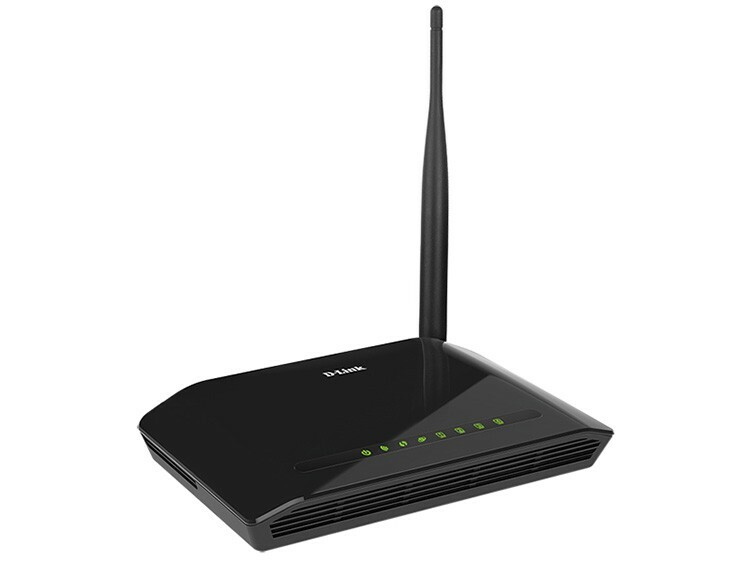
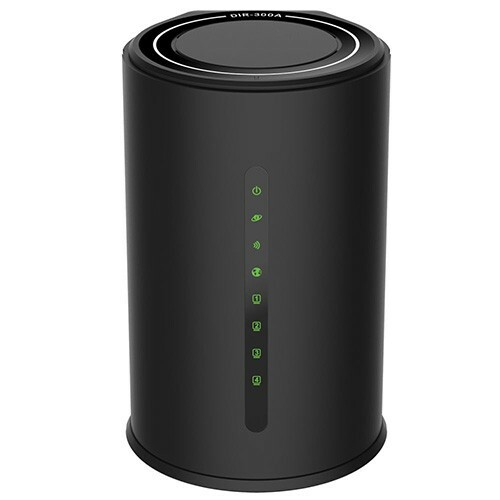
DIR-300 A / A1A
Hardware complete copy of DIR-320 with 4 MB of memory and no USB port. The design is knocked out of the classic "box" and is a cylinder.
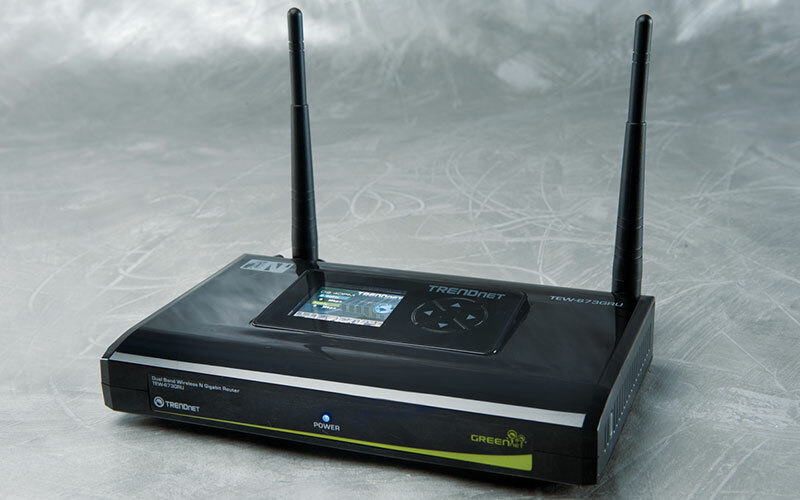 Which is the best to buy a Wi-Fi router and how to set it up.In a special publication of our portal, we will tell you in detail how to choose a router. You will learn what a router is, which Wi-Fi router is better, or the nuances of choosing, how to choose and how to connect a router yourself.
How to connect a D-Link DIR-300 router
In fact, there is nothing complicated about it. First, you need to study a little about the controls and connectors. On the front panel, there are usually LED-icons that are responsible for indicating the processes inside the device:
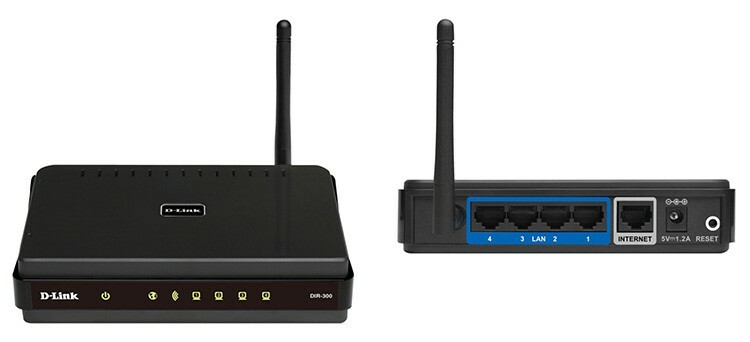
- power indicator. Icon standard for all types of devices;
- Internet connection indicator. This is usually a globe-shaped icon;
- Wi-Fi indicator. Several waves. On - connected, blinking - data transfer in progress;
- LAN ports indicator. Can be numbered according to ports. By analogy with Wi-Fi, if blinking - transmitting data, lit - connected.
The rear panel has 4 LAN ports (black or blue) and 1 WAN port. The latter is yellow and can be labeled internet or wan. There is also a power connector on the back panel, a reset button and, on some revisions, a WPS button. A special blue cable is usually supplied with the router. It is already crimped on both sides and is ready to use. It is with its help that the initial configuration of the router is performed.
It connects to one of the LAN ports, there is no difference to which. The other end must be inserted into the connector of the computer's network card. We connect the power supply and turn it on. This completes the physical connection of the D-Link DIR-300 router. After the wireless network is configured, it will be possible to disconnect the cable and use the Internet over the air.
How to reset the D-Link DIR-300 router settings
The router provides an emergency return to default settings if something goes wrong. There are two ways to do this - via the web interface, which we will discuss later, and physically - using the Reset button on the back of the device. In order to activate the D-Link DIR-300 reset process, you need to take a thin object - a paper clip, a match or the like, press the button and hold it for more than 10 seconds. All settings will be reset to default.
How to configure the D-Link DIR-300 router
All DIR-300 configuration takes place in the web interface of the router. But in order to get into it, you need to connect the router to the computer with a network connection. To do this, at the beginning of the article, we inserted a special cable into both devices. Now let's see how to set it all up.
Preparatory stage - setting up a connection to the operating system
After the cable has been inserted into the LAN ports of both devices, the operating system should detect and automatically create a network connection with the router. At this point, a small nuisance may occur: there is no network connection. This usually happens due to the incorrect setting of the IP address in the network connection protocol settings. The fact is that the router, using DHCP technology, distributes IP addresses at random every time you turn on or connect a new device. That is, one can get 192.168.0.2, and the other - 192.168.0.102. And in the computer settings, there may be an address specified manually, and even from a different subnet. Therefore, if there is no connection, you must first check this parameter. To do this, you need to go to the control panel and find the item "View network status and tasks".
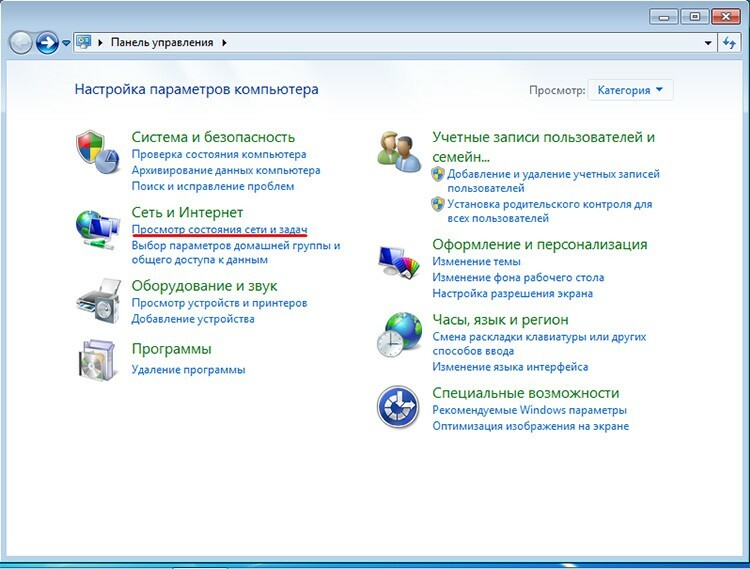
Then select "Local Area Connection" in the list of networks. In the window that appears, click "Properties".
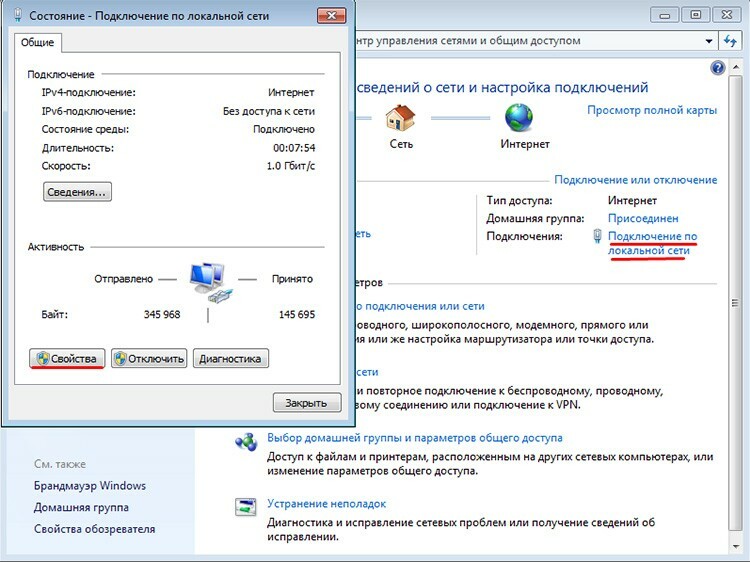
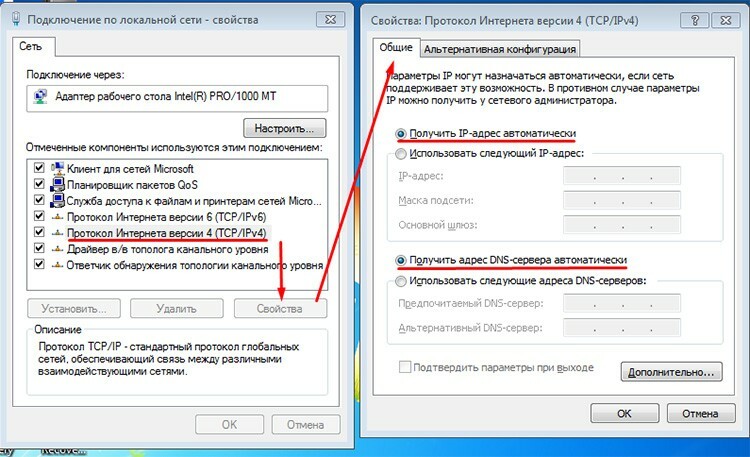
In the new window, select "Internet Protocol Version 4" and click the "Properties" button. Finally, what is needed will open. Here you need to check if the switch is in the "Obtain an IP address automatically" and "Obtain DNS server address automatically" mode. If not, enable both modes.
How to configure the D-Link DIR-300 router
After the connection has appeared, you can start configuring the router itself. All manipulations will be carried out in its web interface. Therefore, you need to start from the entrance.
Logging into the router interface
To enter, we need any browser. Having opened it, you need to enter the IP addresses of our router in the address bar. By default, this is 192.168.0.1. Less common is 192.168.1.1.
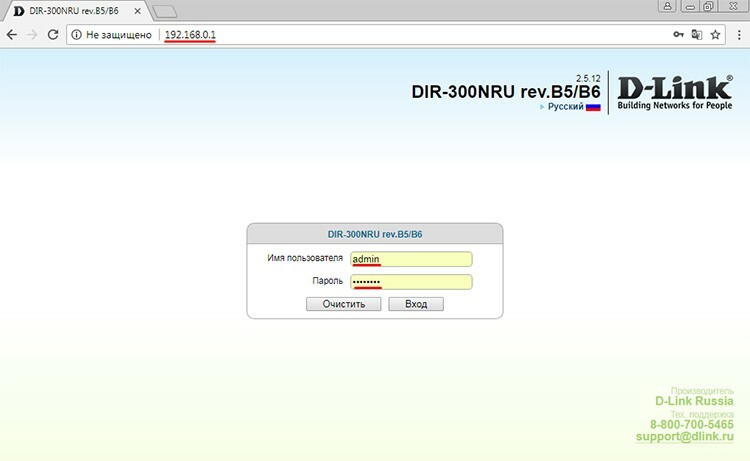
The login window will open. Here you need to enter your username and password. Usually this is the admin-admin pair, less often - admin and an empty field or 12345. After entering the password and login, we will get to the holy of holies - the administrative panel of the router.
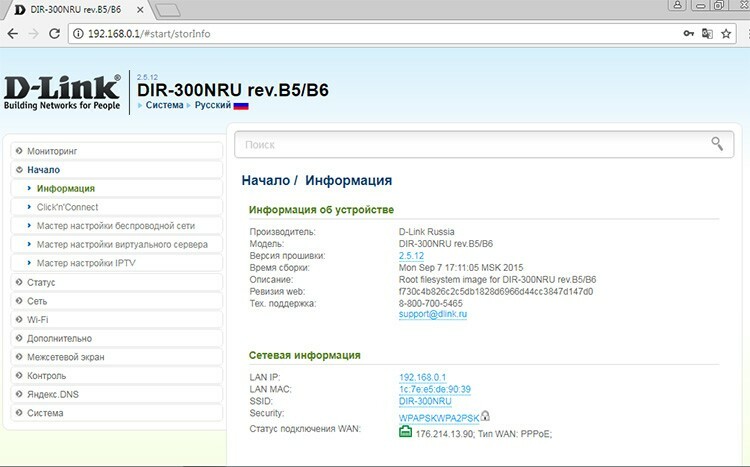
By default, the device information page opens. Here you can view various service data: revisions, firmware versions, network name, MAC address. The sections on the left define the categories of settings.
Internet connection setup
To configure the network, oddly enough, we need to go to the section of the same name. Here you need to select the "WAN" subsection. There is an "Add" button in the lower right corner. She activates the process of creating a new connection to the Internet.
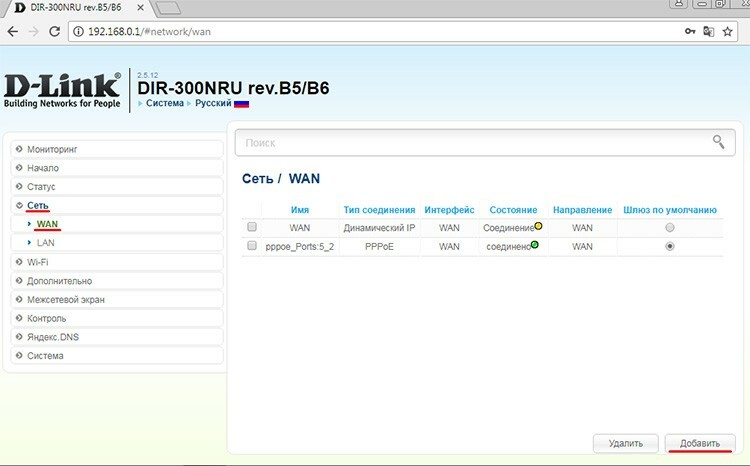
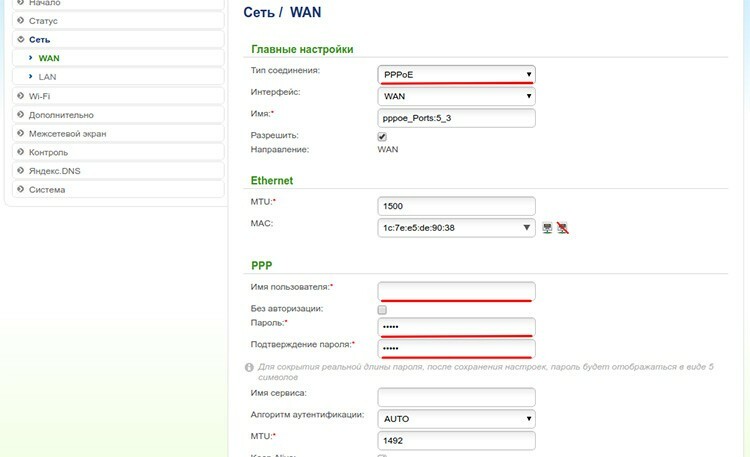
The system will immediately prompt you to select the type of connection. For most cable providers, this will be PPPoE. Further, for a simple Internet connection, we need only three points: the already mentioned connection type, username, password and its confirmation. In the login and password fields, we indicate the data provided by the provider. They can be found in the contract or annex to it. Click "Apply". After that, the globe icon on the front panel of the router should blink.
Configuring Wi-Fi router D-Link DIR-300
Now we need to distribute wireless traffic. There is a special Wi-Fi section for this. In the subsection "Basic settings" the first part of the wireless network configuration will take place.
First, you need to turn it on, if suddenly it is turned off. Therefore, we check if the "Enable wireless connection" checkbox is checked. Then you need to set the network name, which will be visible in the list of available networks. The SSID field is responsible for this. The default router can substitute its own name, which can be used without changes.
In this menu, you can pay attention to two more items: "Hide the access point" and "Wireless mode". Using the first one, you can hide your network in such a way that access to it is only by name, that is, it will not appear in the list of available networks. The second determines which modes the router will operate in. Recommended - mixed so that different types of devices can connect to the network. Basically, modes are bit rate options.
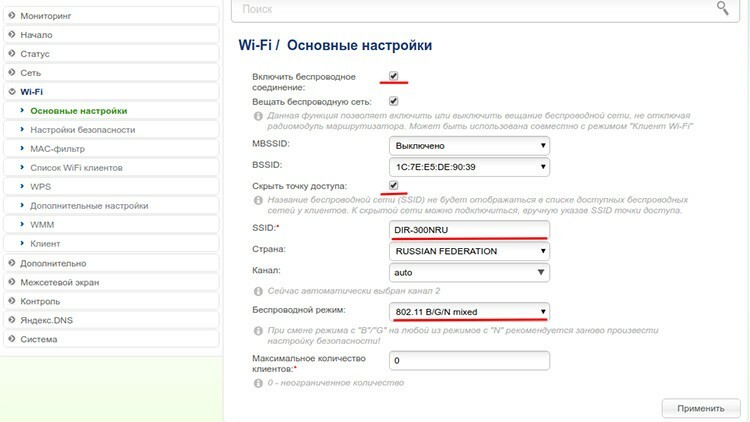
After specifying all the parameters, click the "Apply" button.
Checking the connection status
Checking network availability is now very easy. Disconnect the cable from the router. We turn on Wi-Fi on the device, find our network and try to connect. If the "Hide access point" flag was set, then you will have to find the "Connect to a hidden network" item and manually specify the network name.
If the Internet became available, then everything is configured correctly. However, there is a problem - the network does not have a password. This means that anyone can connect to it. Including intruders. It needs to be adjusted.
Setting a password on the D-Link DIR-300 Wi-Fi router
The “Security Settings” subsection of the Wi-Fi section of the router's administrative panel is responsible for the password. By the way, you can also enter the panel via a wireless connection by typing 192.168.0.1 in the address bar of your browser again.
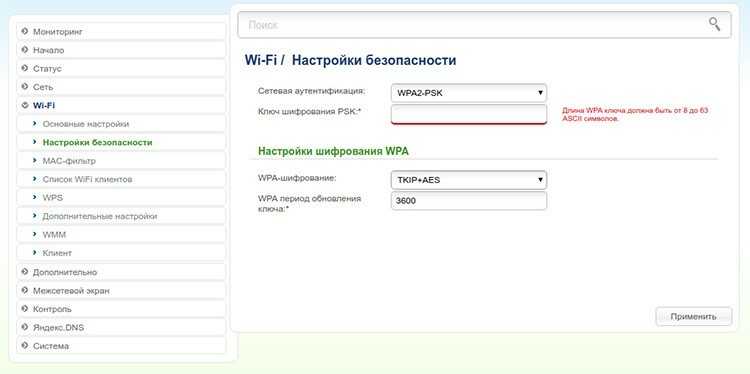
There are not many settings here. First, you need to set the type of authentication. WPA2-PSK is considered the most secure today. Then you need to enter a password in the field. Everything. Now it remains to remember the entered password and click "Apply".
How to back up your router settings
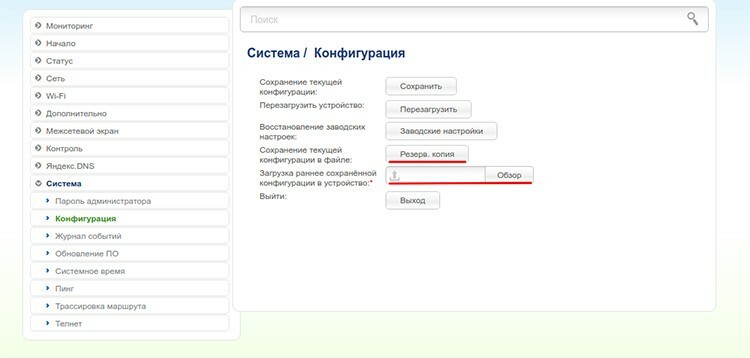
Sometimes it may be necessary to restore already saved settings after an unsuccessful flashing, accidental reset or system error. To do this, you can create a backup, which will be stored in a secluded place on the hard disk, and, if necessary, restore the system. The section "System" and the subsection "Configuration" are responsible for this. The items for the operation of creating a file and downloading it are called so. We press the button, indicate the path on the computer and save. In order to restore data, we perform the same operation. It's simple.
What to do if router firmware is required
Firmware is a pretty serious operation on a router. Its need may arise in cases when the device began to malfunction, lose Wi-Fi, or reboot itself. And if even resetting to factory settings does not help, then perhaps the salvation is in the firmware.
Another reason for the firmware may be the desire to use the router to its fullest potential. The fact is that the original software uses hardware in a balanced way, without requiring extreme performance from it. Custom firmware overclocks it to the fullest. However, this approach has a significant drawback - overheating and failure of the power supply circuits.
We will not describe the firmware process, since each revision uses its own approach and its own tools. But a few recommendations can be made. You should not run to immediately reflash your router, because you can first try to reset it to factory settings. Almost all models have a built-in update mechanism that can be manually activated. Before updating your D-Link DIR-300 router, do not forget to make a backup copy.
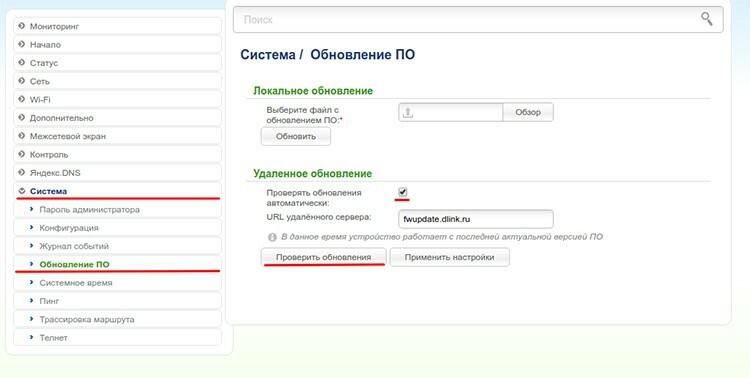
And if you decide to reflash your router, then use the instructions on authoritative sources. For example, the official website has basic tips and guides. Also, the w3bsit3-dns.com forum has a huge knowledge base, firmware and tools for each of the presented DIR-300 revisions.
Features of setting up the D-Link DIR-300 router using the example of the Beeline provider
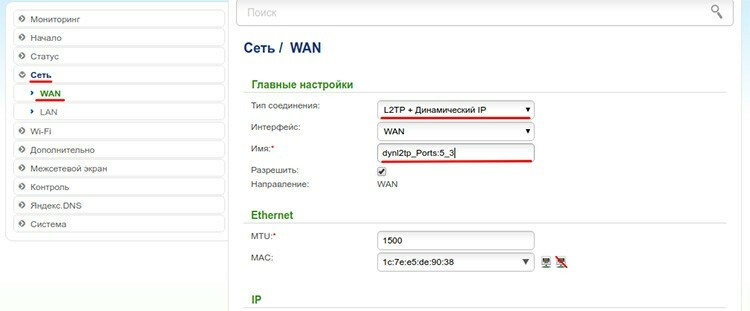
Beeline uses the L2TP type to connect to the Internet. Accordingly, the technique for creating such a connection will be slightly different. However, all the procedures performed before entering the admin panel can be taken from the usual router settings. Next, we will need to get to the WAN subsection of the "Networks" section. Here you need to specify L2TP + Dynamic IP. In the field with the name, you can specify anything, anyway, you will see it only here, in the admin panel.
Then you need to find the "VPN server address" field and specify the address. Usually it is the same - tp.internet.beeline.ru. Next, you need to specify a username and password. They must be specified in the contract.
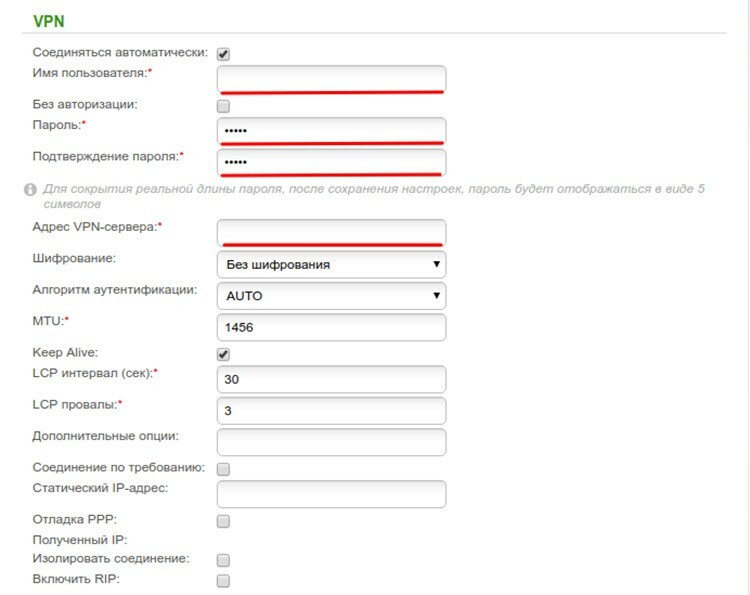
The rest of the settings can be left as is. We already wrote about how to set up Wi-Fi above, the method is the same.
Features of setting up the D-Link DIR-300 router using the example of the Rostelecom provider
The setup instructions completely coincide with the PPPoE connection setup described at the beginning of the article. However, it is worth checking when creating a connection that a checkmark is set on the Keep Alive item. Along with the Internet, Rostelecom also allows you to configure IPTV. This is also done in the WAN subsection of the "Networks" section. We need to find an item here in connection types called IPoE. However, the new firmware does not have it. But there is a static IP. We choose it. Set the MTU field to 1492.
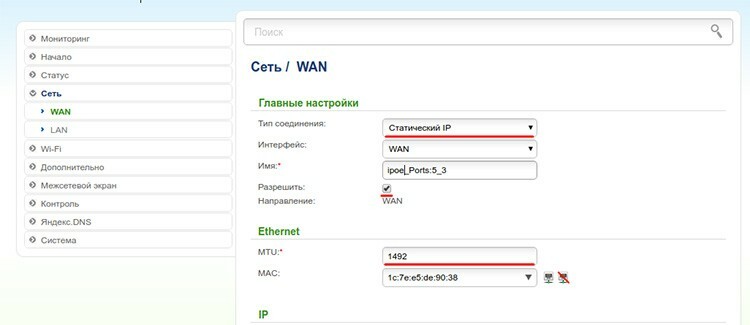
Next, in the fields, set the IP address 1.1.1.2, network mask: 255.255.255.0, gateway address: 1.1.1.1. In the "Miscellaneous" section, leave only a checkmark opposite "Enable IGMP".
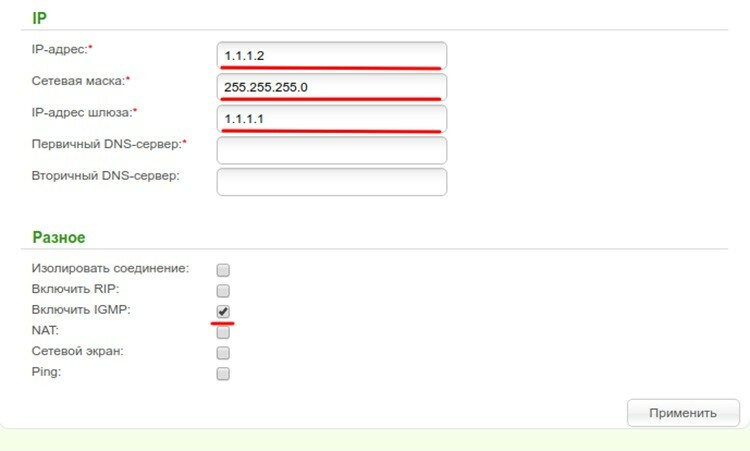
Then you will have to go to the "Advanced" section, the "Miscellaneous" subsection and make sure that the checkbox is checked in IGMP, version 2. That's all.
Prices for DIR-300 routers on sale
| Photo | Characteristics | Price (as of April 2018), RUB |
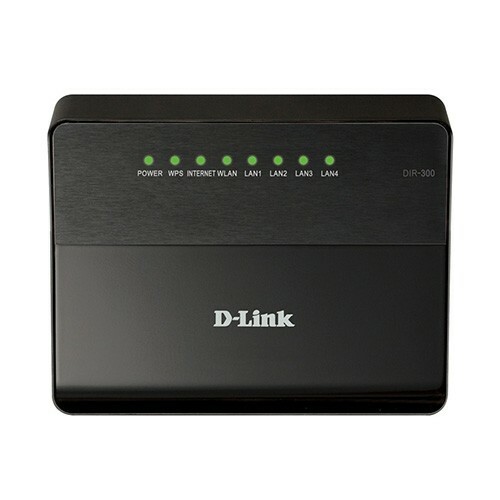 | Transfer rate: 150Mbps. Frequency range: 2.4 GHz. | 800 |
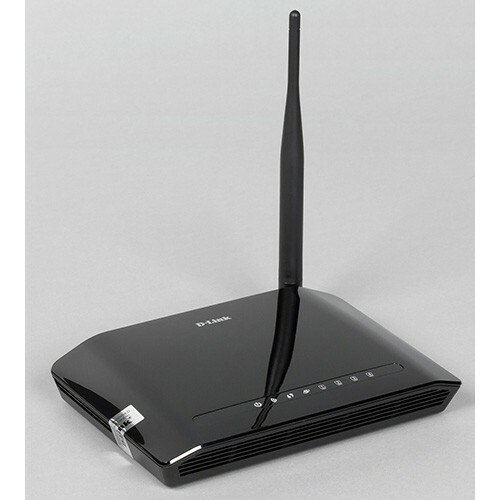 | Transfer rate: 150Mbps. Frequency range: 2.4 GHz. | 990 |
 | Transfer rate: 150Mbps. Frequency range: 2.4 GHz. | 1 000 |
Our editors have prepared this manual especially for their readers. We are waiting for your comments and feedback on the article.


