- Materials for work
- How to make a sink?
- How to properly make a shower tray of bricks and tiles?
- How to make a pallet of solid concrete?
- How to make a door?
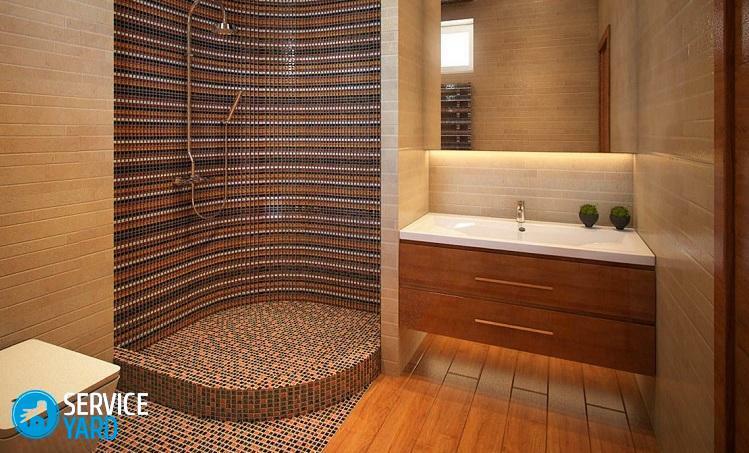
Shower cabins are popular in cottages and urban apartments, in private houses. However, the buy-in shower does not like everyone: it is too flimsy and unstable, especially if the model is budgetary. The cabin, made by themselves, requires a lot of effort and time, but much more reliable. Consider how to make a shower tray yourself.
to the contents ↑Materials for the work of
If you want to do self-construction from savings, think well before you make a shower tray with your own hands. You will hardly be able to save money, because you will need:
- Waterproofing - and, most likely, basin.
- Mortar with the addition of plasticizers to increase the waterproofing effect.
- Tile or mosaic for decoration.
Important! Not a bad idea - with a heated floor, so it was comfortable to stand barefoot on the concrete floor in the winter. In a word, the event is quite expensive, even if you do not hire masters.
to the contents ↑How to make a sink?
Despite the external similarity, there are several options for shower arrangement. Let us consider them in more detail.
Types of pallets
The simplest and fastest option is to purchase a ready-made pallet and install it on a base of foam blocks or bricks. Acrylic and metal( enameled) products are on sale:
- Acrylics do not slip and have a small mass. In addition, this material is pleasant to the touch. However, they have a drawback. Over time, they acquire a yellowish tinge.
- Enamelled - not bad in operation, but they slip. I have to use a rubber mat.
Important! If these options are not suitable, the pallet is made of concrete or bricks, followed by mosaic or tile facing.
How to make a shower tray of tiles and bricks, then we'll take a closer look. This option is reliable, but time-consuming. It requires carefully thought out isolation.
Important! If you equip a shower in a block of flats, miscalculations with waterproofing are fraught with claims from neighbors from below. If in private - that it is necessary to suffer from own negligence most.
There is one more option. It can be called a compromise. Cook the pallet in the bathroom with your own hands made of metal, treat it with an anticorrosive compound and install it on a podium of foam concrete or brick.
Dimensions
With regard to the dimensions of the pallet, there may be such options:
- 800x800 mm - this is quite small. Even a person of a subtle complexion will not feel quite comfortable.
- 900x900 mm - a little bit better, but a bit cramped.
- 1000х1000 mm - quite spacious and comfortable.
Drainage system
There are two options: ladder and siphon:
- The ladder is more expensive, but its height is smaller and it is more reliable. The safety margin is sufficient for a long time.
- Siphon assumes lower costs, but it is not as durable. Zamonolitit it - not a good idea, because when replacing you have to get to it with a puncher at the ready. Therefore, from the outset, provide a revision hole with a small door or hatch.
Important! In order to be able to clean the sewer system with a cable, it is undesirable to make a turn-over to the sewerage more than 30 degrees( 45 is the maximum permissible value).
The drain pipe should be stacked with a height difference of 4-5 cm per 1 m of length. Approximately with the same bias towards the drain, the floor is also carried out.
to the contents ↑How to properly make a shower tray of bricks and tiles?
The first requirement for a brick shower tray is a well leveled floor. If there are any differences, first align it with a rough screed. Place the drainage device, connect it to the sewer. The following procedure is as follows:
- Base waterproofing. The simplest version is bitumen, but the smell is not pleasant. Suitable also for liquid glass, cement hydrophobic impregnation, basin waterproofing. The best option, according to experts, is waterproofing for swimming pools. The composition is designed in advance for a significant pressure of water, and therefore reliable. A little bit worse in this respect is impregnation on the basis of concrete.
Important! Apply waterproofing in 2-3 layers, to be sure that there are no omissions.
- Gluing a waterproofing tape between the wall and the waterproofing. The smallest height of the approach to the floor and walls is 100 mm.
Important! By applying a tape, you protect the most vulnerable places in the plan of water seepage.
- Laying a brick layer. Brick should be used full-bodied ceramic. Silicate bricks quickly break down from moisture.
- Pouring on beacons of concrete screed. This stage already provides for the arrangement of a slope towards the drain. However, the level of the screed is still somewhat lower than the sink, since there is still to be tiled with tiles.
Important! Add to the screed solution the compounds that enhance the hydrophobic effect. Optimum options are liquid glass and building adhesive PVA.
- Once the concrete has solidified, cover it with a layer of waterproofing again. Now it is desirable to apply a hydrophobic layer on a cement base, since the tiles will be stacked much easier.
- Tile laying.
- Grouting joints with a hydrophobic composition.
If you plan to equip the heated floor, it will be 2 layers thicker:
- After the brick is laid, level the base with a layer of mortar, and lay heating cables on it( on the grid or without).
- On top, fill the structure with a special compound for the insulated floor.
- After the solution has grasped, it is possible to lay a tile.
Important! The thickness of the mortar over the cables should not be less than 30 mm. Be sure to form a slope to the sink.
to the contents ↑How to make a pallet of solid concrete?
If you plan to independently form a concrete shower tray, first collect the formwork. Materials for the manufacture of formwork - a thick board with a thickness of 2.5 cm or trimming of fiberboard or OSB( thickness from 1.6 cm).
Important! An obligatory condition is the insulation of the concrete floor. To equip the "warm floor" or not - it's your thing, but it's necessary to insulate it. In the bathhouse of a holiday home, a wooden grate can be helped out, but for a city apartment this is hardly acceptable.
The algorithm is as follows:
- Apply a waterproofing to the substrate. Glue the perimeter of the hydrophobic tape.
- Run a damper strip around the perimeter or lay a layer of insulation along the walls.
- Place polystyrene foam with a thickness of 50 mm( density from 35 kg / cubic meter).Joints glue reinforced tape.
- Place the net from the metal.
- Be guided by lighthouses, form a drain.
- Lay the screed in 2 layers. Half the thickness - with a minimum amount of water, the second half with a normal consistency.
- After setting the screed again, apply a waterproof coating to the surface.
- Only after this can lay the floor tiles.
How to make a door?
Excellent option - tempered glass. It is very strong, and if it is broken, then to large, sharp fragments. The downside of tempered glass is its high cost.
Want to save money? Make a door of ordinary thick glass, pasting it with a polymer film on both sides. The effect is about the same as with tempered glass: when broken, the fragments remain on the film, but do not scatter.
Important! Before gluing the film, the glass must first be washed and then degreased. Paste the film on the wet glass: it's much easier to work with it.
Good doors are made from sheet( not cellular!) Polycarbonate. You can also buy a finished product: glass or plastic "accordion".
In this article, we looked in detail at the materials and the progress of the work so that you could make a shower tray with your own hands. Now you only need to decide whether to do it or not.