
- Materials
- Device
- Required Tools
- Selecting the necessary materials
- Marking for workpieces
- Creating a shelf
It is common to call an ordinary cabinet without walls. The same name was given to regiments on wheels or racks designed for a small load, not attached to the walls, or to the floor, or to the ceiling. That is, it is a fairly simple design, without any complicated details. Nevertheless, this piece of furniture can be called quite multifunctional, which allows to divide the room into zones and aesthetically decorate the interior. From this article we find out why we need and how a shelf is made with our own hands on one concrete example. This issue is not just about saving money, because the special design of such products requires increased concern for their strength. Knowing how to provide it, you can create the perfect piece of furniture.
to the contents ↑Materials from
Before considering in detail how to make a self-made shelf, you should understand which material is better to give preference. In principle, any more or less durable, workable material is suitable for this. But if you are first encountering the process of making furniture, then it is better to give up too much variety.
It is recommended to start with walnut or maple spruce, because the spade is wood, aged by natural way, due to which it has a unique natural pattern.
Important! In principle, the same pine has the same individual wood pattern, so you can use it.
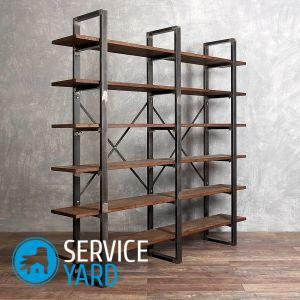
to the table of contents ↑Device
The stage we are considering now consists of a lower pedestal and four shelves.
- From the bottom, it can remain open or covered with doors.
- We will decorate the sidewalls with figured notches, passing into the points of the shelves.
Important! This product looks airy due to the use of beautiful wood and the absence of a back wall.
- Dimensions of the finished product - height 150 cm, width 70 cm, height of the lower pedestal - 50 cm, with shelves - 70 cm, and their width - 2.5 cm.we will carefully consider further. to the table of contents ↑
Required Tools
Our original woodwork will be made with the help of such tools:
- Circular saw.
- Electric drill.
- Hacksaw blade or Reciprocating Saw.
- Electric fret saw. Chisel or hand mill.
- Sandpaper, grinding machine.
- Adhesive for wood, quite suitable and PVA.
- Clamps.
- Wood screws.
- Wooden dowels.
We select the necessary materials
As mentioned above, we need 70 cm in length. To make the shelves we need boards of different widths:
- The two upper shelves are narrowest, their width does not exceed 25 cm.
- The third and fourth shelveswe will make on 30 sm width.
- Fifth and sixth 40 cm. They will act as the upper and lower shelves of the cabinet.
- We produce side panels from a board 20 cm wide, 2 m long and 2.5 cm thick, contrasting in texture or color.
Marking for workpieces
We do this clearly, carefully, according to the instruction:
- First, from each board for the production of sidewalls, we measure and cut off at 47.5 cm.
Important! With the help of these segments, we can then increase the width of the sidewalls in order to increase the depth of the curbstone.
- Then on the remaining pieces of boards we put the markings to determine the location of the shelves. Thus, the height of the space from below is 50 cm, already taking into account the thickness of the upper shelf. The distance from the upper shelf of the bedside table to the shelf located inside it is 25 cm. The dimensions of the upper shelf fully correspond to the upper end of the sidewall.
- As soon as the process of marking is completed, you can cut a groove of 1.5 cm for the shelves with a circular saw, then clean them with a chisel.
- Next, we outline the shape of the supports supporting the shelves. The width is 10 cm, and the rounding starts at a height of 20 cm from the bottom.
Important! Apply the contour better with a stencil so that all the supports have the same shape. The forms are chosen at their own discretion, based on personal preferences.
- Then the supports are cut by electric jig saw.
Creating a shelf
As soon as we prepare all the necessary blanks, we can begin to examine in detail how to make a wood stand with our own hands:
- Increase the width of the sidewalls from below, round off the edge of the shelves. Now we start to work with pieces of boards, cut off at the initial stage. Using glue and dowels, fasten the side pieces, increase the width of the side racks to 40 cm from the bottom. This step will give stability to the bookcase and increase its depth. To make the edges of the racks more rounded, we use the router to process them.
- We cut the regiments in the size of 70 cm, their front corners rounded with a jig saw, and the ends are machined with a milling cutter.
- We make wide shelves. To make them, you need to connect two boards using dowels, clamps, joinery glue. The width of each shelf should be exactly 40 cm.
- We cut the ledges on the shelves. They are necessary to give the structure a special strength. It is necessary to cut rectangles 10 cm from the back edge and 2.5 cm from the side edge of the shelf on the shelves with a hand saw. Also, it is required to cut out additional projections for the uppermost shelf.
- Fitting and grinding. Carefully check how compatible all the details are visually, but you do not need to hold them together yet.
Important! In case of detection of inconsistencies, we clean the protrusions and grooves with the chisel. Using a grinding machine, we process all the parts, and manually cut the bevels and corners.
- Wood pretreatment. If you liked more, for example, the idea of making a wooden bookcase for books with your own hands, you'll have to prime it and finish it before working with the material.
Important! In the case of tie, it is processed first with tung oil, and then with varnish. All the ends and grooves should be left perfectly clean.
- Assembling a bookcase. We glue the joints, fix each side with clamps on each shelf. Do holes for dowels directly into the shelves through the side racks. Immediately before mounting the dowel, it is necessary to put in the hole itself and on top of it glue. Do the same with each shelf.
- Once the glue has completely dries, with the help of a saw blade or a saw blade, we cut off the exposed parts of the dowels. To avoid damage to the surface, we glue it around the dowels with a paint tape.
- All sections must be sandpapered and topcoated with varnish.
The product is ready! It remains only to install it in any convenient place.
Important! According to the presented technology, not only a wooden structure can be made, but also a plywood shelf with their own hands or any other suitable material. If you want to cover the lower compartment with lockable doors, you can easily manufacture the back wall and a pair of doors. Suitable for this is the most common plywood thickness of 1.5 cm. Attach the door with small loops. The rear wall is attached in this case to self-tapping screws.
As it turned out in practice, anyone can understand how to make a bookcase on their own. Having a little experience with construction tools and the most common materials, you can create by your own forces such an original and functional device that can decorate any house.