
- How to set up a microphone?
- How to set up a microphone using a sound card?
- Microphone setup with Realtek controller
- Microphone setting in Skype
- We reduce sensitivity by alternative methods
It's nice to realize that progress can allow us to communicate with any person anywhere in the world. To hear the voice of a friend who lives from you for thousands of kilometers, you just need to have paid internet. But is it enough? Of course, without the equipment to establish communication will not succeed. It's about recording equipment. Buying a microphone in a normal situation does not cause any difficulties. Most often just connect this device to the PC, without resorting to any special settings. But sometimes it is necessary to adjust the technique, in order to get rid of the problems. This article will help you understand all the nuances of how to set up a microphone on a computer. The instructions are relevant for all modern Windows, starting with the "seven".
to the contents ↑How to set up a microphone?
Here we were able to install the microphone on the computer, connect it, but what to do next? You need to set up.
Basic steps of
- Press PCM( right mouse button) on the speaker icon located in the lower right corner and in the menu that appears after clicking, select the item "Recorders".
- You can also access the settings of the recording devices using the control panel. We enter the control panel, then open the "Hardware and Sound" section, open the "Sound" window.
- The window on the "Write" tab should open. Your recording device will be displayed here. Say something to your electro-acoustic device to check it.
- The green bars that appear after your speech mean that the microphone is working and a signal is coming from it. If the microphone is not working, nothing will happen.
Important! Here you can disconnect the microphone without physically disconnecting it from the personal computer. Click on the microphone PCM, select the item "Disconnect".You can turn on the microphone in the same way in the same menu.
Correcting
Let's start tuning the microphone. Select our device in the list and open its properties. A new menu should open, in which several tabs with the settings of the recorder will be displayed. Let's look at all the nuances of regulating the issue step by step:
- In the "General" tab, you can rename the microphone or reassign the icon. From there you can get into the window with the settings of sound drivers or turn off the recorder.
- To adjust the output from the microphone to the audio playback devices, look at the "Listen" tab. Here you can also set the behavior of the "Listen from this device" function.
Important! This function is most useful for laptops, since you can make adjustments when working on batteries.
Additional options for the
The Levels tab contains a couple of the most useful settings for the recorder.
- Function "Microphone".Here you can "unscrew" the volume as you see fit.
- Function "Microphone amplification".Here you can adjust the gain value. The most common value is +20 dB, but in fact everything depends on the microphone itself. If the sound is written too quietly, why not put more amplification? And at a high sensitivity, you can reduce the gain level.
- "Improvements".There is nothing definite here, since the settings in this window depend only on the model of the sound card and its drivers. In general, it is possible to control noise suppression and select effects.
- In the "Advanced" section you can adjust the frequency and bit depth.
Important! The "Default" button will always help to return you the original settings.
to the contents ↑How to set up a microphone using a sound card?
You can configure the settings using the sound card driver functions, but it should be noted that this method almost completely repeats the tuning tools described above:
- To get into the parameters of the sound card driver of the system, you need to go to the control panel and find the category "Hardware and Sound".A tool for managing the sound card will be available here.
- Open this module, then go to the section "Microphone", we find all the same settings, which were discussed earlier.
- On the second tab of the device settings, you can change the discredit rate and bit resolution.
Important! Changes to the settings through this method will appear in your "Windows" settings.
to content ↑Microphone setup with Realtek controller
Having trouble setting up a microphone with headphones on Windows 7?You should pay attention to this point. It happens that the microphone is incorrectly "determined."Return the functionality of the microphone will help to specify the type of device in the driver:
- We go to the control panel.
- Go to the "Manager Realtek HD".
- Select the "Microphone" window.
- Recorder must be marked as working. Also here you can set the volume level of the microphone.
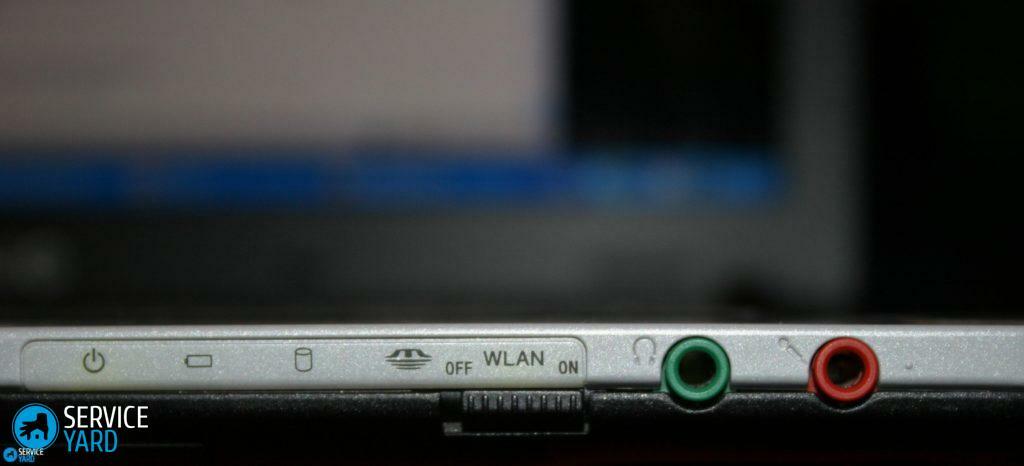
Important! Sometimes you need to specify which device is connected to the computer. Some laptops are equipped with only one 3.5 mm jack, which raises the question of sharing headphones and a microphone, so you have to combine.
to the contents ↑Setting up the microphone in Skype
You can also configure the microphone on your computer in third-party applications. For such purposes, Skype is ideal, just as you configure a separate analog microphone. Skype is just an example - no one forbids you to use other software.
To configure the microphone on Windows, you need:
- Go to Skype.
- Select "Calls" go to "Sound settings".
- With properly configured parameters, here you will observe the interface of a kind of equalizer. If you try to say anything in the microphone, the slider will start moving. Put a tick here next to the "Enable automatic microphone setting" option.
- Open the advanced settings and select the sound recorder from which the signal will be received.
Important! If the sound is still very quiet or nothing is audible at all, then in one of the settings, it is most likely that sound suppression is set. Set the maximum value and the subject of our attention should disappear. If the signal is not present and the microphone is also supported, you should refer to the device definition in the Realtek drivers, we discussed this earlier.
To improve the quality of the connection, you should do the following:
- Update the version of Skype.
- Check the speed of your internet. If you have a modem connection, then the problem may not be a microphone.
- Try to reduce the volume of music and noise. Go to the microphone closer.
Has your problem been resolved? If you can not get rid of the problems - it's worth checking the microphone for physical integrity or taking it to a diagnosis.
to content ↑Reduce sensitivity by alternative methods
High sensitivity prevents high-quality communication on the Internet. To solve this issue, the user is forced to deliberately "worsen" this parameter. The sensitivity is reduced through the use of software and hardware methods:
- Solution through the "program-mixer".We are looking for a sensitivity regulator in it, by means of which we get rid of difficulties.
- When connecting the unit to the recorder, you can use the manual adjustment of the recording level. Reduce the sensitivity of the appropriate regulator. By ear, you can not do such a job, so you need to monitor the indicators.
- And now we'll get into the "insides" of technology. We turn on the resistor( alternating) with a nominal value of 10 kΩ in series with the electret computer microphone. Increasing the resistance leads to a decrease in the supply of the amplifier stage, which leads to a decrease in sensitivity.
Important! Do not try to disassemble the equipment yourself if you are not sure of your skills.
- Achieving the pursued goal can be a "crude" method. You just need to wrap the device in several layers of fabric, the amount of which is selected by experience.
As you can see, there are a lot of ways to configure. The instructions given in this article must solve problems of any kind. If you can not achieve the desired result with your own hands, it is worth consulting with a specialist. Also there is a probability of breaking the input 3.5 mm on the PC itself. You can easily verify this by taking a technician from someone and connecting it to the input. Is the result unsatisfactory again? Then the problem should be solved by another approach. Enjoy your communication!