

- Drying Type
-
- DIY laundry dryer
With the onset of cold weatheracute is the question of drying clothes. Especially in small-sized apartments, where the useful area and so tight. It would be nice to equip an additional place for drying, without spreading cobweb ropes in the kitchen and in the bathroom. The simplest solution in this situation is the purchase of a dryer for laundry. But quality dryers do not always fit into the family budget. Therefore, we offer you a few simple ways how to make a dryer for your own clothes. To build such a structure, you do not need to have any special skills, superinstrumentami or any expensive materials. First of all, let's figure out which kinds of dryers are currently most popular.
to the table of contents ↑Types of dryers
Dryers for laundry can be divided into several kinds of views:
Depending on the location, they can be:
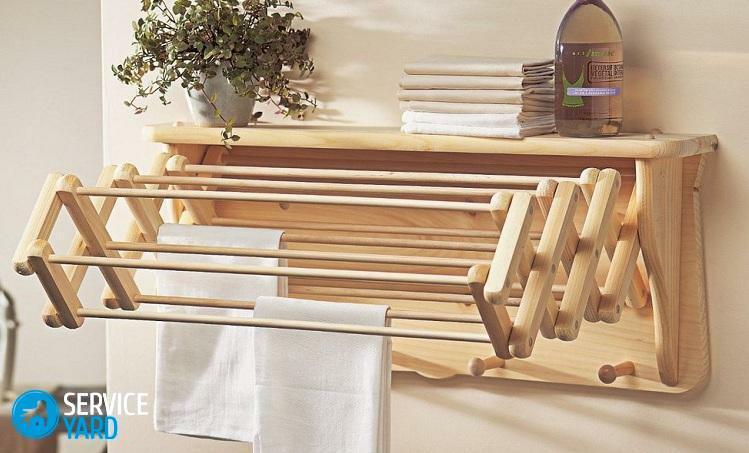
- Wall-mounted - are considered the most practical, since they allow the product to be positioned at any height.
- Ceiling - ideal for placing on a balcony.
- Floor - used when you need to dry large volumes of laundry.
Depending on the fixing method, the following types of dryers are distinguished:
- Stationary - installed both in the bathroom and on the balcony. With them there are no unnecessary questions, for example, where to put the dryer, so that it does not interfere.
- Portable, respectively, can be put in any convenient place for you.
By functionality, you can select: folding, retractable and fixed.
Important! You can think of a system that allows you to lay out or advance a design, when necessary.
to the table of contents ↑Wall-mounted dryer by own hands
To make a wall-mounted dryer for your own hands, you will need:
- wooden bars and bars;
- MDF or fiberboard board;
- hinges, clamp, transforming mechanism;
- handles for furniture, as well as nails, screws and paint.
The procedure is as follows:
- For the frame, you need to make 4 pieces from the beams, as well as 4 pieces of wooden rods. Side rails should be the same size.
- In the bars, drill blind holes, based on the diameter of the rods.
- Point the ends of the rods, insert them into the center of the frame. The frame itself is fastened with self-tapping screws.
- The MDF or MDF board is machined in such a way that its width is equal to the width of the frame, and the length is 15 cm larger.
- Connect the board to the grid using the hinges.
- The resulting design can now be primed and painted.
- Attach the retainer from above, and from one side - a transforming mechanism.
- On the bottom of the board, make three marks. Drill holes to secure the handles.
- Now it only remains to fix the dryer on the wall.
Floor-standing hand dryer
This dryer is somewhat like a table-book. It is compact enough, it does not take much space in the assembled state. To make a floor dryer for your own clothes, we will need:
- 2 side boards of particleboard or MDF;
- lined with plastic 70 by 20 cm and two boards size 60 by 20 cm for the top and bottom;
- steel pipes of two sizes - 22 by 2 mm and 18 by 2 mm;
- 12 stainless steel bars for grating;
- 6 steel pipes for support 18 by 2 mm;
- 4 steel pipes 60 cm, 4 pipes 70 cm;
- steel pipe 18 by 2 mm for the ring of the limiter;
- 4 angles, 4 furniture wheels, 4 corners;
- a pair of handles for furniture and screws.
The procedure is as follows:
- The boards that form the body of our structure must be fixed to each other. For this we need steel corners and screws with countersunk heads. From below, attach 4 furniture wheels. This will allow the construction to move easily.
- The body is connected by means of tie-rods, screwed to the top. Nuts must be pressed in the holes of the couplers. They can be fixed by cold welding. This will make the case durable.
- For the external base metal tubes with a cross section of 1, 6 cm are used, which we also need for a folding support that will hold the frame.
- For the construction of the frame and the body will need hinges. For this purpose, steel pipes are suitable. The pipe diameter for the stand must be 18 mm, and for the grille - 16 mm.
- For the production of gratings, stainless steel rods with a length of 67 cm are used. At the ends of these rods, it is necessary to make a thread, using nuts to connect them to the frame.6 rods are fastened, the spacing from the frame pipes should be at least 6 cm.
- Now the construction should be painted. This will prevent the appearance of rust, because the dryer is constantly in contact with water. First, the surface must be degreased with acetone or a solvent, then apply a primer, and then paint.
Important! As a paint, you can use enamel or car paint. At least two layers must be applied.
This design can be put anywhere: on the balcony, in the bathroom, kitchen or bedroom, and if necessary - can be folded and cleaned.
to the table of contents ↑Drying for the laundry on the battery with your own hands
Dryers for installation on the heating battery are very popular - they are compact and allow you to dry the laundry quickly in case of urgent need. In order to make the dryer for clothes on the battery with your own hands, you will need:
- several pieces of polypropylene pipe;
- four corners;
- three bolts and three nuts.
Operation:
- Cut two pipes of 60 cm and two of 70 cm each.
- Use the corners to assemble them into a rectangle.
- On one of the long sides, you need to drill two holes, insert bolts into them and tighten the nuts.
- In two short sides we make holes for ropes. A rope can be used as a rope. Just put it through the holes.
- The stop under the battery is made from a pipe and a corner at 45 degrees.
As a result - it turns out a rectangular dryer for the laundry, which is easy to install on the battery.
to the table of contents ↑Ceiling dryer for own laundry
The simplest solution to the problem of drying clothes is the manufacture and use of ceiling dryers. It is a structure that is attached to the walls directly under the ceiling. This requires a minimum set of materials and does not steal a useful space near the premises, which is especially important in small apartments. And the installation does not take much time.
To make a ceiling dryer for your own clothes, you need to perform the following manipulations:
- Take an even number of beautiful hooks on self-tapping screws.
- We also need a strong rope or a thin rope.
- On the opposite walls, under the ceiling, make symmetrical marks.
- Drill the walls in marked places, insert hooks into the holes.
- Connect them with ropes, which securely tie and tighten.
Outdoor Dryer for Lingerie
This dryer is best installed on the balcony. In order to make a street clothes dryer for yourself, you will need:
- two identical cuts of a metal pipe with a diameter of at least 3 cm;
- 4 wooden bars;
- wooden strap;
- several springs and a rope.
Operation procedure:
- The bars will function as brackets. They need to be attached to the ends of each pipe by a blind method.
- Then the design is fixed on opposite ends of the balcony.
- In one of the pipes we drill the holes, through them we pass the ropes and bend through the second pipe.
- Loose ends are tied to springs.
- Springs are fastened in advance to the nailed to a wall a lath.
Important! The design can be covered with a panel. In this case, make sure that it was shot.
to the table of contents ↑Drier for linen in the bathroom with your own hands
It is possible to make a completely simple mechanism, superimposed on the bath. To do this, you need a wooden bar, with a cross section of 20 to 20 mm.
How to get the job done:
- Fasten two pieces parallel to each other at a distance of half a meter - this will be the bottom.
- Then attach the transverse bars to which the laundry will later be laid out.
Important! The distance between the bars should be calculated based on the width of your bath.
In this article we have offered you several options how to make a dryer for your own clothes. Choose a more practical option for yourself, and be sure to use strong, high-quality materials for assembly, then you will be satisfied with the result and will not be puzzled by where to put the mountains of laundry after washing.