

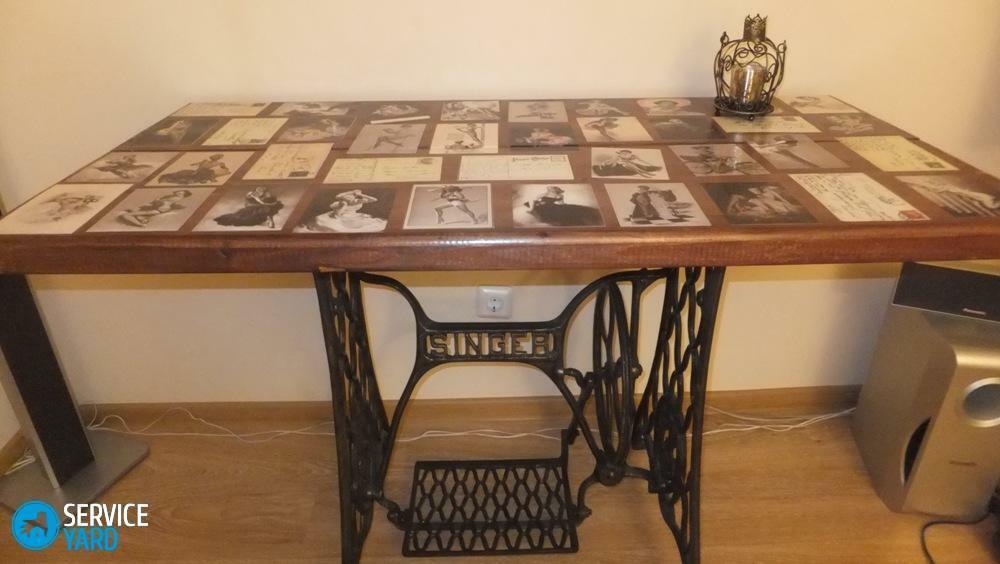
Furniture decoration is one of the simplest andinexpensive ways to update your interior. To give a new life to old furniture can be in many ways, the most popular of which is decoupage. This is a simple creative process that allows you to completely transform old and new things. This method does not require large financial costs. So, let's try to do the decoupage of the table with our own hands. What do we need for this?
Important! In French, decoupage means "cut".In fact, this is a kind of applique, gluing the selected image on the surface of the product. This method is easy to master even beginners, the main thing - patience and accuracy.
to the contents ↑Materials and tools
For decoupage, special cards or napkins are sold, they come with a wide variety of drawings on different topics. But you can use simple three-layer napkins with a beautiful pattern, or print pictures on the printer. For such a case, old newspapers, black and white photographs, in general everything that is near at hand, will perfectly suit.
For work we need:
- napkin or thin paper with a pattern;
- acrylic paints;
- acetone for surface degreasing;
- adhesive;
- primer;
- clear varnish;
- putty.
You may also need:
- furniture wax and paint tape;
- brushes for glue and paints;
- stationery knife or scissors;
- sandpaper;
- cotton wool.
Advice from professionals
There are several recommendations that you need to familiarize newcomers with before you work, so as not to be disappointed with the decoupage of the old table yourself:
- For decoupage it is better to use pictures or photos on smooth paper.
- Plastic or glass table before work should be degreased with any alcohol-containing product.
- If the surface is not smooth, it should be leveled with a putty.
- If the glass top has a raised surface, it is better to use special wipes for decoupage.
Surface preparation
Before proceeding directly to decoupage the table with your own hands, you need to prepare a working surface. For this:
- To begin with, the surface of the table should be thoroughly washed with laundry soap and cleaned with a stiff brush to remove all dirt, grease and dust.
- Then rinse with water so that there are no soap divorces, wipe it dry and leave it for a while, so that the table is completely dry.
- Now you need to get rid of the old cover. With the help of sandpaper, we remove the old paint and varnish. If there are pits on the surface, chips or cracks, they should be puttied.
Important! In the deep cracks before the putty it is necessary to pour furniture wax.
- It is the turn of the primer - you can use acrylic, it dries quickly.
- Finally, you can once again walk through the skin, then the surface will be smooth and smooth.
Now the surface is prepared for decoupling the table with your own hands.
to the contents ↑Working with the drawing
You need to form the picture the way you want it to be in the end.
Important! You need to pay enough attention to the formation of the image and carefully think over the composition in general and the location of each picture. Otherwise, the result may disappoint you.
Best if you draw a simple pencil for each picture. Next:
- If you made special wipes for decoupage, then they just need to be glued to the surface.
- But if the paper is multi-layered, for example, printed on office paper, then it needs to be stratified. This is difficult for a beginner, you need to act carefully and carefully.
So, let's start:
- Pour warm water into the container.
- We load it into the water face-down for 30-40 seconds.
- We spread the file on the table and put the picture down on it.
- Gently roll the top layers of paper until there is a thin layer with the image.
- The remaining layer is covered with PVA glue and applied to the table surface along with the file.
- Smooth the image with your finger across the file to avoid wrinkles.
- Remove the file.
In the same way, we glue all the selected images or photos to the places marked for them.
to the contents ↑Corner processing
When the entire composition is glued, it is necessary to process the places around the pictures:
- Take the appropriate paint and brush and paint.
- If you are afraid of dirty pictures with paint, then it's better to paint the table before attaching pictures.
- After drying the paint, you can start decorating the corners. This is an optional procedure, you can do without it.
- For corner decorations we use stencil and acrylic paint of the right color. We put the stencil on the corner of the table and paint it over with a brush.
- Try to hold the brush vertically so that the paint does not become numb for the pattern.
- Also process the remaining corners.
- After 10 minutes, you can carefully remove the stencils from the corners.
- The last stage - coating the surface of the table with varnish. For this purpose, an acrylic lacquer is suitable, it is advisable to apply two layers so that when using furniture the pattern is not damaged and is not deformed.
- When the varnish is completely dry, the table can be used.
Restoration of a coffee table in the technique of decoupage
To make decoupage of a coffee table is possible for everyone. The main thing is a sequence of actions and accuracy. The choice of material for decoupage largely depends on the size of the table and the material from which it is made.
Important! For this kind of work is excellent furniture from "Ikea" - it is not expensive, there are a lot of different tables in the assortment and written, and kitchen and magazine. The style of decoration can be selected depending on the design of the room where it will be located.
You can restore the old coffee table in decoupage technique, using old newspapers. Since the technique is already familiar to us, we will consider it without going into details:
- The surface of the table should be sanded, puttyed, primed.
- Newspapers cut, or even better - tear to pieces of the right size.
- Spread these pieces of glue and glue to the surface of the table.
- Dry the surface of the table.
- Coat the table with varnish, preferably in two layers.
Important! For more convenience, the newspaper should be moistened with water. When distributing pieces of newspaper on the surface of the table, care should be taken not to form large folds.
to the table of contents ↑Ideas for the kitchen: decoupage of the kitchen table with your own hands
For decoupage of the kitchen table you need to choose the pictures that fit into the interior in color and style. A technique can be used any - here you can use napkins, newspapers, postcards, photographs. It will look good tray, zadekorirovanny in the same technique.
to the contents ↑We decorate the office
You can decorate and revitalize your office by making a decoupage of your desk with your own hands. This can be done by pasting it with a cloth or a special paper for decoupage. The easiest way to return a nice view to your old desk is to paste it with napkins.
Important! It is not necessary to make very bright images on the desk in your office, they will distract attention.
Before starting work, as usual, the table surface is prepared for decoupage. It can be artificially aged, if desired, using a lacquer varnish. Cut napkins, spread the table with glue, paste and smooth the images. Then cover all with varnish for fixing.
The table will look elegant if you decorate its legs.
Important! The table should fit well into the interior of the room, for example, a small computer table can be decorated with geographical maps.
By the same principle, you can make a decoupage of a children's table with your own hands. Choose for him pictures from cartoons or even you can revive the old table from the nursery with the help of drawings of its inhabitants.
In this article we gave you the basic ideas for the beginning of needlework and the restoration of furniture in the technique of decoupage by yourself. Develop further your endeavors to give your home the same color and comfort to which you aspire.