
- ceiling drier device
- installation needs We choose the right
- Complete
- Go to assembly
Many readers have a balcony or loggia on which they dry their clothes. It is there that the mistresses hang their belongings on the ropes and dry them in the old way. Agree, this drying very much spoils the interior of both the loggia and the premises as a whole. A good alternative is to install "Lianas" - this design almost does not take up space on the balcony and has a fairly modern look. On how to assemble a ceiling dryer, you will learn from this article.
to the table of contents ↑The
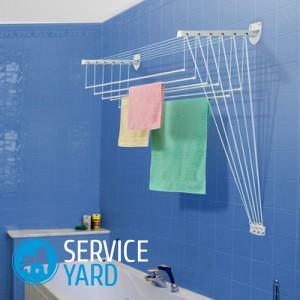
ceiling-mounted dryer "Liana" is a technologically simple design that is very convenient to operate. In addition, you can install it not only on the balcony or loggia, but in absolutely any room in your home.
The design itself looks like this:
- The installation is attached to the ceiling, at the same time, several cords-regulators holding tubes on which things are dried are attached to it.
- Several tubes of high-quality plastic or metal, covered with a means of painting wet things with protection and rust. Their length is from 0.5 to 2 m.
- A block that regulates the height of the described tubes. This function is very helpful during the hanging of wet things. Especially happy it will be girls with low growth.
Important! Such an installation is not only very convenient in its use, but also allows washed goods to be dried quickly and qualitatively due to the cascading arrangement of levels.
to the table of contents ↑Need to install
Before buying and installing a Liana dryer, it is absolutely necessary to understand all its positive and negative aspects.
Let's start with a positive note:
- This design is able to withstand heavy weight due to tension cords.
- Aesthetic component - this installation looks neat, which can not be said about ordinary ropes on the balcony or balcony.
- Easy installation and construction. To install such a "helper", enough to stock up the standard set of tools and instructions to the model.
Many will ask: "Is there really no negative side to Liana?".According to buyers, you can safely answer: "No, there are no drawbacks in the design."
Important! Do not abuse what is written in the advertising booklet of similar dryers. It is better not to risk and hang clothes weighing no more than 2.5-3 kg.
to the contents ↑Choosing the right
Before proceeding with the installation of the Liana dryer, you need to be guided by some important points:
- Before buying, find out about the maximum weight that a dryer can withstand.
- Consider the dimensions of the structure of the room where it will be located.
- Consider the material of the tubes on which things will be dried. Many users prefer to take aluminum because of its lightness and strength, however, experts recommend taking models from steel, as they are more durable and do not stain the laundry.
Important! Pay attention to the country where this or that model was produced. Everyone knows that Chinese products do not have high quality, which can not be said about the products of European countries.
to the contents ↑Completion
After the purchase of the structure, you do not need to immediately go to the installation of the dryer. First you need to check whether all of its details are present in the kit.
These parts include:
- 2 supporting brackets.
- Control side bracket.
- Set of linen rods.
- By 2 strings to each rod.
Proceed to assembly
Before assembling the structure, it is necessary to stock up on the following items, without which the installation simply can not be carried out:
- Rotary hammer with 6 mm drill. To come to the use of a drill is undesirable, since it is not as reliable as the named tool.
- Marker, tape measure to make small measurements.
- Self-tapping screws( diameter - 3,5-4 mm), dowels made of nylon( diameter - 5 mm).
- Screwdriver to lock fasteners.
Now it's time to find out how to assemble the clothes dryer bought in the store:
- Unpack the kit and remove the brackets from it - they will hold the whole installation.
- Attach them to the ceiling and note where they will be located.
- Drill holes at these points.
- Fix the brackets with screws, install the plugs on top.
- Using the same screws, screw the fixing bracket onto the wall.
Important! The height is chosen the way you want, the main thing is that you can reach it in the future.
- Skip the accessories with rods cords through the rollers of the right bracket, and through the left you need to skip a long cord.
- Pass the long and short cords through the right bracket.
- Their ends should be passed through the fixing caps on the bracket - this is necessary to give the upper and lower positions.
- In the same way, fasten the other rods.
Important! The installation algorithm in the article and in the operating instructions in the kit may differ slightly from each other. For this reason, you need to read and take into account what is written in the dial book.
After the assembly, you can already use the design for your own purposes, at the same time and checking how it copes with its task. And now you know how to fix a ceiling dryer for laundry, without harming the interior of the room, it's up to the small thing to realize it.