The bathroom is the smallest room in the house, but that does not make it any less important than all the others. On the contrary, when carrying out repairs with your own hands in this room, you need to take into account a large number of important nuances. So, in the bathroom there is always high humidity, but at the same time it is necessary to make lighting there, place sockets and electrical appliances. A small area of the room should be used as efficiently as possible so that it fits everything you need, but at the same time there is room for a comfortable stay.
If you do not follow the recommendations of experts regarding each stage of the repair, you can easily ruin everything. For example, if you start doing pipe routing after finishing walls and floors, you will have to redo everything. That is why it is so important to use the experience and tips of masters in the field of repairs.
Step by step bathroom renovation
Bathroom renovations are carried out for various reasons and may not involve the full range of repairs possible. If we are talking about repairs in a new building, you will have to do everything from and to. If it's time to refresh the old design, then it will be enough to update the walls, floor and ceiling, replace some appliances and plumbing, and perhaps add sockets.
That is why it is important to clearly define the entire front of the necessary work before starting the repair, that is, to draw up a plan. At this stage, you need to determine where the toilet will be located, how to position the shower, wall cabinets, and so on.

Bathroom renovation plan:
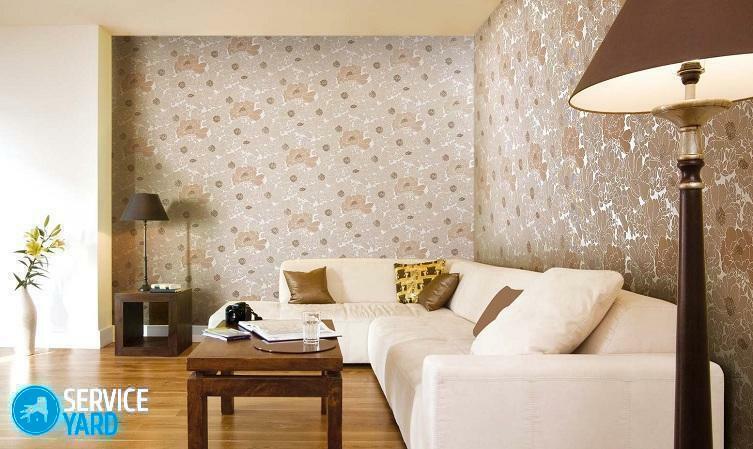
- First you need to choose the color scheme of the future bathroom. Choose the color of plumbing, tiles. Traditionally, this room is decorated in pastel colors or in white and blue colors. But nothing prevents you from making a bathroom of absolutely any color. Moreover, manufacturers offer sanitary ware in a wide color palette to the attention of buyers.
- Now to decidewhat materials will be used for decoration. As a rule, ceramic tiles are used. Will it be regular or mosaic? Or maybe you like porcelain stoneware? A what will be the ceiling?
- Then you need to decidewhether you need to purchase new plumbing. If yes, then it is worth taking the time to accurately measure so that new items fit in size.
- At the final stage of preparation you need to measure the total area of \u200b\u200bthe room, i.e. its height, width and length. And then a bathroom plan is drawn, which will take into account all the parameters obtained and reflect the location of plumbing and furniture.
Important! After finishing the fine finish, the parameters of the room will decrease slightly. This must be taken into account when calculating and planning. If this is difficult, then you just need to buy plumbing, etc. Postpone until cleanup is complete.
Bathroom remodeling
It is important to agree on the redevelopment of the bathroom with the BTI, so that later there are no problems with documents and obtaining a new technical passport. Many people mistakenly believe that if they are not going to sell an apartment, then they will not need to legalize a new plan. Bearing structures are not touched, are they? So, no big deal.
But in fact, sooner or later, one of the family members will have to face re-registration real estate (for example, when entering into an inheritance) and then this illegal redevelopment and remind you of yourself.

Having agreed on all possible changes, you can begin to create a plan for a new bathroom. Often small rooms are combined: bathroom + bathroom. In new buildings, sometimes there are no walls at all. It is necessary to carefully consider the location of the walls and the entrance, so that there is room for plumbing, furniture and the tenants themselves to be there.
Advice. Creating a plan for a new room, taking into account all the features, is not an easy task. It is advisable not to save money at this stage and turn to a specialist for a project.
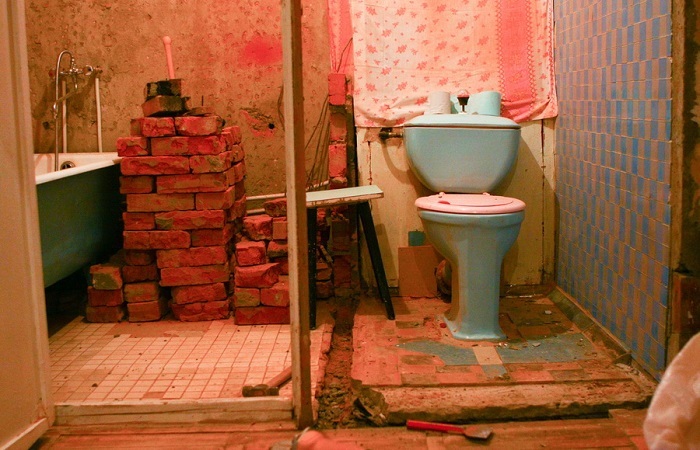
Dismantling the old and superfluous
The plan and the project are ready - this means that you can proceed directly to the repair in the bathroom and the bathroom.
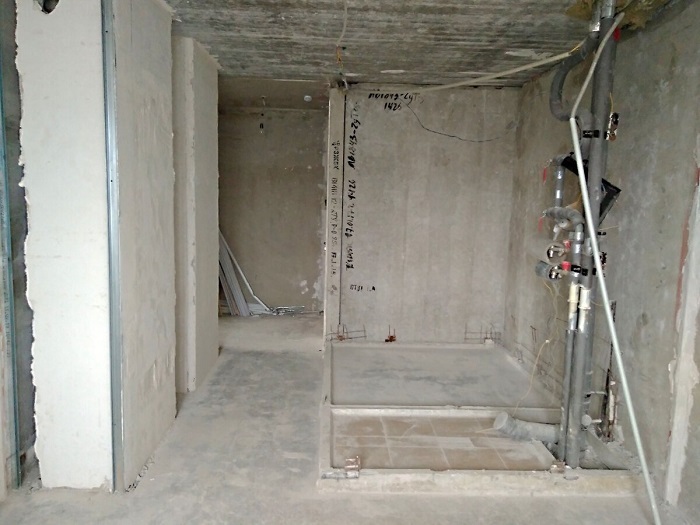
Works at the preparatory stage of dismantling:
- First of all the door with a box and platbands is removed. A freer doorway will make it easier to move, bring in and take out materials. Even if the door remains old, it is better to remove it so that it does not interfere and is not damaged.
- Now you need turn off the water and turn off all appliances. At this stage, all plumbing is also taken out. Washing machine, heated towel rail, sink, toilet - all this should leave the room.
- Next you need dismantle water and sewer pipes. Work must be carried out with the utmost care so that it does not lead to flooding of neighbors.
- Then dismantled finishing material from walls, ceiling and floor. If it was a tile, then it is necessary, in addition to itself, to remove the remaining glue.
- And lastly, partitions are removed, if necessary.
The room is empty and clean. It's about repair itself.
New walls
The creation of a new room begins with the construction of new walls, if redevelopment is conceived. For partitions in the bathroom and bathroom, you can use brick, gas block, foam block or drywall. Each of these materials has proven itself well, so you need to choose based on the availability of each in a particular case.
Important points that should not be forgotten: the thickness of the walls should not be less than 8 cm, excluding the final finish. When choosing drywall, you need to take only moisture resistant (green).

Leveling walls and floors
The walls are leveled with cement or gypsum plaster. First you need to put special plaster beacons on the walls. And only the next day you can proceed to plastering surfaces.
The material must be applied to the walls from the bottom up, parallel to the beacons and removing the excess. Only at first glance it seems that this work is difficult for a beginner. Several video lessons will dispel doubts and give confidence in their abilities.
You can level the walls not with plaster, but with sheets of moisture-resistant drywall. But this method has both advantages and disadvantages.
Advantages of using drywall:
- drywall - an excellent basis for laying ceramic tiles;
- simplifies the laying of electrical wiring, which can simply be brought into the frame of the crate.
Flaws:
- time spent on creating a crate for attaching drywall sheets;
- reduction in the area of \u200b\u200bthe room due to this crate.
No overhaul of the toilet and bathroom is complete without leveling the floor. Special beacons are also installed on it, along which a cement or gypsum mixture is then poured. You can use a "bulk" floor - a self-leveling screed.
If floor waterproofing is necessary, special films can be used that are laid under the fill or cement mixtures intended for this. The latter are applied to the screed before laying the tiles.

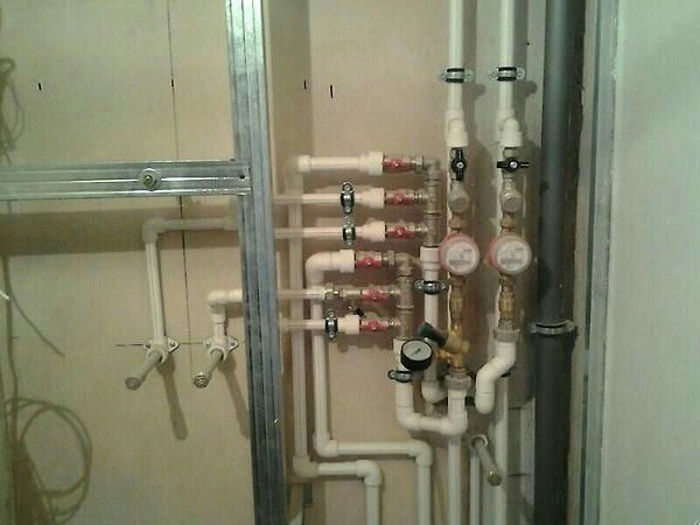
Pipes of water supply and sewerage
When replacing water and sewer pipes, be sure to immediately need to replace and risers. It will be problematic to do this after the repair. And if the house is old, then the pipes have been in operation for many years, which means that sooner or later problems will arise with them. It is better to immediately exclude such a possibility.
When replacing risers, it would be good to negotiate immediately with the neighbors from above and / or below, so that they would give access to their apartments. Thus, you can replace not only the riser in your bathroom, but also its part located between the floors.
Advice. If for this work it was decided to turn to hired specialists, it is worth at the same time to ask the neighbors if they also want to replace their risers. Then it would be possible to divide the cost of the work in half.
Work sequence:
- giving risers the desired configuration;
- laying hidden pipe wiring;
- installation of a heated towel rail if necessary;
- installation of filters that cut off emergency taps and a collector;
- installation of a water heating system, if necessary.
A collector is to distribute water to several pipes at once. Many people are familiar with the situation when hot water does not enter the shower when the washing machine is running. Or if the faucet in the kitchen is open, the pressure in the bathroom immediately weakens. That's just in order to prevent this from happening, and a collector is needed. It will supply water to various appliances and taps through separate pipes.
Important! Do not forget about the place where the measuring device (water meter) will be installed, and immediately provide easy and quick access to it.
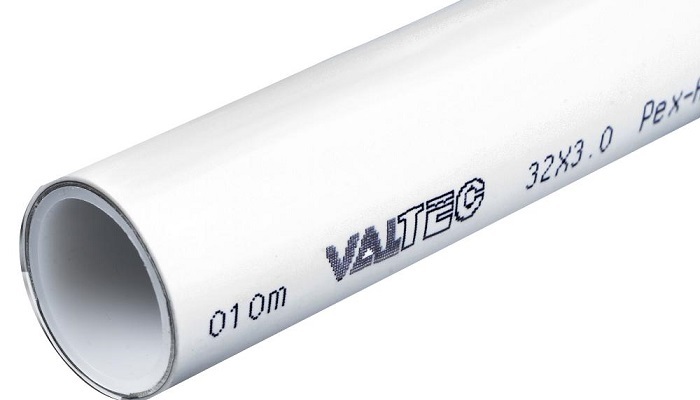
For water and sewer wiring, it is necessary to use metal-plastic or polypropylene pipes. How do they differ from each other and which ones to choose?
Metal-plastic pipes
The metal-plastic pipe consists of three layers: polyethylene, aluminum and again polyethylene. All layers are securely glued together with a special composition.
What are the "pluses" of such pipes:
- high operating temperature (95-110 degrees);
- pressure 10-16 atm.;
- with proper installation and operation, they can last about 50 years;
- do not clog, because the inner layer does not rust;
- good thermal conductivity ("plus" for the heating system);
- ease;
- ease of installation;
- the ability to give any shape and bend;
- the possibility of seamless installation of joints.
But it was not without drawbacks:
- relatively high cost;
- vulnerability to mechanical damage;
- weakening of joints from temperature changes.
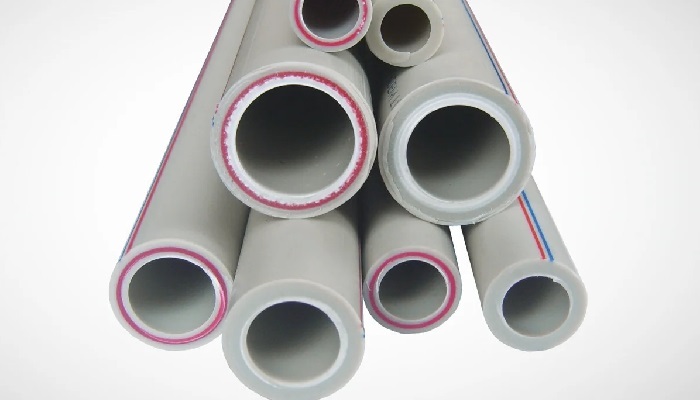
Polypropylene pipes
Most of the characteristics of metal-plastic and polypropylene pipes are the same, because both are essentially plastic. But the installation methods and technical indicators differ.
Advantages of polypropylene pipes:
- resistance to mechanical damage;
- the impossibility of stratification of the material;
- expansion and contraction from different water temperatures, which protects against destruction;
- operating temperature 75-95 degrees;
- pressure 7-14 atm.;
- low thermal conductivity;
- possibility of installation under a tile;
- low cost parts.
Flaws:
- service life, maximum 25 years (under the influence of high temperatures, they can last only 3 years);
- susceptibility to open air and sunlight;
- installation requires skills and special knowledge.
Conclusion: for water and sewer wiring in the bathroom, it is recommended to use metal-plastic pipes. But if for some reason it was decided to lay pipes without sinking them into the walls, then it is better to opt for polypropylene ones. They are more resistant to damage and are suitable for surface mounting.
Sewer installation
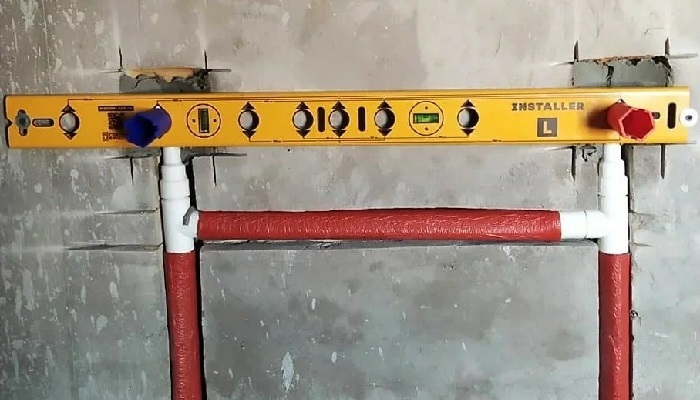
For the installation of sewer wiring, the same pipes are used as for plumbing, but of a larger diameter. For sewerage from the toilet, you need to take a pipe with a diameter of 50 mm. For washing machines and dishwashers, 40 mm is enough.
We must not forget about the obligatory slope of the sewer pipes towards the general drain so that they do not clog. For this, there is even a special plumbing level with the required degree of inclination already laid down.
Such work in the bathroom can be easily done with your own hands without the involvement of expensive craftsmen and teams.
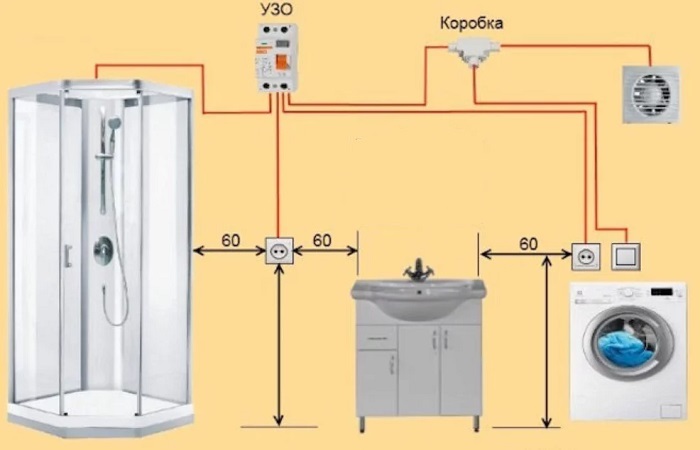
Installation of electrical wiring
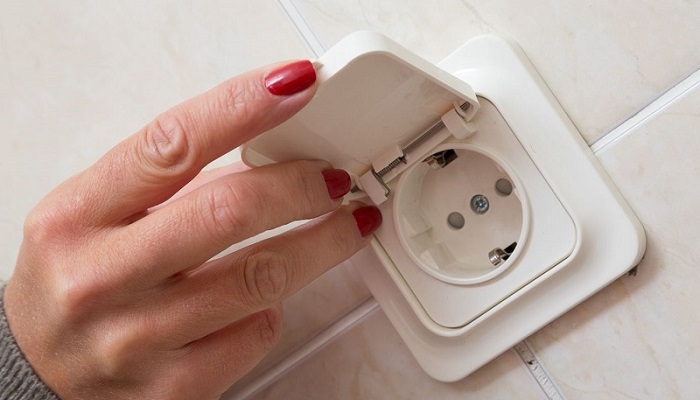
Now you can start doing electrical wiring in the bathroom. All electrical appliances can be plugged into sockets or directly connected to the network. The latter option is not convenient because when replacing, for example, an illuminated mirror, the connection point of the new one may not coincide with the old one. Then you have to make either a socket or wire connections with moisture protection.
Switches are recommended to be taken out of the room, and sockets should be sufficiently raised from the floor surface so that water does not get into them in case of possible gusts, floods, etc. At the same time, sockets should be mounted away from water sources, be grounded and have protective covers.
Helpful advice. It is convenient to lay wiring in thin pipes laid directly in the walls. Then, if you need to replace some piece of wire, you won’t have to destroy the wall: you just need to pull it out of the pipe and stretch a new one there.

Installation of a sanitary cabinet
A plumbing cabinet is a structure that closes the sewer and water risers. Most often it is made of drywall on a metal crate. A door (hatch) is made on the sanitary cabinet for constant access to communications. Also, with the help of the door there will be access to the water meter, as already mentioned above.
This design is necessary because pipes will need to be repaired or serviced in the future. Modern finishing materials allow you to make the bathroom cabinet aesthetic and fully consistent with the overall design of the bathroom.

Tiling
When all the rough and preparatory work is completed, you can proceed to the fine finish. You should start by laying ceramic tiles on the floor.
First you need to check the purchased tiles for marriage and compliance with the declared color and pattern. In addition, you need to check the batch number on each package, because the same color in different batches may differ.
Tile adhesive is applied to the tile or floor, after which the tiles are laid, leveled and tamped down. You need to start from the far corner. Whole tiles should go to open areas of the floor, and let the cut strips hide under appliances and plumbing.
Advice. The use of a laser level greatly facilitates this work.
After a day, you can proceed to laying tiles on the walls. The sequence should be as follows: the first is a row from the floor along the entire perimeter, then the second, third and further in height to the ceiling. You should also start from the far corner, taking into account all the whole tiles and the trimmed ones.
Sometimes the space under the bathroom is not laid out with tiles in order to save money. If a protective screen underneath is used, the lack of finish will not be noticeable.
In this case, it is necessary to install a bath, fix the legs and seal the joints between it and the walls. And only after that you need to proceed to laying the tiles.
All necessary holes on ceramic tiles are cut using special tungsten crowns or glass cutting nibs. The work is complex, painstaking and requires a lot of attention.
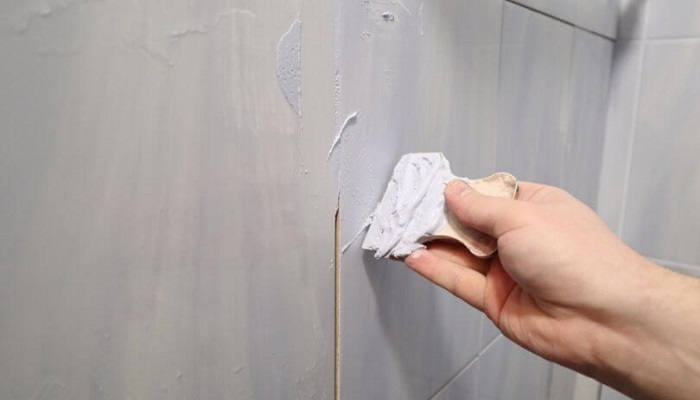
At the end of the work, all seams between the tiles are closed with waterproof grout: a special solution is applied to all gaps with a rubber spatula. It takes a day for the grout to dry.
You can't do without the use of grout for seams. Firstly, it will prevent moisture from getting under the tile and the occurrence of mold and mildew there. Secondly, it is aesthetically pleasing and gives the walls a finished look. Moreover, the grout can be chosen in any shade so that it fits perfectly under the tile.
Attention! Renovation of the toilet and bathroom involves finishing the walls not only with ceramic tiles, but also with PVC panels.
The tile has a number of advantages: aesthetic appearance, durability, ease of maintenance. But it also has a significant drawback - the price. But PVC panels are budgetary, they are also well resistant to moisture and are quite simply installed on the walls.
A wooden or metal frame is mounted on a wall that has been leveled and treated with an antiseptic, on which the panels are then attached with ordinary self-tapping screws. At the end of the work, the joints are treated with sealant, and the seams are closed with plastic corners.
A variety of designs of such panels also allows you to choose the material for any design idea and taste. But no high-quality plastic will last as long as ceramic tiles - this is a fact.

Shower tray
The shower tray can be purchased ready-made, or you can make it yourself. Both options have their pros and cons.
So, the finished acrylic pallet often has low sides, which is why water will always remain on the floor. But if you purchase a collapsible shower cabin, then the tray will easily detach from the sliding screen. This is necessary for maintenance and revision.
A do-it-yourself pallet can be laid out from a gas block or brick and overlaid with tiles, which allows you to make it the desired height. But then the siphon will not be available for maintenance and, if necessary, the entire structure will have to be disassembled.
If you decide to make a shower tray out of tiles, then you need to choose a mosaic or matte tile so as not to slip on it.
Note! A pallet from any tile will always be colder than purchased acrylic.

False ceiling installation
The clean finish of all surfaces of the room is completed with the installation of the ceiling.
It could be:
- stretch fabric;
- PVC panels;
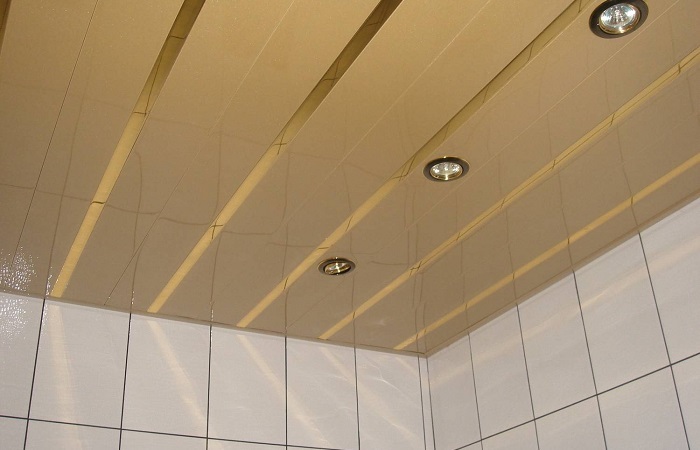
- aluminum rails.
To install a stretch ceiling, special equipment is required, and it is almost impossible to do it yourself. But the invited experts will cope with the work very quickly.
PVC panels on the ceiling are mounted in the same way as on the walls. Everything is easy and simple here, but do not forget about their fragility.
But the aluminum rack ceiling is considered the most durable, but also the most expensive of all the options presented. It is installed according to the principle of PVC panels, but with some differences in the design of the metal frame crate.
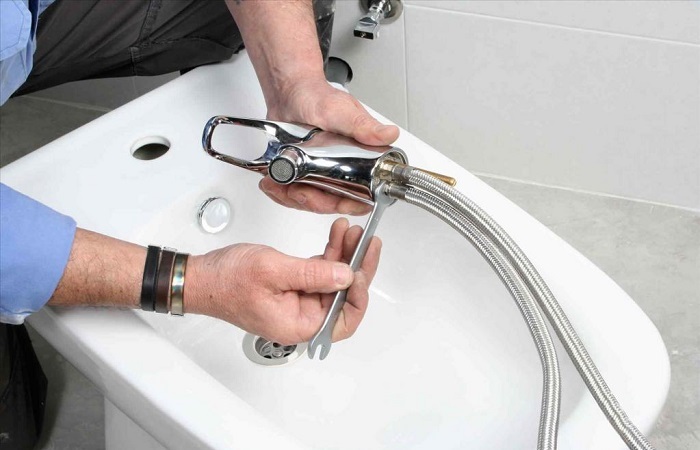
Installation of plumbing
Installation of plumbing and furniture cannot begin before the completion of the toilet and bathroom. And now, when everything is ready, nice and washed, you can proceed with the installation.
Washing machine, toilet bowl, sink, faucets, hygienic shower - all this can be easily installed and connected on your own. Right now, the whole picture that was created in my head at the planning and design stage will begin to emerge. The same picture from the drawing with calculations will “come to life” and be filled with colors.
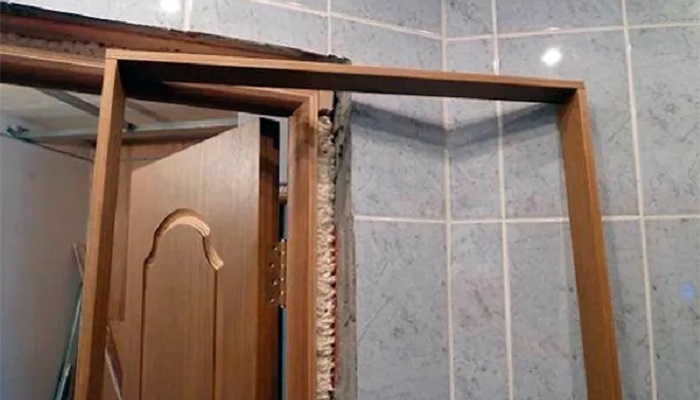
Door installation
If you correctly follow the entire procedure for the repair, then the installation of doors with a box, additional trims, trim and handles completes the work in the bathroom.
And only after that you can complete the design of the room: hang mirrors, towels, a toilet paper holder, put a brush, a trash can, etc.
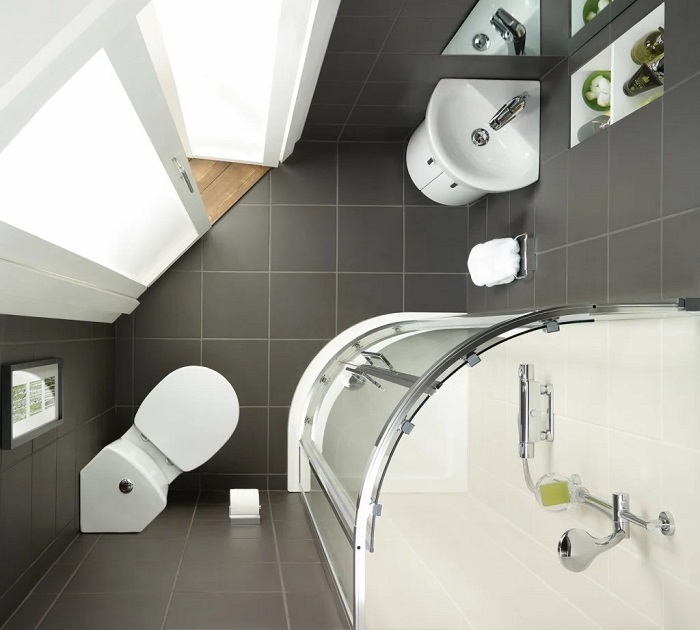
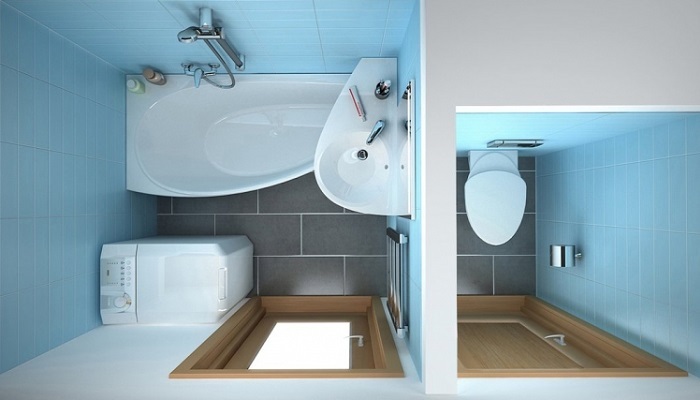
Small bathroom renovation
For a small bathroom, the best solution would be to combine it with a bathroom. Sometimes a little space can be taken from the hallway, kitchen or pantry. Such a redevelopment, based on a plan drawn up by oneself at the initial stage of repairing the bath, will make it possible to place a washing machine or a closet for hygiene items there.
Also save space corner toilet and hanging shelves. You can choose a small top-loading washing machine or place it under the sink. Of course, a shower takes up much less space than a bathtub.
Fortunately, a huge number of photos and videos are regularly posted on the Internet with ideas and tips for renovating small bathrooms with your own hands.
How exactly to plan everything, combine a bathroom with a toilet and where to start repairing a bathroom, experts in the field of repair suggest. Already having some knowledge based on the above material, you can handle most of the work yourself.
Preparation
The stage of redevelopment and the creation of new partitions is the dirtiest and most time-consuming. The wall separating the bathroom and toilet needs to be demolished. If something was located on it, you need to find a suitable place on another wall.
For example, there was a heated towel rail on the partition. A place is suitable for him, for example, above the washing machine. Do not place it over a bathtub or toilet, so as not to accidentally burn yourself.
Just under the new place of the heated towel rail, you need to think over the electrical wiring (if it is electric) or plumbing (if it is powered by the heating system).
One of the doorways is being laid, because now only one will be needed. In an empty and relatively spacious room, you can clearly see how to place a bath or shower now so that they take up less space.
Leveling walls and floors
The walls are treated with a primer and plastered. Then the floor is poured and leveled. These processes are carried out as described in the relevant section above.
Advice. You should not save on the quality of the compositions of the primer, plaster and antiseptic! The quality and durability of the entire repair as a whole depends on this.

Water supply and sewerage
After replacing the risers, they proceed to piping and (important!) Installation of the collector. It is necessary so that you can use water at several points at once so that none of them suffer from a decrease in pressure.
The traditional distribution of water pipes involves the supply of water from one pipe to the entire apartment (or house). If someone went to wash in the shower, the kitchen will no longer be able to wash the dishes. This will not happen with a collector: the collector connection increases the pressure in the apartment line.
Advice. If the risers have not been replaced, then before installing the plumbing cabinet, you need to paint them with anti-corrosion paint!

electrical wiring
It's time to move on to the wiring of the new electrical wiring. It is necessary to remember the height of the sockets and the removal of the switches into the corridor (hallway). It is recommended to make a separate supply for the washing machine and boiler from the main shield.
The ventilation exhaust fan can be connected to the lighting so that it starts its work as soon as the light turns on.
Laying tiles
Laying tiles starts from the floor and ends with the last row on the walls just under the ceiling. The horizontal arrangement of rectangular tiles on the walls will expand the space, and the vertical arrangement will increase its height.
After the tiling is completed, sealing all joints of the bathtub with the walls, a protective screen must be made. To do this, you can use all the same bricks or gas blocks, plastered and tiled.
Advice. You can use a purchased screen. They are made of plastic, and not the best quality. This is a budget and fast option. What else does it give besides full access to the space under the bathroom? Additional storage space. For example, you can put basins or some household chemicals there. This is not the most aesthetic and high-quality solution, but it is suitable if there is not enough space in the bathroom and in the apartment.

Installation of plumbing and doors
It's time to install faucets, a shower head, shelves, connect and hang an illuminated mirror. When installing a toilet, you can immediately install a non-return valve in the sewer channel, which will not let unpleasant odors into the apartment.
After installing the doors and washing all surfaces from dust, grout, you can proceed to the decor and design of the room. An original curtain, an artificial flower, a rug and a straw laundry basket can give a special coziness and convey the mood of the owners.

Conclusion
If you approach the matter with all seriousness, then you can complete the repair with your own hands in the bathroom in a few weeks. Sometimes you can even invest in a month. Of course, it all depends on the scope of work and the wishes of the owner.
Breaking down the whole process into step-by-step steps helps you better understand what you have to deal with. It also helps not to forget anything and not to miss out on inexperience. It is quite possible to completely update the bathroom with your own hands, doing everything to your liking, personally making sure of the quality of the work and saving several tens of thousands of rubles.