In the construction business, many Western terms are used. Apparently, Tsar Peter initiated this process. So the word "hip" is of German origin. For linguists, it has several meanings. And builders call this word a beveled triangular roof element. If there are two such bevels at the ends of a rectangular house, then the roof is "hip". And if there are four triangular bevels, then it will already be a “roof-tent” or “roof-pyramid”. In any case, such a roof is an interesting architectural and engineering solution.
Read in the article
- 1 What is a hip roof
- 2 Kinds
- 3 Pros and cons in terms of functionality
- 4 Structural Design Fundamentals
- 5 Self-assembly of a hip roof
- 5.1 Parameter calculation
- 5.2 Materials and tools
- 6 Installation work
- 6.1 Mauerlat installation and fixing
- 6.2 Marking and laying floor beams
- 6.3 Laying temporary flooring
- 6.4 Installation of racks and rafters
- 6.5 Lathing and counter lathing
- 6.6 Hydro and wind insulation
- 6.7 Fastening roofing material
- 6.8 Warming
- 7 The device of complex knots and reinforcements
- 7.1 Knots
- 7.2 Gain
- 8 Is a hip roof suitable for every house?
- 9 Conclusion
What is a hip roof
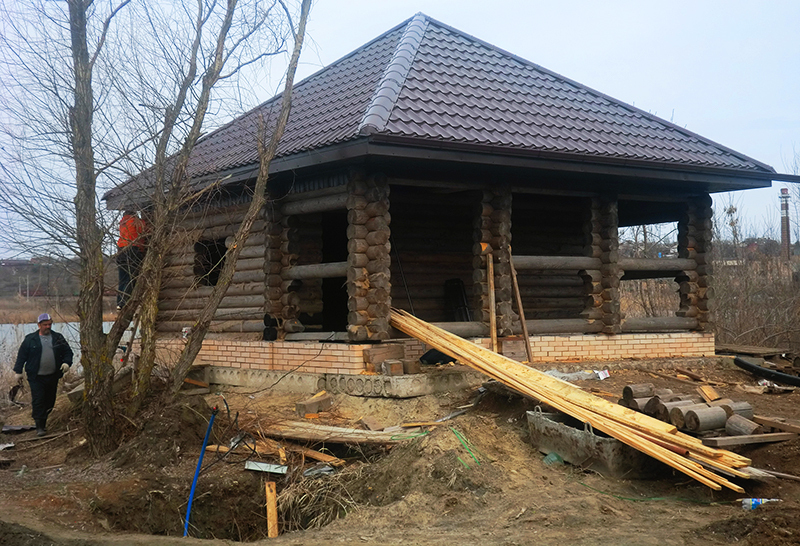
The main features of a hip roof are four slopes, and the end slopes are inclined. Such an external configuration also requires special design solutions. In a conventional hip roof, the end slopes are triangular. These triangles are called hips. But there are descriptions where the hips are called the edges of a triangular slope.
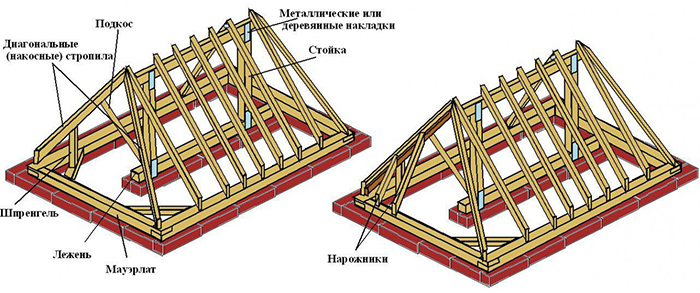
The hip roof has a complex truss system. Sometimes the builder is given the height of the ridge, then the angle of inclination of the slope has to be calculated. In other cases, the leading parameter is the angle of inclination, and the height of the ridge in this option is what happens. The builder is guided by aesthetic considerations. The geometric accuracy of the construction largely depends on the accuracy of the installation of the diagonal rafters. They are often made from double boards. Hip roofs have increased rigidity, but this property is achieved by a set of design tweaks. Careful study of the methods and execution of connecting parts to each other is required.
Kinds
The hip roof has defining features by which the roof gets the right to be called "hip". This number of slopes is four and the shape of the gable slopes is a triangle. But within this class there are groups that, at least a little, but differ from one another. This is a classic (hip-pediment), half-hip double-slope, half-hip four-slope, tent.
The classic hip is formed from two trapezoidal slopes and two, also inclined, triangular pediments. In the half-hip version, part of the triangular slope is combined with the pediment. Depending on the order in which they are arranged, it will be either a Dutch view (triangle above, gable below) or a Danish view (part of triangle below, part of gable above. At the hipped roof, all four slopes are triangular, at the top they converge to one point.
There is another type - a broken hip roof. This is an architectural structure, consisting of a number of outbuildings on the main slopes, but also observing the hip principle. Such roofs are the fruit of the architect's imagination, they are only suitable for large buildings.
Pros and cons in terms of functionality
Any technical solution has its advantages and disadvantages. The builder needs to correctly and effectively use the positive properties and, if possible, avoid the negative impact of the shortcomings.
The shape of the hip roof was born in the zone of frequent and strong winds and, from the point of view of aerodynamics (the science of the interaction of air flows and objects), experiences the least wind load.
The hip roof provides uniform thermal insulation and even distribution of heat in the house. Triangles at the base of the structure provide increased strength to the entire structure. And the absence of vertical gables reduces the wind load. Long overhangs protect the facade from precipitation. The under-roof space can be increased in volume, but you will have to be smart with design solutions. Any roofing is suitable for such a roof - ceramic, metal, soft tiles, ondulin, slate, membrane. A large number of corners and breaks suggests a great benefit from the use of piece roofing materials - tiles. There will be more waste from the leaves. The roof is very attractive.
The main disadvantage of this type in the first place is the high cost of the necessary materials and the expensive payment for installation work. In addition, due to the design features, the usable area of the attic space is noticeably reduced.
Structural Design Fundamentals
The design solutions for the hip roof are well developed and worked out a lot of times, and this allows us to highlight the core of the structure, which is mandatory. All kinds of variations are built on its basis.
Designing begins with drawing preliminary sketches. At this stage, the main dimensions and proportions are pre-set. According to the selected sketch, a general view of the building is drawn along with the roof. The dimensions of the building are initial, the dimensions of the roof are adjusted to them. This drawing determines the scale of all project drawings.
According to the general view drawing, you can determine the list of parts from which the roof will be assembled, points and methods for connecting different parts are determined. After that, you can develop drawings of all parts with all dimensions, but in the accepted scale. It would be desirable and convenient if the scale for all project drawings remains the same.
The drawings specify the installation step of the rafters, the installation locations of the supporting pillars, and the types of fasteners. Rafters distinguish layered and hanging. The rafters of the first option with their “heel” rest against the Mauerlat, and the upper end rests against the ridge beam. This option, according to the builders, gives the roof greater strength. Hanging rafters with their lower free end go below the Mauerlat.
The design of the hip roof is based on a triangular element, and this form in mechanics is considered the most rigid. Triangle combinations create a rigid structure. Corner rafters (they are also called "sloping") with their size and angle of inclination set the main geometric parameters of the roof. Short rafter legs are attached to this rafter. The ridge is made from a board of the same section as the rafter legs. At the corners of the ridge, the central rafters converge. The ridge and harness are connected by intermediate rafters. The skate is supported by a stand. The rafters are fastened with a puff, usually an appropriate floor beam is used for this purpose. The wind beam is attached to the rafters from the most windy side. Mauerlat is the base in any truss system; it runs along the entire perimeter of the building. Sprengel increases the diagonal rigidity of the building, it is attached to the Mauerlat in each corner. Struts, if necessary, increase the rigidity of the rafter legs for deflection. The number, type and dimensions of the parts will allow you to calculate the amount of wood needed, the amount of fasteners, the area of sheet materials.
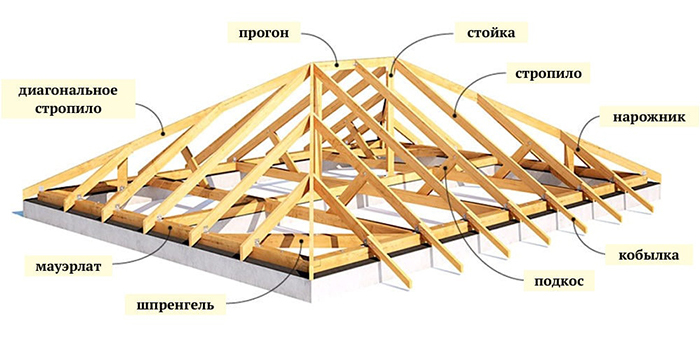
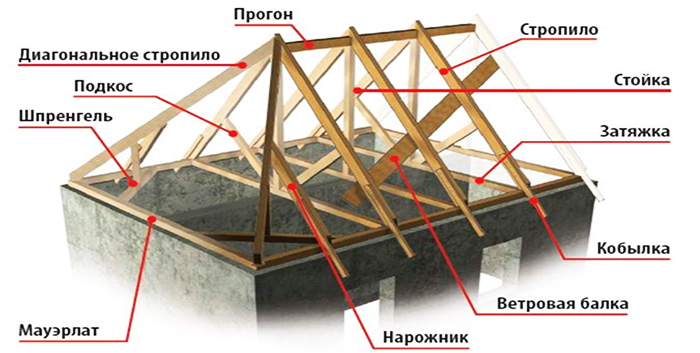
These structural elements are always present in hip roofs of any kind, and their combinations create an individual look of the building.
In the working draft, a list and sequence of all technological operations for assembling the roof from a set of parts is being worked out.
In construction practice, there is an option when farms are assembled on the ground, and then they are completely dragged into their place on top of the building. Farms in general, you can not collect yourself, but buy ready-made ones. But in this case, you will have to pay for the rental of lifting mechanisms, this option is quite expensive.
Self-assembly of a hip roof
The implementation of the project is the installation of the structure that was developed in the project. The work is difficult, but it is necessary to adhere to the developed technology. A skilled and quick-witted assistant can be of great help in installation work.
Parameter calculation
The calculation is mainly subject to the length of the truss beams. The list of initial parameters includes the overall dimensions of the building, the estimated angle of inclination of the slopes, the length of the overhangs, and information about the snow load. You can count on the basis of theorems of geometry and the rules of trigonometry. Reference books and regulatory materials provide recommendations on the value of parameters that the builder himself chooses. The calculation takes into account the type of roof construction, the need to use the under-roof volume for housing or organizing a pantry, the presence or absence of heaters in the "roofing pie" and its composition. There are calculator programs in which you need to enter the initial data, and they themselves will calculate the required parameters. The online calculator will determine the amount of building materials required for the construction of a roof of various shapes according to the specified parameters. The calculator will calculate the angles of inclination of the roof slopes, the strength of the truss system. The amount of roofing and under-roofing material and battens will be presented. In addition to the rafters in the project, one central rafter leg for hip slopes is laid, and in the side ones their number is determined depending on the length of the side of the house.
But that is not all. The calculator will compare the obtained results with the preferred ones, and if they do not match the opinion of the calculator, it will issue recommendations for adjusting the initial settings. The result will be optimal in terms of price, durability and aesthetic appeal.
Materials and tools
Before starting work, you need to complete the complete list of materials and assemble a set of tools necessary for the job.
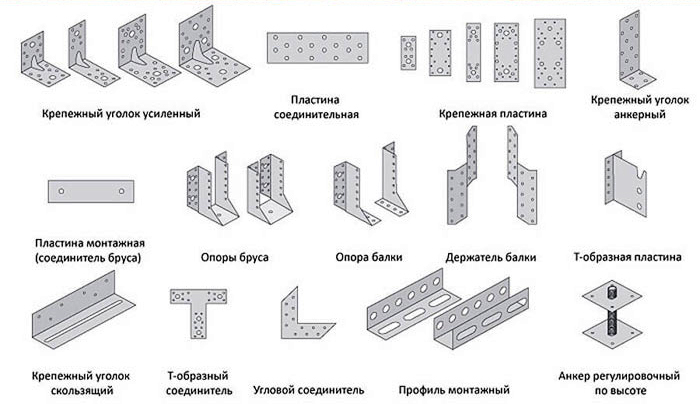
The main material is high quality and well-dried wood, which will be used to create a truss system. Professionals prefer and recommend spruce, pine, larch. It is desirable to acquire timber and boards of equal cross section, this will greatly simplify the work of connecting them. To fasten the parts, you will need fasteners - nails and self-tapping screws of different sizes, anchor bolts, large brackets. This type of fastener will need to be applied after shrinkage of the building. You should purchase a set of various fasteners of various shapes used to increase the strength of the joints of two or more parts. The set should contain special sliding fasteners for connecting the rafters with the Mauerlat, the purpose of which is to prevent the deformation of the roof during the shrinkage of the building. Roofing materials, insulation, vapor barrier film are required for complete installation of the roof.
The list of tools is standard, carpentry. You will need a pair of hammers, a mallet, a nail puller. To work with wood, you need hand saws for wood for longitudinal and transverse cutting, three planers of different sizes - jointer, medium size and small, a set of various chisels for gouging grooves, an electric saw (circular) and an electric jigsaw, a screwdriver and an electric drill with a perforator and with a set of bits and drill Tools and fixtures for marking work are needed - a building level, a plumb line, a tape measure, a ruler and a square.

Installation work
All work must be carefully planned in advance. It is necessary to make a list of all activities to be carried out and consider their sequence. Important points are highlighted. So you can't miss them. The design of the hip roof and the technology for its creation are complex, and the slightest inaccuracy can lead to collapse.
The installation of the roof is carried out in stages.
The first step is to prepare the wood elements. They must be dried, treated with antiseptic solutions, and thoroughly dried again. After reaching readiness, they can be started up in the installation of the system.
First install and fix the Mauerlats. They are placed around the perimeter on each load-bearing wall. They are placed on waterproofing materials. Carefully check all dimensions relative to each wall. If they are not identical, then it is better to measure each section. Otherwise, the floor beams may be installed unevenly.
Then comes the turn of the installation of floor beams with Mauerlats. In another case, a section of the wall is chosen below the level of the fixed beam.
The supports must be carefully fastened with screeds, this will relieve the load from the cavity of the bearing wall elements.
Mauerlat installation and fixing
Mauerlat keeps the roof from being torn off by strong gusts of wind. Therefore, the beam is attached to the walls with anchor bolts in increments of 400-500 mm. If the Mauerlat is made up of two beams, then the upper beam is attached to the lower beam with self-tapping screws. Beds (secondary Mauerlat) create support points for rafter legs, braces, racks, which additionally unloads the rafter frame.
Marking and laying floor beams
The overlap connects the outer walls of the building into a single structure. As a floor, you can use a reinforced concrete slab or assemble a floor from wooden beams.
Wooden beams are laid with their ends on the Mauerlat. Then, cross-links from the same beam are laid on top of them, plank flooring on top, and bottom filing with sheet material (OSB, plywood, fiberboard or chipboard) below.
Laying temporary flooring
On the beams intended for ceilings, on the advice of experienced craftsmen, a layer of boards is laid. Attaching them is not required. This will increase the comfort and safety of the work performed.
Temporary flooring is organized from boards not nailed to the floor beams for ease of use.
Installation of racks and rafters
In accordance with the project, the installation sites of vertical racks and rafters of all types are marked. At this stage, racks are installed, fastened with ties. They are fixed with a ridge beam and truss central bars.
To install rafters and racks, markup is carried out. Then the intermediate rafters are screwed along the frontal slopes of the structure.
They place diagonal rafters that connect the ridge and the corners of the house. If necessary, you can mount a number of additional racks.
On the diagonal rafters, sprigs and shortened truss elements are attached. The distance must be the same as for the intermediate beams.
Lathing and counter lathing
Lathing and counter-latting are laid along the rafters. Their step is determined depending on the type of roofing material chosen.
Hydro and wind insulation
These are the layers of the "roof pie". These films are laid in their places and fixed there.
Fastening roofing material
The selected roofing material is laid and fastened after assembly and installation of the "roof cake". Its fastening is carried out according to the rules for fastening the selected material.
Warming
The insulation layer is located at the top of the roof cake.
The device of complex knots and reinforcements
Knots
Reinforcements require nodes in which two or three beams are connected. For this purpose, special metal fasteners have been developed and produced.
Gain
Some beams can be overlapped by simply hammering them together with nails. Others require a tie-in to hold not only the nail, but the tree would rest against the wooden step. And in the most critical cases, special metal fasteners are used.
Is a hip roof suitable for every house?
Hip roofs organically complete low country houses. They will disfigure the general appearance of a multi-storey city building. To decide on the necessity and admissibility of a multi-pitched hip roof, it is necessary to have a sense of proportion and artistic taste.
Conclusion
The hip roof, its types and design options, its architectural appearance cannot be described in one article. The question is serious and multifaceted. Here has been an attempt to give the main points associated with this element of the building.
Those who usually suck at life really do not understand a lot of things. And in general they regretted ...
That blogging shit again... Suck on!!!
I just can’t understand: where do juvenile cockerels and swallowers get such incomes from? Who encourage...
Basements in cities and private houses should not be built, they are often drowned. Regarding similar...
There was an idea to buy a country house with a carport. We found an interesting place near the…
We have been wanting to buy a painting on canvas for a long time and recently we were pleased with this by the company Va…
Didn't like the renovation. The kitchen is narrow, it was necessary to visually solve this particular pr…
unlike the palaces of our president's friends, this is just a miserable hut, albeit in style ...
Hello, my name is Andrey. I am buying information sites. There is…
and if the top layer of foam is not broken, then the lacquer surface greatly reduces the hygroscopic ...
strange reasoning regarding sealing. If the log is doused with sealant, foam ...
In the 80s he worked in one NPO, then hammer enamel was sintered. It turned out great,...
While in the summer I lived in the country a lot of different situations I saw and no one fines anyone. Uch…
You won't find a normal apartment for such a sum in Moscow. Even for a country house that …
Thanks. Briefly and clearly...
