CONTENT
- 1 What you need to connect a TP-Link router
- 2 How to connect TP-Link router to laptop or computer
- 3 Configuring TP-Link router
- 4 TP-Link Wi-Fi router firmware update process
What you need to connect a TP-Link router
First you need, in fact, yourself router. Included with it, most often an already compressed patchcord cable is supplied, which is needed for the primary connection to a PC. You will also need a computer - it is from it that the basic configuration of the TP-Link Wi-Fi router will be performed. Well, and an agreement with an Internet provider for the provision of services with a wound Ethernet cable or a dedicated ADSL line.
How to connect TP-Link router to laptop or computer
Before connecting the TP-Link router to the network, you will have to complete a series of preparatory procedures and initial configuration. The configuration process itself can be performed in two ways: using a physical connection or using a wireless connection via Wi-Fi by default, but not all routers support this functionality.
How to find the best place for your device
There are no particular restrictions on the placement of the router. The main thing is to install it so that all connected devices are in line of sight, that is, it is advisable not to put it where there are obstacles - walls, partitions, etc. But in general, this is not critical, and if the dwelling has a small area, then you can install the router where it is convenient.
How to set up and connect your TP-Link router to your computer
For the initial configuration of the router, it must be connected to any PC. This is possible either via a wireless network or using the cable usually included in the kit. More or less modern models, when first turned on, immediately create a guest wireless network to which you can connect without a password. After that, access to the settings will appear. But most often you have to connect the device via cable. You need to connect it to one of the LAN ports on the router and the PC network card connector.
Configuring TP-Link router
After connecting the router, the very setup begins. This is a fairly quick and uncomplicated process. But still, in order to avoid misunderstandings, we will analyze the key stages.
Rollback existing router settings to factory state
At the initial stage, we will not need this. Basically, a factory reset is performed in case of beginning problems and failures of the router. On any router, not necessarily TP-Link, there is always a miniature reset button. It is marked with Reset.
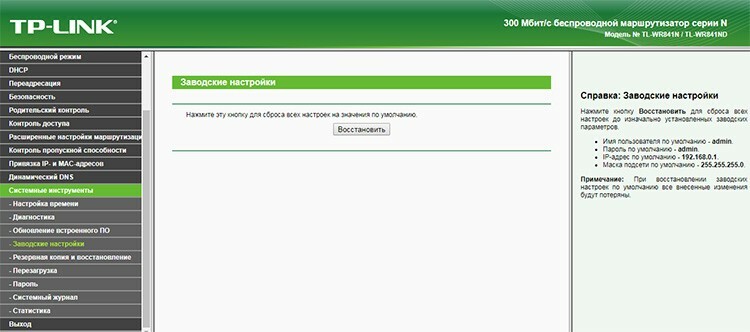
Also in the settings you can find the "Factory settings" menu item, which is usually located in the "System tools" section. The button may be called "Reset Settings", "Restore" or similar. It is worth remembering that all settings will be reset - login passwords, password for accessing the wireless network and access to the Internet.
Using the tplinkwifi.net address to log into the router control panel
Relatively recently, TP-Link began to bind a hostname like tplinkwifi.net to the default IP addresses 192.168.0.1 or 192.168.1.1. New versions of TP-Link router models are capable of this. On older models, tplinklogin.net might work as well. Actually, the address is indicated on the bottom of the device and you can, if anything, spy on it. In any case, if you type it in a browser, it will bring you to the router's web interface page. In order not to guess what name is used in a particular router, you can apply the classics - 192.168.1.1 or 192.168.0.1.
How to set up Internet connection of TP-Link router
Now you can go directly to the setup. To do this, you need to use the built-in web interface of the router. The default connection address can be found on the bottom of the device. In most cases, this will be either 192.168.0.1 or 192.168.1.1. And as we already wrote, there may be tplinkwifi.net or tplinklogin.net. Regardless of the connection method - wire or Wi-Fi, these addresses are used to connect to the router.
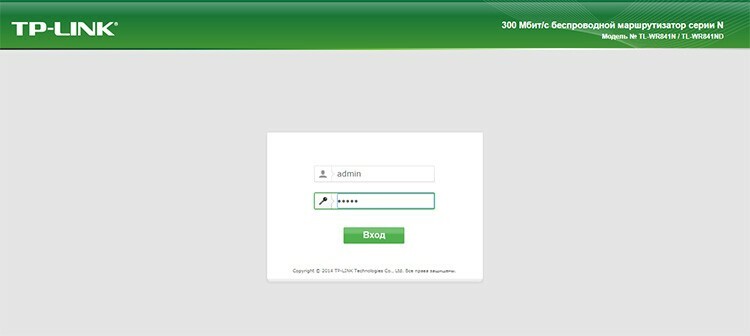
So, we have a computer connected to the router. Also, the cable from the ISP must be connected to the WAN port of the router. Before connecting to a TP-Link router, we need to open any available browser and enter the address shown on the bottom panel. The router will display a login dialog with a username and password. Again, in the bottom pane, we can find out the values of the username and password fields. Most likely it will be admin - admin.
Immediately after entering, we will see a status panel in which you can find out about the software version, hardware revision, MAC address and traffic statistics. To connect our router to the Internet, we need the "Network" section. And in it - the WAN subsection. Of the entire array of fields to fill in, we are interested in "Connection type", "Username" and two fields for the password. Connection type is the standard by which the provider provides the Internet. Most often it is PPPoE. Modern routers can automatically detect the type of connection - for this there is a button "Define".
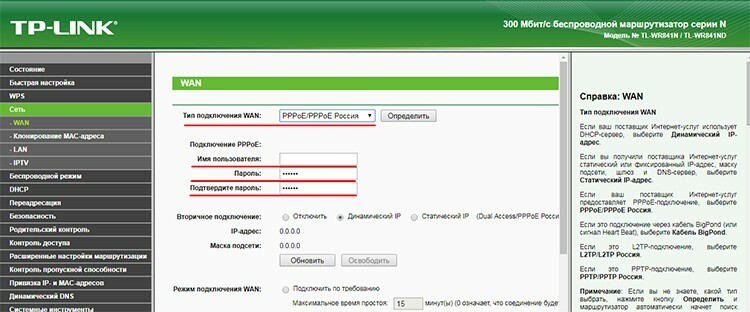
Username is a set of characters that the provider has defined for the subscriber. It can be found in the service agreement. By the way, the password must be specified there. After specifying all the necessary data, click on the "Save" button at the bottom of the page. In fact, this is the main point for configuring the router. The Internet should now be available. Even if you just connect the PC to the router with a cable, the World Wide Web will already be available.
Setting up a wireless network
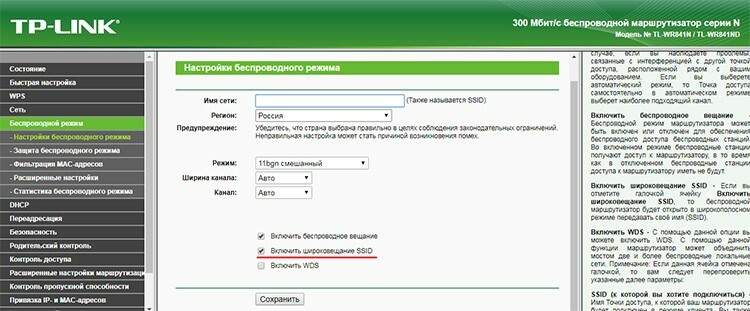
Now you need to make sure that all the user's wireless devices can access the Internet using Wi-Fi. That is, set up a wireless network. To do this, go to the "Wireless Mode" section and, first, to the "Wireless Mode Settings" subsection. Here we are only interested in two items: "Network name" and "Enable wireless broadcasting". In the first, you need to specify the name. It will be displayed when any device tries to connect. In the second, you need to check if the checkbox is ticked, and if not, put it on.
Then you need to go to the subsection "Wireless Security". Here we will indicate the type of authentication, encryption and password for access.

The authentication type can be selected WPA2-PSK. It is perfect for a home network. It is better to choose the type of encryption AES - it is more modern, reliable and fast. Any password for Wi-Fi can be set.
Changing the password for logging into the web interface
One of the important aspects of how to properly configure a TP-Link router is its security. Therefore, you need to change the password for logging into the router's web interface. This will reduce the possibility of unauthorized access. An attacker can do it this way: by brute-force or vulnerability of communication protocols, he can guess the password for accessing the wireless network. Then, by going to the standard address 192.168.0.1, he can simply specify the default login and password - admin and admin. After that, he can do whatever he wants with the router - install his own firmware, change passwords, find out the login and password to connect to the provider, and much more. Naturally, such a scenario is unlikely, and even having gained access, an attacker will not cause particularly serious harm, but still losing control of your device is a little unpleasant. Therefore, we will change.
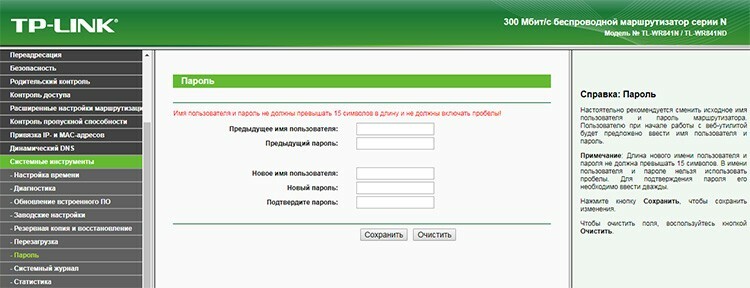
The section of the web interface "System Tools" and the subsection "Password" are responsible for this. Everything is quite simple here - we indicate the old name and the old password, and then we indicate the new data. Click "Save".
How to configure specific functions of TP-Link router
Now let's go over some additional functionality. Since we configured the TP-Link TL-WR841N router, we will indicate all the interesting features for it.
The first thing you can pay attention to is hiding the network name. This approach allows only those who know the name to connect to your wireless network. And it can only be obtained from the mouth of its owner, like the password itself. That is, this is a good additional element of protection. In our WR841N, this option can be found under Wireless Settings. You need to find the checkbox "Enable SSID Broadcast" and turn it off.
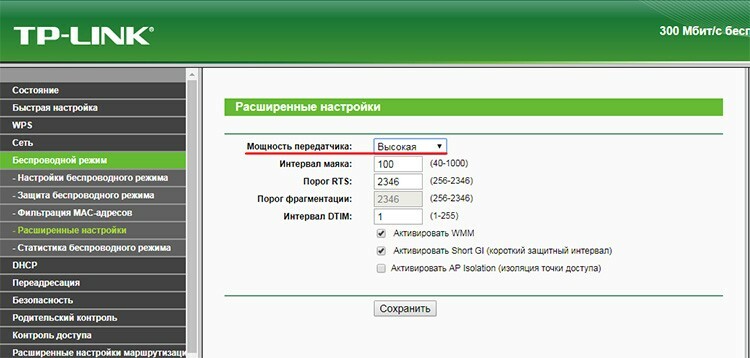
You can lower the transmitter power to narrow the range of the network. This is done in the advanced settings of the "Wireless mode" section. The item is the power of the transmitter and determines the range. The default is usually high. By reducing it, you can significantly reduce the range of the network.
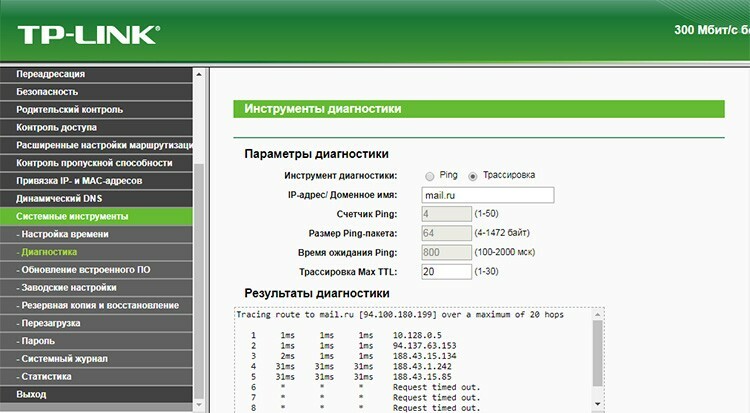
Interestingly, some of the models in the "Diagnostics" section of the system tools contain a ready-made tool for tracing and pinging remote nodes. Tracing is needed to determine the packet route and analyze problem nodes. A ping is used to check the availability of a website or resource.
By the way, from the same section "System Tools" you can restart your router without getting up from the couch when, for example, network problems or just minor problems begin.

MAC address filtering function
This is an additional mechanism to protect against unwanted connections to the wireless network. A MAC address is a special and unique identifier hardwired into a network card. And it can track those devices that shouldn't be connected to Wi-Fi. Filtering settings allow you to prohibit individual single devices or, on the contrary, prohibit everything, and give access only the chosen ones. You can find the option in the Wireless Mode section and the MAC Address Filtering subsection.
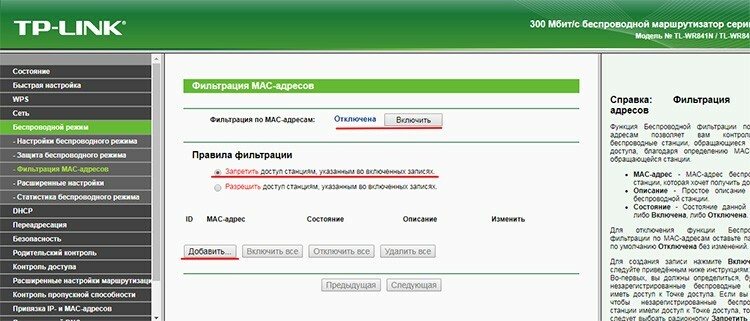
The function is disabled by default. You can enable it with the button of the same name. Filtering works in two modes: prohibit - when addresses specified in the list are blocked, and allow - on the contrary, only those specified in the list are allowed. Using the "Add" button, you can add new devices to the list.
TP-Link Wi-Fi router firmware update process
Router has a built-in mechanism for updating the firmware. It is very convenient. Software updates are intended to address past bugs in the code, add new functionality, and sometimes improve the appearance of the web interface.
The Firmware Update item is located in the System Tools section. Before downloading the new firmware from the official website, you must first find out what version of the equipment is in this router. This is important, as updating the firmware with the wrong hardware can damage the device. On the official website of the company, you need to select the type that is indicated in the item "Equipment version".

After downloading the required firmware, you need to specify the file using the "Select file" button, and then click "Update" and wait for the process to complete.