- Why do this?
- Beginning of renovation - Tips of masters and designers
- Cheap - does not mean bad
- Partial replacement of tile
- Interesting design solutions for bathroom
- Pictures from stickers
- Change in design of tile
- Solid tile painting
Tile is a universal material for decoration. Especially often it is used in the bathroom, as it is very durable, waterproof and easy to care for. But even such unpretentious and persistent material eventually loses its appearance and dims. In addition, for a long period of operation on the tile may appear defects, chips or cracks. Carry out major repairs to replace the tiles - this is an expensive and lengthy exercise. Therefore, often we think about how to update the tile in the bathroom with our own hands.
to the contents ↑Why do this?
After some time after repair, the appearance of the bath trim fades, wears out and gets dirty, which is why you may need to restore the tiles in the bathroom. Due to minor flaws, it is not necessary to shift all the tiles, as this is a rather long process and expensive.
What could be the reasons for repairing the bathroom tile? The most common are:
- Damage to tiles. These can be cracks, chips or scratches on individual tiles.
- Pollution of both tiles and joints. Tiles can be covered with a hard-wearing coating, various streaks or grease. The stitches become dark with time and also get dirty.
- If you think that the tile is obsolete. Coloring and drawings could fade, go out of fashion or just get bored.
- Changing the design. Let's say you decided to add bright colors to a more relaxed and cozy style of the bathroom. Or, on the contrary, change the contrasting range to pastel colors.
Important! Partial repair allows you to save a lot of money in your budget. Sometimes it's just enough to clean the seams and fix minor defects to make the bath like new.
to the contents ↑Start of update - Tips of masters and designers
If you decide to refresh the tile, then by all means get acquainted with the advice of experienced masters and designers how to update the tile in the bathroom with your own hands.
At the initial stage it will be necessary to prepare the surface for restoration. This will serve as a guarantee of quality repairs and a long service life.
Preparing the entire surface of the
We recommend sticking to a simple action plan:
- Inspection. Pay attention to the presence of defects, their appearance and quantity. Based on an assessment of the state of the tile, think through a suitable solution.
Important! It is desirable to provide several methods.
- Cleaning of seams. Eliminate the accumulated dirt from the joints, try to whiten them. If there are any damages, it is recommended to remove the top layer of the grout.
- Elimination of dirt. Thoroughly rinse the surface of the tile so that all kinds of stains and dirt disappear: rust, lime scale.
- Elimination of fat. An important step is degreasing the surface.
Important! Remove the greasy film from the tile with a solvent or alcohol - just wipe them with a tile.
- Grinding. This procedure is used as necessary, since it involves the cleaning of the top layer. In parallel, it helps to eliminate roughness and roughness of the tile, petrified mud.
- Coating with a primer. This stage is also individual and is most often needed for painting.
After the preparatory work, you can proceed to specific actions.
Joint preparation
Be sure to work on the joints. This is one of the most problematic places of facing. It is the sutures that first lose their appearance, become untidy, darken, become covered with mold. Against their background, the appearance of the tile itself deteriorates, even if it is not completely damaged.
Choosing a way to restore
When repairing, you can often wonder how to upgrade the bathroom without removing the old tile?
- If only a few individual slabs are damaged, it is not advisable to replace all tiles in the bathroom. It will be enough to remove only defective items.
Important! It will be great if you have the remains of this tile or you can still buy the same in the construction shop.
- If it is not available, then you should choose a similar tile or come up with other options.
In such ways, you can easily realize the repair of bathroom tiles without large-scale construction works, and the result will be amazing. The bathroom will be like new!
to the contents ↑Cheap - does not mean bad
Due to its purpose, the bathroom is always very humid. This factor primarily affects the appearance of its cladding.
Update of
joints The most accessible way to make the bath fresh is to update the joints.
At first glance it may seem that such a partial repair method will not be effective. However, this is a completely erroneous opinion. With a little effort, you can upgrade the old tile in the bathroom.
You can correct the situation in several ways:
- Special repair tool. Its action is to smooth out unevenness, whitening.
Important! An essential factor is the antibacterial properties of such agents.
- Whitewashing and painting. Apply the paint to the cleaned seams. After a few minutes, use a damp sponge to wipe the tile off the traces of paint.
Important! This method is very simple, but short-lived. The effect will last no more than 6 months.
- Apply a new grout on top of the previous one. To use this method, make sure that the seams are sufficiently deep, and there is also an available space of at least 2 mm for the new grouting layer.
- Complete replacement of old grouting joints. First, remove the old compound - you can remove it with a sharp object or a special joint expander. If the cement composition was used when laying the tile, an acidic cleaner should be used. This tool will soften the composition and allow you to remove the grout. Rinse the seams and tiles with water and leave to dry for a day. The next day, treat the surface with a primer and apply a new formulation.
Important! Be careful not to damage the tile. When working with a cleaner, always wear protective rubber gloves and eye glasses.
to the table of contents ↑Partial replacement of the tile
The need for partial replacement occurs when inadvertently you damaged individual tiles. As a result, chips, cracks and other flaws may appear on the tile. As we have already said, it is not necessary to do a complete bathroom repair. It will be enough to learn how to update the tile in the bathroom with your own hands.
Important! Before you delete the spoiled item, think about what will be in its place.
Check to see if you have any excess material left after repair. If not, you can search in ceramic tile stores. But even if you do not find a similar one, you can always find a way out of this situation. Use the replacement as an element of decor, remove a few more tiles to complete the design idea or decorate the place with a sticker. Having picked up new elements it is possible to start direct replacement of a tile. 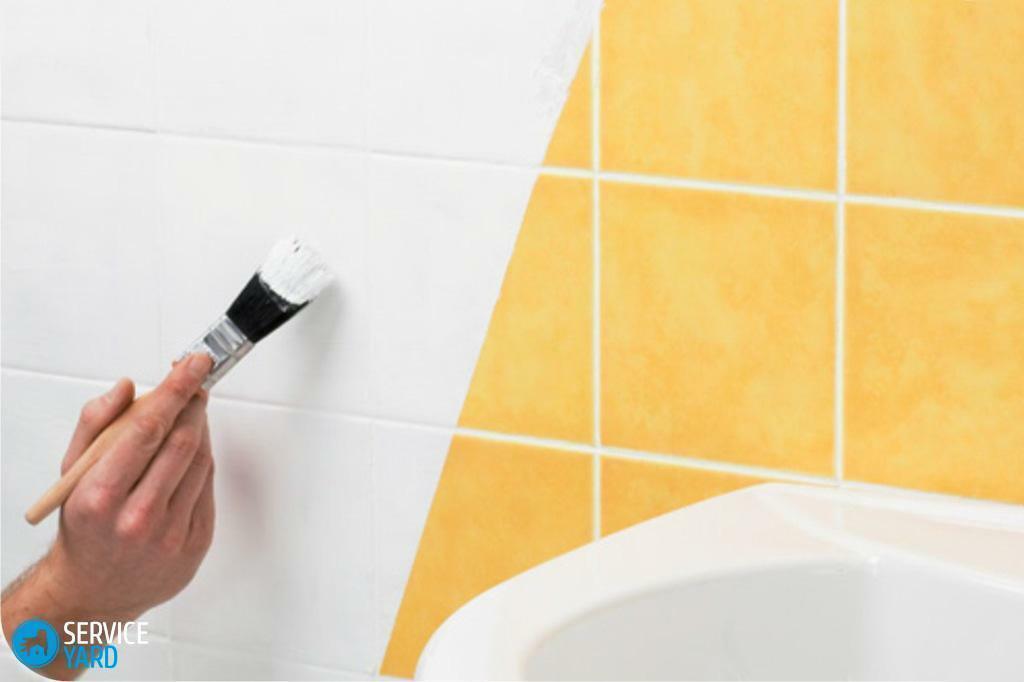
Now let's take a closer look at how to remove unnecessary elements and do not damage the rest of the tiles.
- First remove grout between joints. How to do it - we wrote in detail above.
- Then drill a few holes in the middle of the tile. Next to the resulting holes, install the chisel and crack the tile with strong strokes, moving from the center to the edge. Movements should be strong, but neat.
Important! There is another way that experienced masters advise. Put a rag on the tile and hit with a hammer, the tile will split into pieces and it will be conveniently removed. At the same time, neighboring tiles will remain intact.
- Remove the tile as well as the glue residues.
- Treat the surface with a primer of deep penetration, and after it dries, you can begin to lay new items.
- Apply tile adhesive, lay the tile.
Important! Do not forget to take the level!
- Creation of clearances between tiles will help mounting crosses. When the tile dries, treat the seams with a grout.
- These manipulations must be carried out with each element to be replaced.
- To ensure that new parts do not stand out against the general background, it is recommended to level the tile adhesive with a trowel on the entire surface. If the tile slightly protrudes, gently tap on it.
- After the tile dries, seal the seams.
On this partial restoration of the tiles in the bathroom is over. You can enjoy the result of your work.
to the contents ↑Interesting design solutions for the bathroom
To update the old tile in the bathroom, do not forget about the creative approach.
At present, there are many interesting design methods and materials for this. Thanks to the decor, you can give your bathroom its unique style and exclusivity.
Let's list the possible design solutions for the bath:
- Volumetric decorative compositions.
- Plastic panels that are installed on top of the tile.
- Mural. This is a kind of special wallpaper for a bath.
- Drawing patterns and patterns on the tiles with a stencil.
- Vinyl stickers.
- Partial or complete painting.
Let's dwell on each of the methods in more detail.
to the table of contents ↑Pictures from the
stickers Try to update the tiles yourself with the help of a sticker.
Important! A huge plus in their application is the simplicity and wide choice.
Manufacturers are ready to offer you great pictures or small items, classic patterns and cartoon characters. You will certainly find something to your liking. At the same time, there is no need to rework, build or break anything.
What is important to know about stickers?
- Be sure to clean the tile before gluing.
Important! It is necessary not only to remove impurities, but also to degrease the tile with alcohol or thinner.
- They are very easy to apply to tiles. Remove the protective layer and glue the pattern on the tile, gently smoothing over the entire surface.
Important! It is not necessary to separate all protective paper immediately, since air bubbles and creases may occur during gluing. This will spoil the appearance of the scenery. It is more correct to start gluing from the corner, gradually opening the glue base and smoothing it.
- Vinyl stickers are short-lived and can exfoliate. On the other hand - you can often update the design of your bath.
Changing the design of tiles
There are different ways to change the design when restoring tiles in the bathroom.
Decor elements
You can hide defects on the lined surface using small parts. Of these you can create a voluminous composition. For this purpose, you can apply beads, crystals, buttons, glasses, etc. Elements can be of different sizes, colors and different in texture. Incorporating your imagination and sense of style, you can create a unique scenery.
Important! Attach all parts to superglue, hotmelt or acrylic lacquer.
Drawing on the tile
Another creative method of decorating tiles can be drawing a pattern or a pattern. When deciding to use this method, consider the following recommendations:
- As always, the first priority is thorough cleaning of the surface.
- Treat the tile with sandpaper or other abrasive. Scratching the top layer of tile, you will achieve excellent adhesion of the paint to the tile.
Important! This step can be skipped if the pattern is applied with paint for glass and ceramics. However, such material is quite expensive.
- Apply a primer coat in the areas to be painted.
- Adjacent tiles are covered with paint tape so that they do not get stained with paint.
Important! The pattern can be applied in many ways: by spray, brush, roller, through a stencil or by hand.
How to make a geometric pattern with a paint tape?
Draw a picture on the tile with a pencil, glue the tape along the contour. Surface of the future pattern is treated with a primer. After it is completely dry, you can start drawing.
The final stage will come no earlier than a day, only when the paint is completely dry, you will have to remove the scotch from the tile.
Your masterpiece is ready! 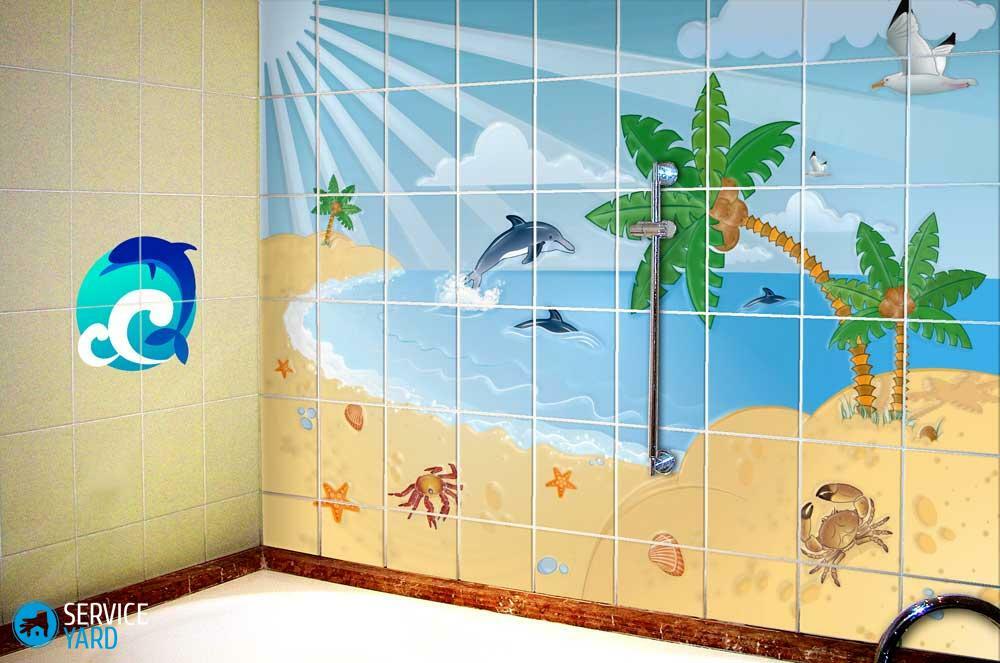
Decorative plastic panels
Refresh old tiles in the bathroom with a lot of damage is best with the help of plastic panels. They are installed directly on top of the tile.
Decorative panels have several advantages:
- High moisture resistance of the material.
- Panels are resistant to temperature changes in the range from -10 to +60.
- Convenient and simple installation.
- Easy cleaning and maintenance.
- Heat and sound insulation.
Important! To install such panels you need scissors and a hacksaw for metal, a screwdriver and a punch. Elements are fastened to the LED and UD profiles using 25 mm self-tapping screws.
Having prepared everything you need, you can start the work:
- Treat the cladding with a ground antiseptic.
- Mark markers for the installation of profiles, to which decorative panels will be attached.
Important! If the walls are smooth and smooth, you can use a silicone sealant.
Mural
Murals are large wallpapers on plastic panels. Since the image is obtained on the whole wall, this bath looks very bright and stylish. You can choose any picture.
Qualitative characteristics are the same as for the panels. Accordingly, the mural is established in a similar way.
Design methods will easily help to update the old tile in the bathroom, at the same time create a special style and add an exclusive.
to the contents ↑Solid tile painting
An alternative way to update the bathroom without removing the old tile may be its continuous painting. In addition, it is considered a budget option for repair.
To achieve an excellent result, pay attention to two important aspects:
- Surface preparation.
- Choosing quality paint.
Important! When choosing a paint, not only the desired shade and price is important, but also its properties. Ideal for waterproof acrylic or epoxy paints.
For all procedures you will need a primer, sandpaper, roller and paint. The direct painting process can be divided into the following stages:
- Cleaning of tiles.
- Degreasing. To do this, wipe the lined area with acetone, alcohol or vinegar.
- Removing the top glossy layer using sandpaper.
- Priming of the surface. At this stage, you will have to wait about a day while the mixture is completely dry.
- Re-sanding with sandpaper.
- Only after all the preparatory work, you can finally apply the paint to the tile.
- One layer is indispensable, so after 12 hours, check that the paint has dried and repeat the application.
Important! Think about your health. Use a face mask to avoid inhaling the smell of paint.
Apparently, there are many ways how to update the tile in the bathroom with your own hands. In order to choose the right one, assess your financial capabilities, the scope of the required works and creativity. Then you can easily cope with the task, you will be satisfied with the final result.