- Devices for marking up the skin
- What is sherning?
- Than to cut a material?
- How to Stitch the Skin?
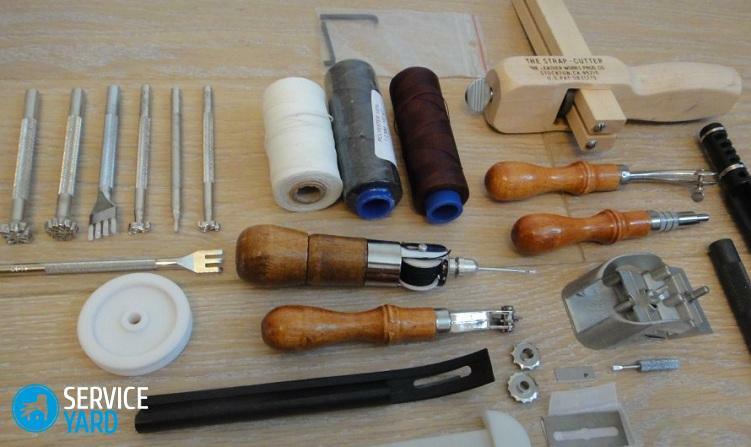
skin bonding technology We all know that leather is a wonderful material for making quality footwear and outerwear, as well as various bags, gloves, jewelry and much more. In this article, we will look at the basic tools for working with the skin with our own hands. Since the first clothes of our ancestors were the skins of the animals they killed, the way of sewing clothes from natural material remained virtually unchanged. But what tools does the modern industry offer for self-manufacturing of leather products?
to content ↑Skin markers
Before applying any marks, the leather flap should be leveled, stretched on the work surface and carefully fixed.
Important! Avoid drawing patterns using chalk, because the skin is an expensive material, and the marking in this way will not be accurate enough.
For working with the skin there are special two-color pencils, if you do not have such, then you can use a marker, a felt-tip pen or a conventional pen.
Important! Do not forget that you are dealing with wasteless material. Even small pieces of leather fabric can sometime come in handy.
For precise marking, experts recommend using patterns or templates. Also in the store of goods for sewing, you can buy a tailor triangle and special rulers.
to the contents ↑What is sherning?
Surfacing is an important and delicate process, thanks to which the skin can be given the thickness you need. In the joints of the parts, you need to evenly reduce the density of the material, but if you do not have the required thickness, you will have to scrub all of its surface.
Important! It is desirable to learn this on small flaps of skin left after cutting the product, because in case of an error, it is not a shame to throw them away after use.
For this work, you will need a special tool for working with the skin with your hands - a plexiglass stand that needs to be placed on the table like a school notebook - at an angle to the edge of the table about 70 degrees:
- The skin rests on the tile with bakhtarma up, and is located closer tofront and right edges, firmly press it with the fingers of your left hand.
- With your little finger, ring and middle fingers, grab the knife from below, put your thumb in the butt, and press the instrument with your index finger on the center.
- The blade of the knife, the index finger and the forearm, must be on the same line during the shering process.
- The work needs to start from the edges, gradually moving away from you.
- The knife should be kept with a slight inclination to the right.
- Cut thin layers of skin: for this, drive the knife parallel to the surface of the plate.
Important! Do not put your left hand fingers in front of the knife - this can easily be cut.
- In this work, first cut long edges, then short, and lastly, if necessary, middle.
Important! Perhaps it will be difficult for beginners, but with the acquisition of experience and the availability of a good tool for working with the skin with their own hands, the procedure will not require much physical effort.
- Manufactured products can be varnished, shoe polish, mastic or beeswax. To apply them, use a special sponge or a soft cloth, and then polish the surface with a shred of flannel, which will protect the future product from contamination.
Important! To fix the color of the painted product, it is recommended to cover it with a layer of skin varnish or egg yolk.
to Contents ↑Than to cut material?
To successfully cut the leather materials you will be helped by sharp scissors and a knife. For this purpose you can use a shoemaker, wallpaper or a clerical knife, a medical scalpel is also suitable. Scissors need to have a minimum of three pairs:
- To cut straight lines or cut thick skin - Tailor's are big.
- For rounding, medium size scissors.
- For cutting small details - small manicure.
Important! It is best to start cutting with straight lines, because you can cut with a knife, until the skin is fixed, and then, having detached, it can be cut along the bends.
Today on sale there are special sets of tools for sewing leather with your own hands, which can be purchased with a complete set.
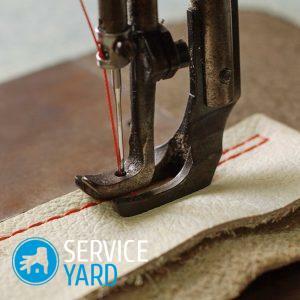
to Contents ↑How to Stitch the Skin?
Working with the skin at home can involve sewing products in one of two ways:
- manual;
- mechanical.
Sewing leather mechanically
There are special sewing machines at enterprises that are engaged in the professional manufacture of leather products. Such equipment is more powerful than the usual home analogues, and is also equipped with two, three, and tetrahedral needles.
One of the most important problems of home sewing is the fact that the skin does not slide well under the presser foot, because it can lead to distortions, creases, and tearing of the thread. Some masters try to deal with such problems independently with the help of the following tricks:
- smears the skin with soap;
- lay the newspaper;
- pulls the material over the edge.
So they try to help the sewing machine. However, our advice to you - do not skimp on small things, but buy a special roller foot and a set of faceted needles. Such adaptations will help to save your product from unnecessary problems and make the work with your own skin pleasant and convenient.
Handmade leather tailoring
The sewing method depends on the material that you are going to process:
- if the leather fabric is dense, use an awl or shoe hook;
- if it is more thin skin, you can use a conventional sewing needle.
Important! To protect your hands, do not forget to use a thimble.
Special attention should also be given to the selection of threads, because not all threads are suitable for leather processing. So, it is worth not to use cheap synthetic or nylon materials. It is best to use cotton or linen threads.
to the contents ↑Skin bonding technology
Proper skin gluing is carried out in several stages:
- First the cleaning is performed.
- The material is degreased.
- On the prepared surface of a matter the necessary layer of glue is applied.
- The applied substance must dry.
- A small amount of adhesive is applied again.
- The parts are pressed against each other tightly.
- The bonded product is placed under the press for a specified time.
Important! If a material is found on the material you are using, it can be sealed with tape, however, this is only a temporary measure.
There is still a large number of auxiliary tools for skin processing with your own hands - curly piercers and patterned stamps, electric torch, etc. You can try to make such tools yourself, but it is more profitable and easier to go to the store and purchase them. If you plan to do more than one thing from the skin, they will definitely be useful to you.