

- Flap products
- Blanket
If you have any quilting fabrics, things, etc., do not rush to throw them away. You have probably seen patchwork quilts made in patchwork or quilting techniques more than once. Also you can make a mat for a child, a rug in a bath, almost anything. Such options are even very good, because why spend fabulous amounts on what you can do with your own hands? Consider what can be sewed from the shreds of furniture fabric, the example of specific master classes and interesting ideas.
to the table of contents ↑Products from the
flap In your house, you definitely have things that are not worn or lost their presentable appearance. They mostly go for rags or are thrown away. But do not rush to do this, because now you will find out what you can sew from scraps of cloth.
Rug
This is a master class with a rug example, but you can do the same with a full blanket, just by increasing the size.
You will need:
- 66 squares of fabric of bright colors. The size of each square is 17.5 * 17.5 cm.
- From the neutral cotton fabric, cut out the squares measuring 12.5 * 12.5 cm. They must also be 66 pieces. They will go to the wrong side.
What to do with this abundance of squares:
- Fold a large and a small square from the wrong side, bend the corners and pin them with pins.
- Turn the figure to the front side, start to form a "bubble".
- Put a stitch around the perimeter, leaving a couple of centimeters free, then to fill the "bubble".
- Fill it with sintepon, sew a hole.
- Sew 6 "bubbles" between each other in a row on the sewing machine. As a result, you must make 11 bands.
- Now you need to connect all the strips together: pre-cut everything with pins, but if it's hard, put a note.
So you get the top of your rug. Remains the left side of the carpet. To create it:
- Take the soft fabric that you have chosen for the lining, for example mohair or fleece.
- Attach the frill to it.
- Place the lining and top of the rug face-side inside.
- Tangle the two pieces together, leaving a hole to unscrew the rug.
- Remove and sew a hole.
That's it, you should get a pretty mat with a size of 1.10 m * 60 cm!
to the table of contents ↑Blanket
- Sew a four piece in a right angle. From the resulting part, cut out the circle. Make a few pieces of this kind.
- Make small mugs of solid patches. Also, the blanks are even smaller than the first two.
- Sew a lining of light fabric on large and medium-sized circles. Unscrew the product.
- In the middle of medium and large circles, attach the smallest billets by bending the edges.
- Attach your round flaps to the base.
Important! As a basis, you can take a usual blanket or a monophonic blanket.
Stitches
Stitches, of course, are not as comfortable as mittens, but they are also used. And they can be sewn from pieces of furniture fabric with their own hands:
- Cut your scraps into identical rectangular strips.
- Sew the strips together. Smooth out the seams so that nothing sticks out.
- Make two patchwork squares. Size choose as desired. Quadratures can be either identical or different combinations of colors.
- Cut out the batting on the cut out squares. If you do not have one, use several layers of dense fabric.
- Fold the patchwork squares facing each other.
- Attach the batting and sew on the perimeter, leaving the piece uncoated to unscrew the tack.
- Sew part where you did not sew.
- Sew a hood so you can hang the product.
- Sew the seam along the perimeter and the pattern.
Your pothook is ready, now you can take hot dishes boldly!
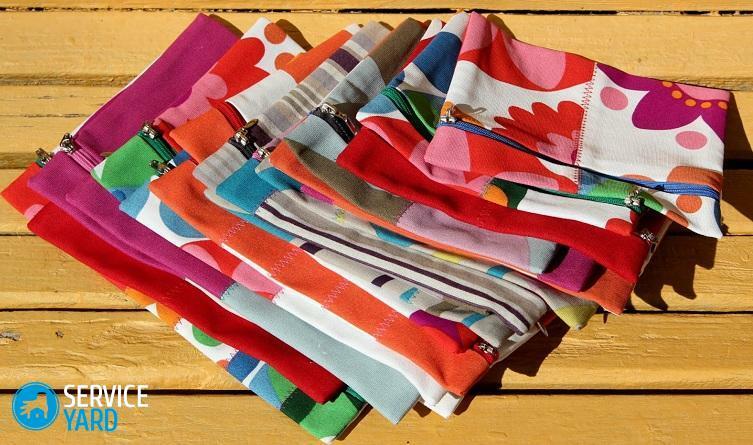
Beautician and purse
Prepare templates:
- Make a circle Ø 16.5 cm, a circle Ø 14 cm and a square with a side of 10 cm.
Important! The smaller circle and the square must be cut out of plastic or rigid cardboard.
- Cut out workpieces:
- circle 16.5 - 19 parts from one basic fabric;
- square - 19 items from another basic fabric and 19 details of non-woven.
We assemble by carefully observing the following instruction:
- To assemble a large circle, the line is small, with a margin of 3 mm along the edge. Tail the threads long, so that you can tighten the template.
- We have a small circle of cardboard in the center of a large, sour cream from the underside. Evenly stretch, tightening the ends of the mark. Smoothing, keeping the shape of the part. Notching the estimate, carefully remove the template and iron the part.
- In the middle of the circle on the underside we put the square workpiece, press the projecting edges of the circle onto the square.
- We connect the square from another basic fabric with non-woven fabric, put it into the workpiece and iron it. We fix the product with stitches, leaving the edge 2 mm.
- Of the finished items form a purse or a cosmetic bag.
- We cut out the rectangle 42x52 cm from the lining fabric. Fold it in half, sew the side seams with the allowance of 1 cm. The result is a part 40x26 cm. We measure the bottom edge 7 cm from each edge, form the folds, sew.
- Make up the purse or purse inside. From the top, we pivot on 1 cm level with the front side, fix it with pins and reel.
- Zipper is sewn by hand, fixing the two parts of the cosmetic bag, the end of the zipper( 4 cm) should hang.
- Sew a zipper handle( 2 children), turn out and cut off the corner.
- Press, bending the edges inside.
- Insert the free end of the zipper and sew.
This is a hard, painstaking work you will have to do, to create a cosmetic bag or purse. But the result will be uniquely interesting, especially if as an additional decor you take beads or make embroidery.
As you have already noticed, such crafts do not require any kind of superfluous and costly - you just have to take a couple of old things and start. The main thing is to start the process, and then you will succeed. Such products are universal, because at the time of their creation the material is used only those color combinations that you like, figures and ideas that you like. Look through all the above mentioned ways once again - everything is suitable for the role of the material, the main thing is the desire to create. And mastering these simple ideas, you will be able to show your imagination and even make clothes of cloth with your own hands.


