
The ladder in a multi-storey private house is not only a necessity, but also an integral part of the design of the room. Today's huge selection of materials gives room for imagination. Wood, glass, metal constructions, stone - there are a lot of options. Particularly interesting look rotary stairs, created independently. It is not difficult to manufacture them if you know all the nuances: how to make the staircase drawings to the second floor with turns, how to assemble them, and so on. But first things first.
to the contents ↑Types of
If you decide that without a ladder your house can not do, then you need to decide on the type of construction and the material of its manufacture. The form of it depends not only on your wishes, but also on the possibilities of the room and its layout. Today, all models of the type of their supporting structure can be divided into the following types.
Marching
Such variants consist of stages, which are fastened together by small platforms-spans. These structures can be held:
- on the strings - in this case the steps are installed above the supporting structure;
- on strings - such stairs to keep on grooves, in which the steps are mounted.
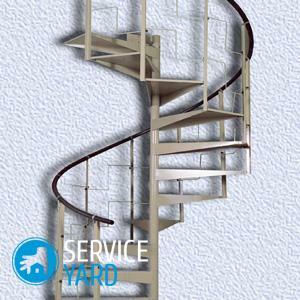
Screw staircases
These models have a supporting pole, and do not have straight steps. They do not occupy large areas, but climbing them is not as convenient as on direct steps.
Constructions on the
heels The steps of these variants are held by the wall, and they are connected by bolts. From this type of attachment, the ladder looks very light, but it remains very strong. There is a variant of the designs with the bolts, when the bearing frame is taken not by a wall, but by a metal frame.
Mixed
These ladders can combine several types listed. Which of the models eventually becomes the decoration of the house depends on the area of the room and the space required for the stairs. If the area is small, rotary systems are installed.
Important! The private house assumes that such structures will be wooden, since this material is much easier than others, it is much easier to work with it.
We will go further with varieties of stairs with spans and turns.
to the table of contents ↑Turning stairs
Before answering the question how to make a rotary ladder with your own hands, you should learn more about them. The structures with spans may be straight, but may have rotations. If they are direct type, then a large area for installation is needed. Therefore, most often chosen rotary options. They are divided into different turns:
- 90 degrees, or designs in the form of the letter D. They can be connected by spans and securing parts. Please note, the more you set the turning staircases in the structure, the more uncomfortable you will climb and descend. Angular options necessarily have a pillar support, which is already mounted the required type of attachment.
- 180 degrees, or in the form of the letter P. These models are made with a platform for turning, or with the help of the steps. As we have already said, such steps are less convenient than the platforms, but they allow to save a considerable area.
Important! In the calculation of such constructions, it is impossible to admit a single mistake. Under the swinging ladders, cabinets and niches are often mounted, which allows the most efficient use of space.
to content ↑Preparation of
Today, to create a rotary ladder, you can purchase a ready-made kit with all the necessary details. To do this, you just need to correctly make all the measurements and transfer them to the manufacturer. But in this case you just collect your ladder, and do not create it from the very beginning. If you are not afraid of the difficulties - you can start working independently. But first you need to prepare a little.
Materials and tools
The most popular material for stairs was and remains a tree. It is a durable and environmentally friendly material, with which it is convenient and pleasant to work with. Also, wooden structures are somewhat cheaper than other materials for stairs.
Popular types of wood for stairs:
- Beech - it can be used if the room is not too wet.
- Maple is a very durable material, resistant to various damages, but over time it can go cracked.
- Oak - malleable and comfortable in work, durable, but very heavy.
- Larch is a fine solid tree species, which has high resistance to decay.
- Pine - this material is used less often than others, since such a tree can have knots which, if humidity and temperature drops, can not withstand the impact and fall out. Then the whole construction, if it does not collapse, it will become much weaker.

Important! Before you assemble a structure from any type of wood, the material should be dried well and must be wiped with waterproof and antifungal agents.
Required tools and structures:
- bearing beam, the cross-section of which depends on the required height of the span;
- edged board;
- balusters and handrails for easy lifting;
- glue for wood;
- hacksaw;
- drills;
- file;
- electric jig saw;
- drill and screwdriver;
- skin protection and respiratory protection;
- work clothes;
- safety glasses;
- hammer;
- level;
- fasteners;
- cutting pliers.
Important! When working with electricity, remember the safety precautions.
When all tools and parts are ready, it is important to correctly make all calculations and the actual design.
to the contents ↑Making the project
So, to create your own design, you need to familiarize yourself with its basic details.
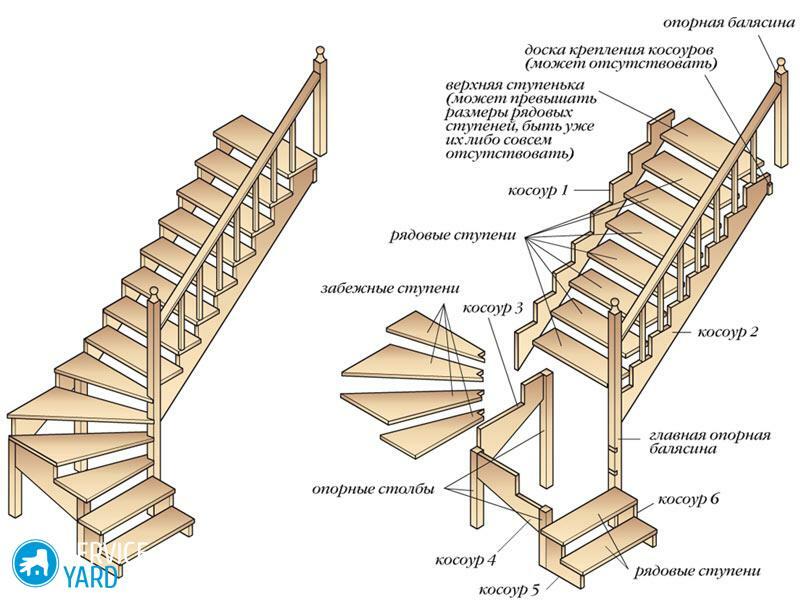
Elements:
- Supporting structures.
- Steps - with a turn and straight.
- Fence details.
To calculate the rotary stairs to the second floor with your own hands, you will need to use formulas from geometry and drawings:
- First we will need to find out the middle span line. It is parallel to the inside of the ladder, at a distance equal to the middle of the step.
- The radius of the turnstile depends on the radius of the two marches. Today on the Internet for such calculations there are special programs available online. In them, you must enter all the requested values and get the finished result.
- When choosing the width, be guided by what area you plan to give under the construction, and also how comfortable it will be for you to move around.
- Also, when drafting a project, you must immediately decide how you can organize a turn: by using spans or turning steps.
Tips:
- The curved stage should be more than ten centimeters in its narrowest part.
- The width of the narrowest and widest stage does not differ by more than 10 millimeters.
- The span can not be less than 90 centimeters in width.
- The middle line of the runner stage can not be less than 20 centimeters.
- Convenient for a person lifting does not exceed 45 degrees.
Important! The width of the steps assumes that all household members will comfortably climb on them. You can calculate it by the formula: 2x + y = 55 cm, where:
- x is the step height;
- y - its width;
- 55 cm is the average step size.
You can display your value and adjust the formula according to your parameters.
If you have difficulties with the calculations and drafting of the project, you can contact the specialists-designers for help.
to the contents ↑Making a kosour:
- The supporting part is made of a beam of the same length as a flight of stairs. At the same time, its thickness should be more than five centimeters.
- Before starting to cut the beam, make a triangular pattern of solid material in all dimensions. On this sample, you will apply markings to the beam, cut out the teeth.
- Depending on the design of the ladder, cut out the required number of supports, on the teeth of which the steps will be attached.
- After the beams are ready, they must be fixed. First, the anchor bolts fix the upper parts of the kosoura to the ceiling beam and the beam of the support. When installing in the floor - it can be concreted.
- For the fixing strength in the support make a groove about 2 cm, which is smaller than the cross section of the Kosoura by one millimeter, and insert the beam into the groove.
- Next, the supports for the wall scissors and the base for the tread stairs are mounted.
Important! All work must be done, checking the level.
Next, consider how to make steps and assemble the structure.
to the contents ↑Steps:
- For the manufacture of steps, it is necessary to cut out the template from the plywood, and on it to make the parts. Make sure that the parts are the same size, except for the ones that are spotless. They are cut out separately, also after preparing the template. Of course, all parts should be treated with protective agents, varnish.
- After creating the steps, you can go to the string for the lower span. It is also made of edging, but without teeth. Here, the steps are inserted into pre-prepared grooves and fastened with self-tapping screws.
Important! The installation of parts is done using self-tapping screws and joinery glue. The swivel elements must be fixed more carefully.
to the table of contents ↑Doing the handrails
It is not easy to create a railing yourself from scratch, as all the details assume an ideal evenness, accuracy. Therefore, if you doubt your abilities, take a closer look at the ready-made parts to order according to your sketch.
To make the staircase not only look beautiful, but also safe:
- Install the balusters on each of its steps.
- The fastening is due to the insertion of a rod and joinery glue into the step. Balusters are drilled to the size of the rod and placed on it, pretreating the drilled surface with glue.
- At the corners, at the end of the stairs are set wide details - thumbs, which also hold the handrails.
In conclusion
Finally, a little more advice:
- For safe use of the ladder, fix all the details securely, carefully check the fasteners.
- To ensure that all parts are set exactly, pull the line from the top balusters to the support.
- To make all the details look beautiful and not spoil from mechanical impact, they are treated with lacquer.
- If you do not have the experience of carpentry, the best option is to entrust the matter to professionals.
Do not forget about the timely care of the product, then the ladder with your own hands made of wood with a turn will not only decorate your house, but also will last a very long time.